Tutorials
Learn new skills with our bite sized lessons
Featured Products
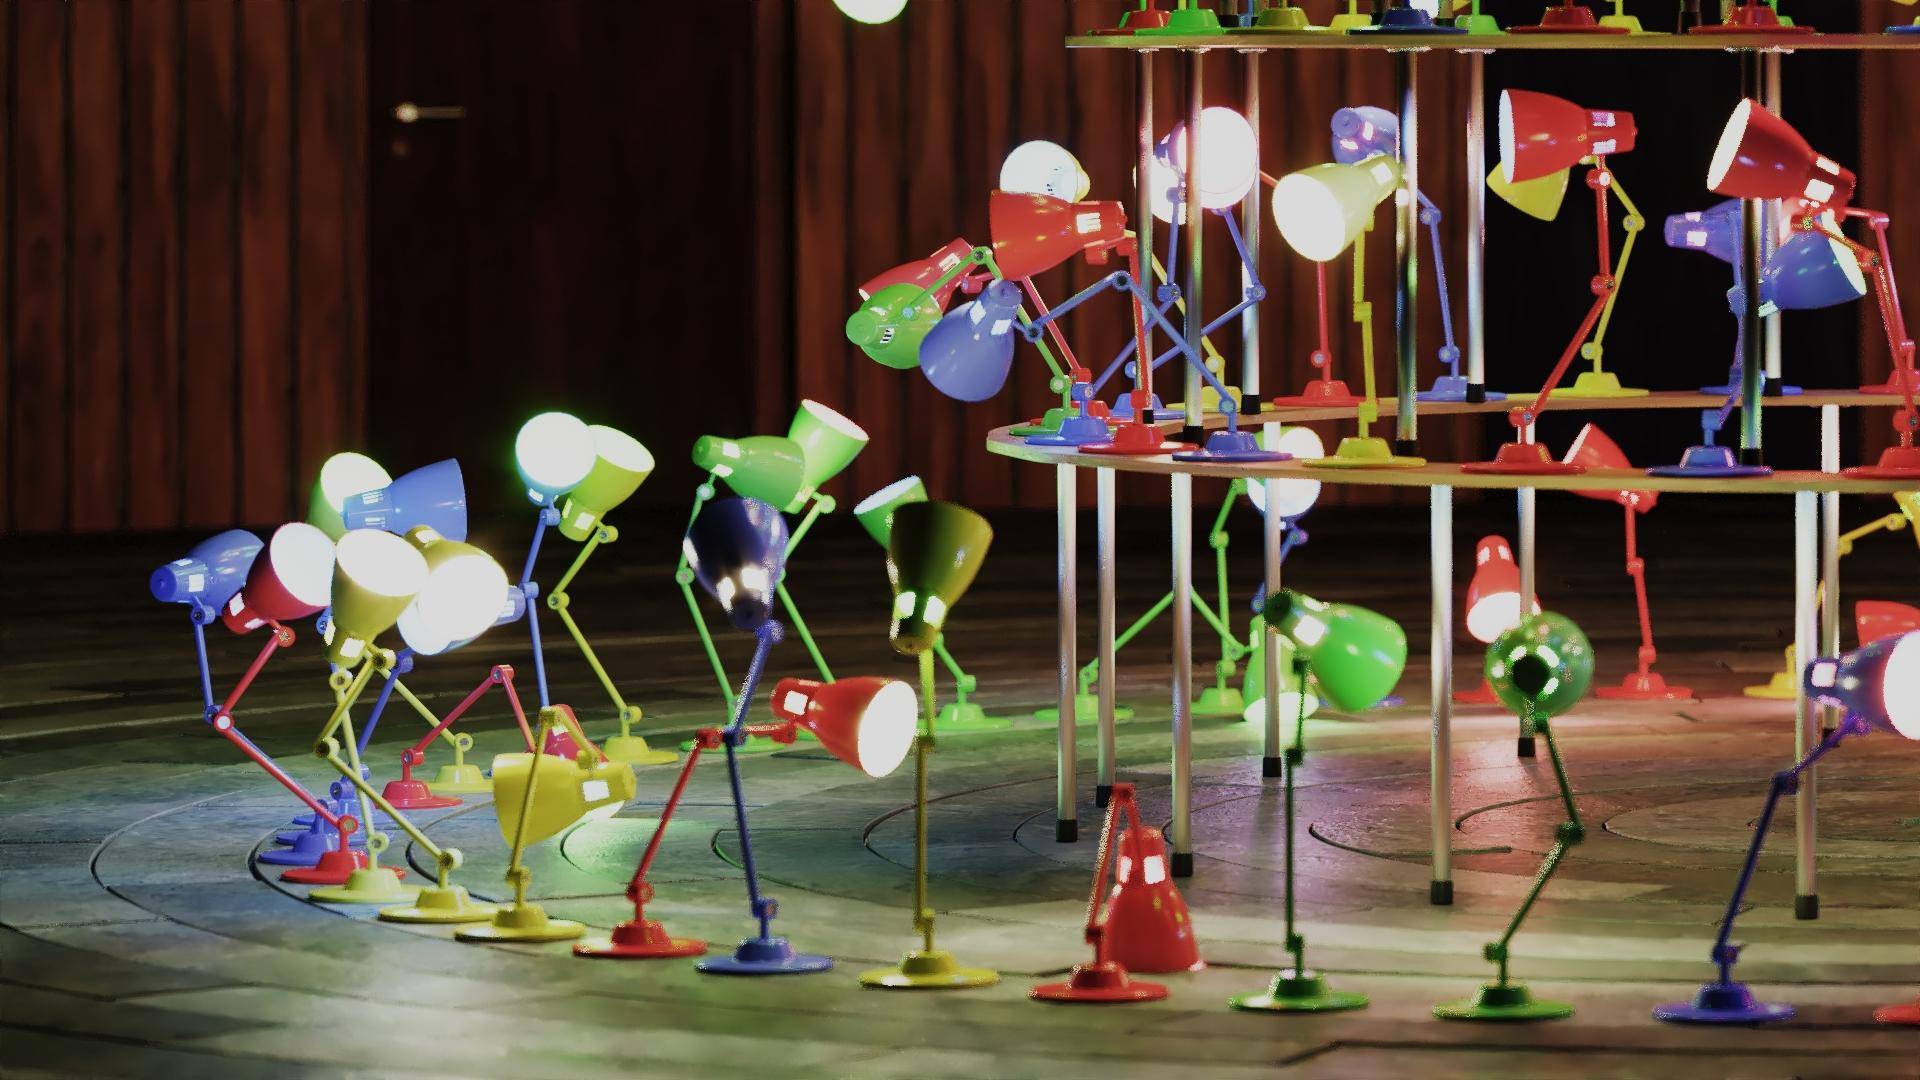
Get ProductsIt’s that time of year when we sneak in some RailClone tips under the guise of our annual Xmas tree tutorial. In this, our 5th instalment, we’re going to look at how to randomise articulated objects like the desk lamps in the image above and learn some really handy tricks that can be adapted to many other types of object.
If you’re a beginner, I’d probably suggest starting with another tutorial, but if you can find your way around a linear generator and you know a compose from a transform operator, then keep watching to learn how these can be combined to create simple mechanical rigs.
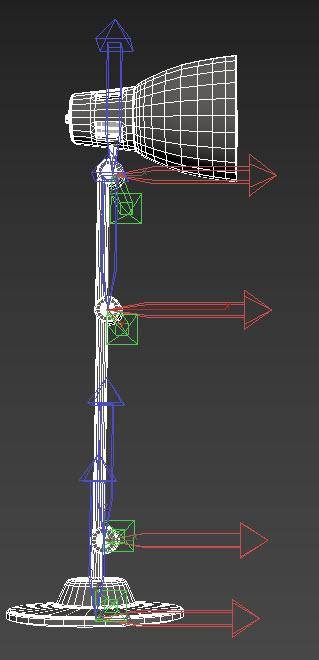
To get started, let’s look at the source geometry. As with any kind of rigging, the placement and orientation of pivots are the most important considerations. This lamp has been broken into 5 parts: The base, the bottom arm, the middle arm, the top of the arm, and finally the lampshade. In each case, the pivots have been carefully placed to allow them to rotate correctly, so the bottom arm can be rotated on the Z-axis, the mid and top arms on the Y-axis, and the lamp on the Y and Z axes. It’s also always good practice to reset the XForms before adding the segments to RailClone. This will lock in those pivot positions and the current scale and rotation.
Now we’re ready to get into RailClone:
- We’re going to start by creating a single lamp. Create a new RailClone object, open the Style Editor and add an L1S generator.
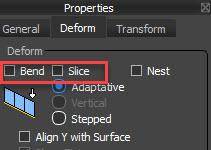
- Next, let’s bring in all 5 of our lamp pieces. To do this, add a Segment node and turn off Bend and Slice.
![Bend and Slice]()
- Right-Click and select Clone Multiple. Pick the 5 lamp objects from the list and click Clone. This saves us changing those settings 5 times.
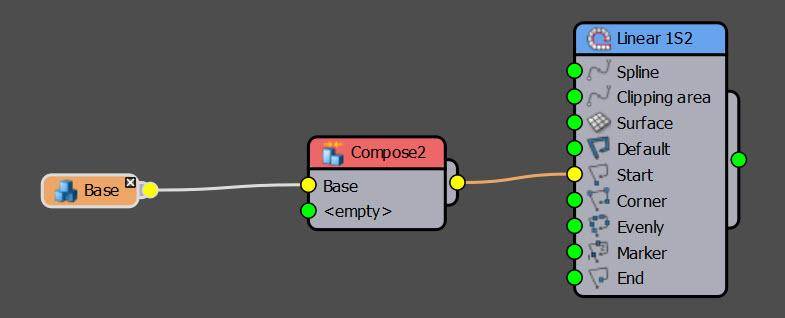
- Create a Compose node and wire it to the L1S Generator’s Start input. Wire the Lamp Base segment to the first input of the Compose operator.
![L1S and Compose]()
- No geometry is displayed. That’s because the generator has no Spline or length. To fix it, increase the X Size value. The amount is irrelevant for now since we are only building a single lamp in the start input.
- Next wire the Bottom Arm segment to the Compose operator’s second input. You’ll notice the segments are positioned one after another. Change the compose operator’s mode to Grouped to align all the attached segments using their pivot points.
![Compose Group Mode]()
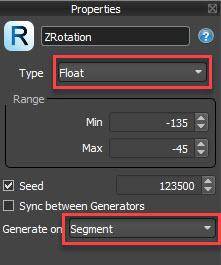
- This is the first movable part, and it will rotate on the Z-Axis. To randomise it, add a Transform operator after the Segment node and export the Z Fixed Rotation property. Wire a Random Number node to the new input, set the Type to Float and enter a Min and Max value. I’m going to use -135 and -45 in this case. Set Generate On to Segment.
![First Transform]()
![Random Settings]()
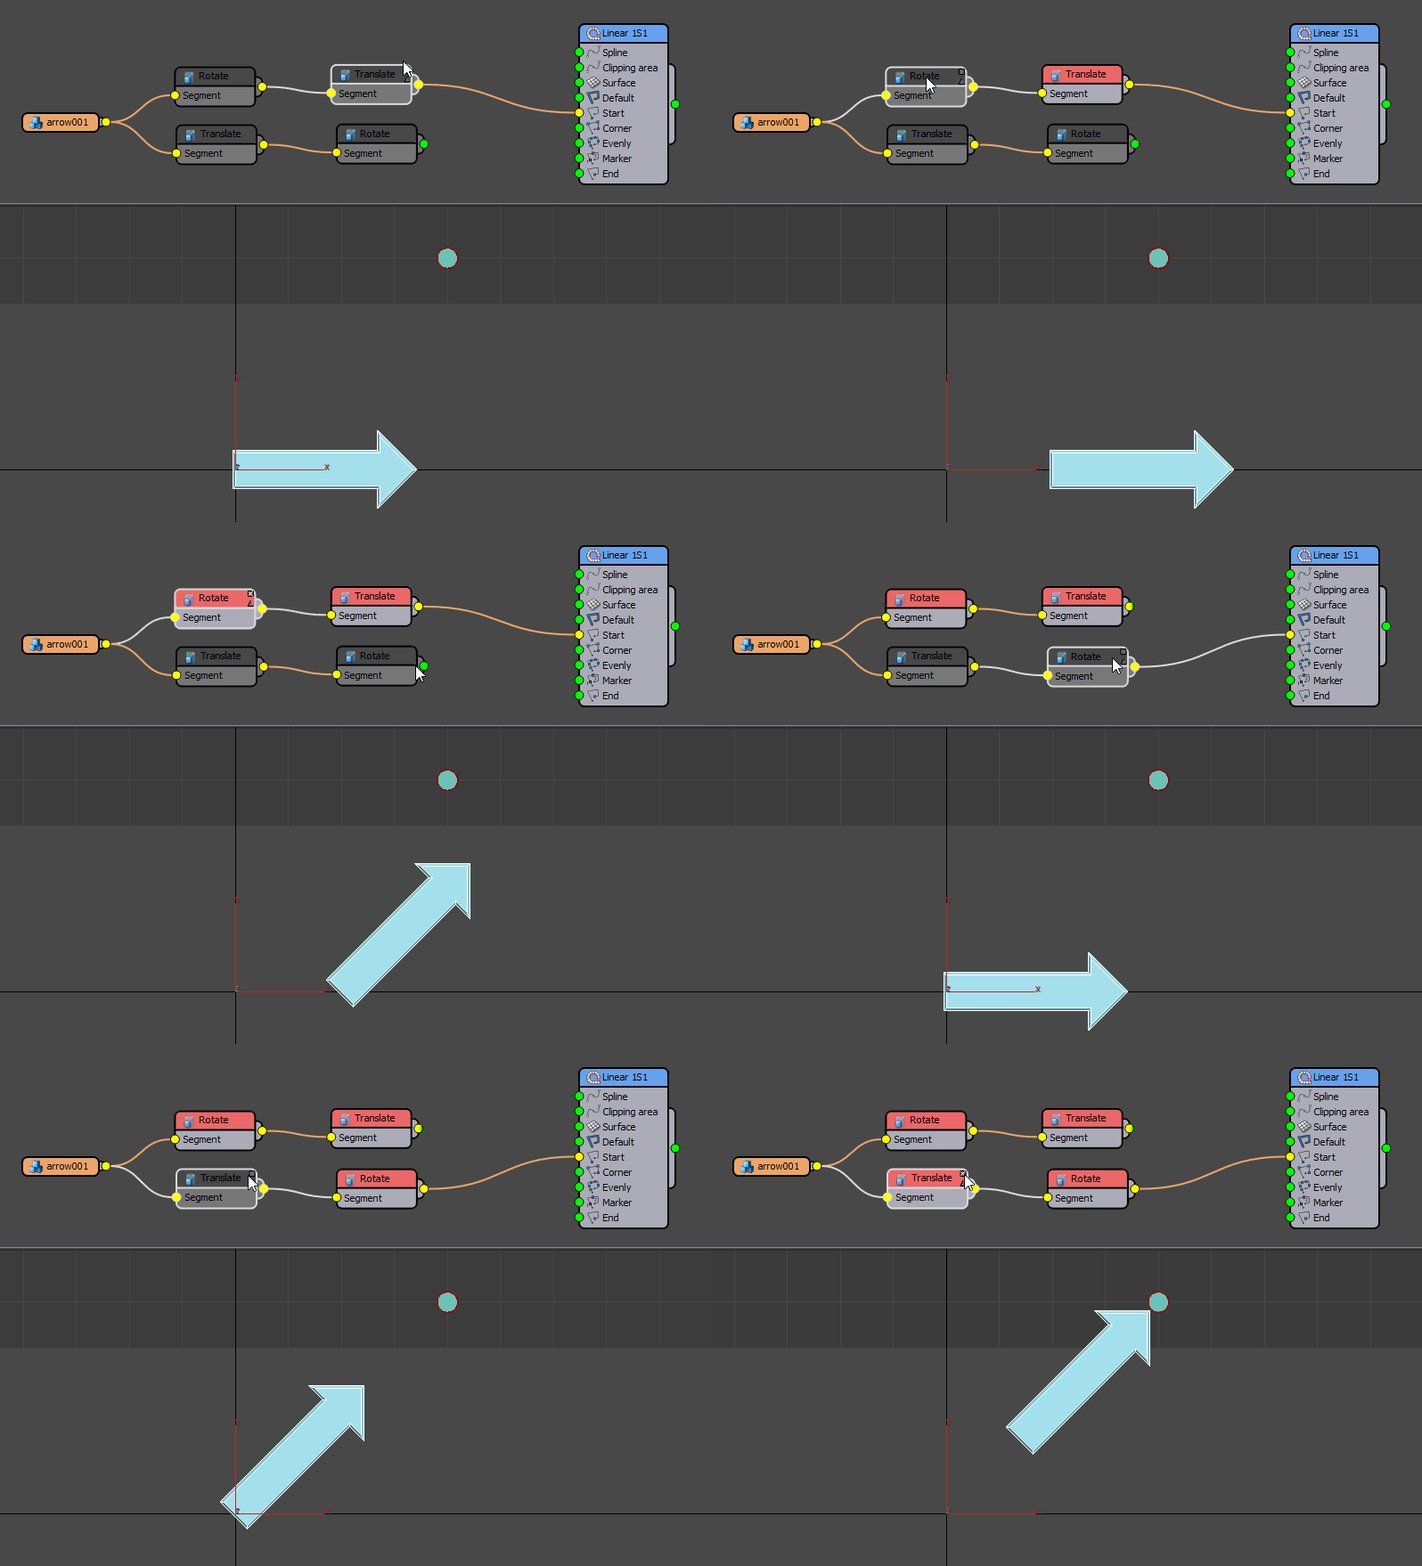
- Now we can build the basic rig. This is possible because from RailClone 4 and onwards, transforms across chained nodes are calculated sequentially, and the order does make a difference. You should be aware that in every case each transform node still uses the segment's original pivot position. It's really important to understand this principle - the pivot doesn’t move with the segment.
![Order of transform operations]()
If you find it more intuitive to imagine that the pivots move and rotate with the object instead of remaining at their original position, all you need to do it imagine the order of transform nodes is backwards (from right to left) instead of forwards. Looking at the example above in this way, in the top row and reading backwards, the segment is translated first and then rotated using its modified pivot position. In the second row, the segment is rotated, then translated along the local axis of its modified pivot. - That's the theory, let's put it into practice. Duplicate the existing Transform node and wire it to the Compose operator’s third input. Wire the Mid Arm segment to its input. So far so good. By using the same Transform node again, we’ve synchronised both segments to take the same rotation value.
- Now we need to move it to the correct position. Remember we’re building a hierarchy by working backwards from the Compose operator here, so add a new Transform node before the existing one. Go to its Fixed Translation settings and increase the Z value to move the arm up, and then the X value to move it to sit on the correct part of the hinge.
- Now we’ll rotate this arm too. Export the X Fixed Rotation property. Connect a Random Number node, set it to Float and Generate on Segment and enter the range over which you’d like it to rotate. I settled on -80 to 60. We now have two controls - one to randomise the Z rotation, and another to randomise the first part of the arm.
![Second Transform Node]()
- Let’s add the next section. Select and duplicate both the Transform nodes and wire them to the 4th input of the Compose operator.
- Wire the Top Arm segment to the new chain. Now, let's move this one into position. Add a new Transform node before the two existing ones and adjust the Fixed Z and YTranslation properties to move the arm into the correct position in the next hinge.
- To randomise the rotation, once again export X Fixed Rotation and connect a Random Number node, set it to Float and Generate on Segment. Enter values as appropriate, I used 30 to 100.
![Third Transform Node]()
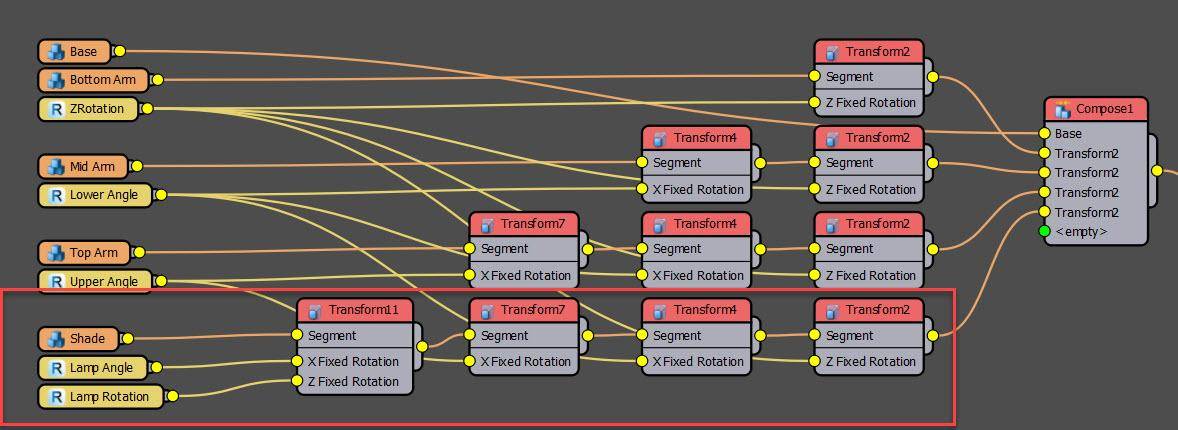
- Nearly there! Let’s add the final part, the lamp itself. Duplicate the 3 Transform nodes from the previous steps, and then add another to the beginning.
- Connect the lamp segment to the new Transform node. You know the drill by now. Edit the Z and Y Translation values to place the lamp on the end of the arm.
- Now, let’s export the lamp’s rotation. Right-click on the new Transform node and Export Z Rotation and X Rotation.
- Create two new Random Number nodes and set their type to Float. Wire one each to the new Rotation inputs. I went for -100 to 20 for X rotation and -90 to 90 for Z, but feel free to experiment.
![Final Transform Node]()
- All parts of the lamp are now randomised!
You might think that was a lot of effort for a single lamp - but now we have it set up, it’s easy to create tens, hundreds or even thousands of lamps, each one with random values. To do it, let’s take our single light and add it to some conical shelves to make our Christmas tree shape. All we need to do is make a couple of changes.
- Add a new Spline node.
- Wire it to the Generator’s Spline input.
- Select a Spline from the scene.
- Disconnect the Compose operator from the Start input and wire it to the Evenly input.
- To set the spacing between lamps, edit the Generator’s Evenly Distance setting.
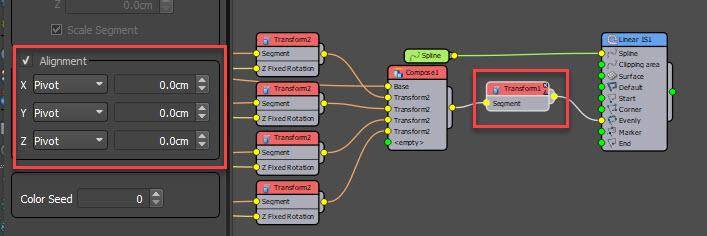
- One final thing, The bounding box for each lamp is being used to align it to the spline. Because the different rotations change the size of the bounding box, this means the lamps are not placed on the spline using a common point. To fix it, add a Transform node after the Compose operator and set the Alignment for all 3 axes to Pivot. Problem solved!
![Fixing The Pivots]()
So, we’re pretty much there. But these lamps aren’t providing a lot of light! Unfortunately, RailClone 4 can’t currently distribute lights, but we have just introduced this feature in our Forest Pack 7 beta, so it might appear in RailClone one day too. Until then we can get around it by combining RailClone with the Forest Pack 7 beta - and to do that, you need to modify the RC style so that it can temporarily create some markers
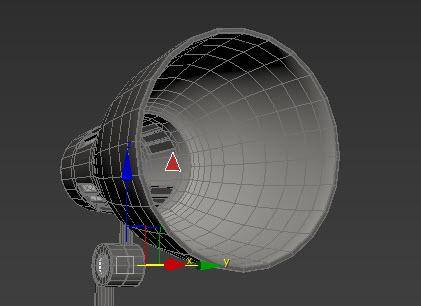
- You need a single triangle that marks the location of your light in the lamp head.
- It’s very important that the triangle’s pivot exactly matches the position of the lampshade’s pivot. They will take the same random values so this needs to be identical to ensure everything continues to line up correctly.
![Marker Geometry]()
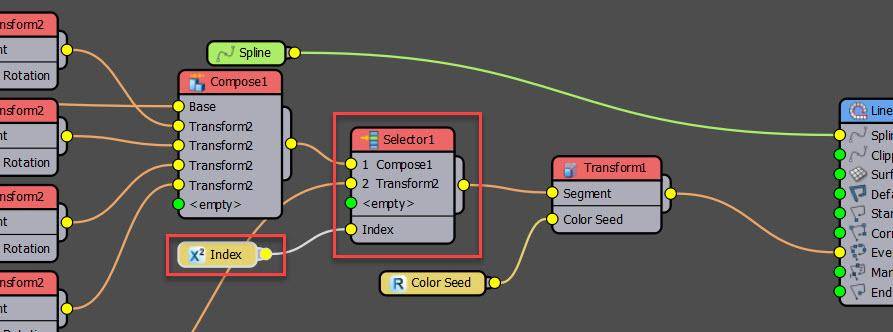
- Next, open the Style Editor. We’re going to create a switch to toggle between the markers and the lamps. Add a Selector operator before the final Transform node. Then export the Index property and wire it to a new Numeric node. Limit it between 1 and 2, since we’re only going to have two options.
- Copy and paste all the nodes from the final lamp Segment and the Compose operator. By doing this we will have an exact copy of the lampshade’s rotations.
- Select the new Segment node and change the geometry to our triangular marker.
- Wire the other end of the chain - the final Transform operator - to the Selector operators 2nd input. We now have a switch, accessible from the modify panel, that allows us to swap between full geometry and the markers.
![Creating a swtch]()
- So far so good. What we’re going to do now is create a second RailClone object to generate those markers that’ll be synced to this one. To do that create a new RailClone object and name it Markers so it’s easy to find later. If we were to use the original lamps object, then adding it to FP would disable instancing making it far less efficient. Creating a separate markers object avoids this limitation.
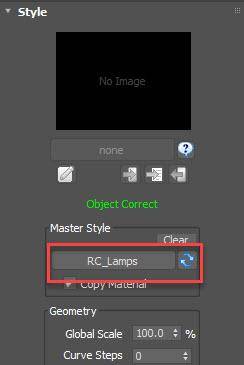
- Click on the Master Style picker and select the Lamps RailClone object from the scene.
![Master Styles]()
- Assign it to the same spline.
These two RailClone objects are now synced - edits to the original will cascade down to this style. However, and here’s where it gets very useful, any changes made to the values in the Parameters rollout will override the master’s settings. Therefore you can change the switch value to 2 in order to change this version to display only the triangular markers! Perfect, now all we need to do is use Forest Pack 7 or above to add the lights.
- First up you need some light objects. We used 4, each with different colours.
- Next, create a new Forest Pack object in Icon mode.
- Go to the Items rollout and add the lights to the Items list.
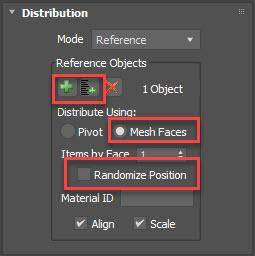
- Go to the Distribution rollout and change the mode to Reference.
- Click the Add Multiple button to open an object picker. Find and add the RailClone object called Markers that we created earlier.
- Change the mode to Mesh Faces and disable Randomise Position to lock them precisely to the triangles.
![Reference Mode]()
- That’s it - the lights now follow the lamp head. If you go back to the original RailClone object and make some changes, you’ll see that the markers - and therefore the lights - all update when the style editor is closed, keeping everything nicely synchronised!
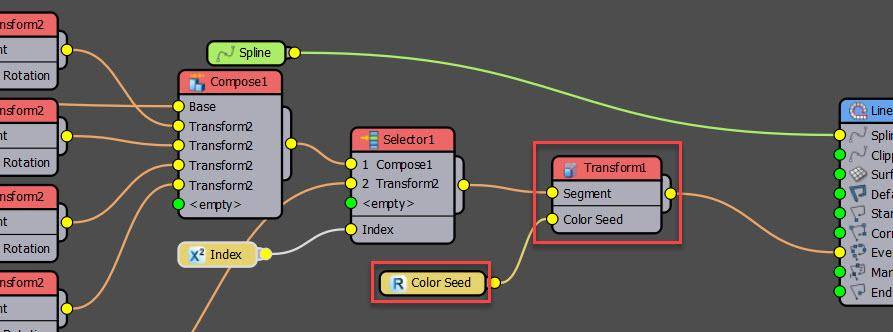
Let’s add one more thing. We want to randomise the colour of the lamp geometry using RailClone colour. Easy enough, you can just pop the map into the materials diffuse input and pick a few colours. The issue is that because the lamp is made from multiple parts, the colours are different per element. To harmonise them, all you need to do is find the final Transform node and export the Color Seed value. Connect a Random number node with a large range and voila! If I render now, each lamp is randomised with a single colour.
And that’s it, there were quite a few advanced tips in there that can be used in many different situations. We really hope you find them handy.
This was the final video of this rather strange year, so we'd like to take this opportunity to wish all our users a happy holiday. Thanks for watching and we hope you'll stay tuned to plenty more episodes and announcements in the new year. All the best.


