Tutorials
Learn new skills with our bite sized lessons
Featured Products
Get ProductsIn the 3rd tutorial a bespoke seating style will be created for the stadium. The previous tutorials demonstrate how to create the advertising hoarding, glass walls, and railings. If we examine the finished style we can see that the chairs attach to a continuous rail with regularly spaced supports.
Though the final result looks complex, none of the individual components are difficult to construct. To create this effect we'll create a composite style comprising 3 generators controlled by a single spline.
Creating the Rail
- Start by creating the rail. First create a new RailClone object and call it "RC_Chairs".
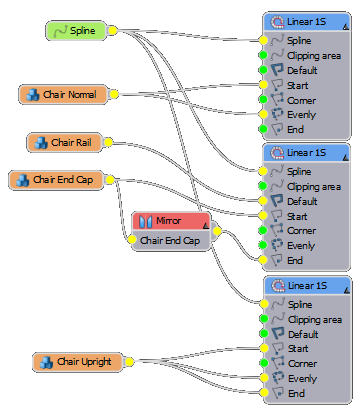
- Open the style editor and add a new L1S Generator and spline node to the construction view.
- Wire the spline node to the spline input and pick "spline_test" from the scene. This is a shorter spline we can use to test styles as we construct them.
- Create a new segment and pick "Chair Rail" from the scene. Wire this to the generator's default input.
- You should now have a simple rail. All the segments in this style have been created with their pivots aligned to a common point, to ensure that they snap together correctly change the Properties>General>Alignment Y and Z values to Pivot. You'll need to do this for all the segments used in this style.
- The ends of the rail are open, to cap them we'll add a segment to the start and end of the array. Copy the segment you just created to retain the pivot settings and pick "Chair End Cap" from the scene. Wire this to the Start input.
- We can use the same geometry at the end of the rail by using a Mirror operator to flip it on the X axis. Drag a Mirror node to the construction view, connect the input to the segment we just created and connect the output to the End slot.
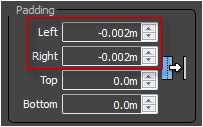
- There is currently a small gap between the cap and the rail, to close this up adjust the segment's left and right padding to about -0.002m.
Creating the supports
- With the rail complete, add the supports by adding a second L1S generator to the same style. Connect this to the spline object as used above.
- Next clone the segment node a third time and pick "Chair upright" from the scene. wire this to the Start, End and Evenly inputs of the new generator.
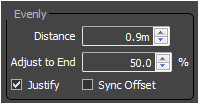
- Select the new generator and and go to Rules>Evenly>Distance - a value of about 0.9m looks about right.
Creating the chairs
- Finally we'll add the chair to the style. Create a third L1S generator and connect to the existing spline.
- Clone a segment node. There are two versions of the chair included in the scene, one opened and one closed. If you want to render the scene without and audience use "closed chair", otherwise use "Chair Normal" as demonstrated. Attach the chair segment to the evenly input.
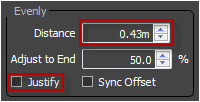
- To control the spacing, go the the generator's Properties>Rules tab and adjust the Evenly Distance to 0.43m. Since we want the spacing to be absolutely regular turn off Justify to prevent averaging the first and last space.
- Evenly will not create a chair at the start of the spline, to do this wire the segment to the start input. You notice that the first chair now intersects the second - this is because when X-Pivot property is set to automatic the start geometry will align to the left while the evenly to the center of the geometries bounding box. To remedy this simply change the X Pivot property to Left to ensure the same point is used to align the segment irrespective of the node to which it is attached.
- That concludes the chair style, in the next tutorial we'll be adding an audience to sit on the seats and adding some flags to help break up any repetition.
Conclusion
This short video demonstrates RailClone's ability to use an unlimited number of generators inside a single style to create complex geometry, it also looked at pivot alignment and the mirror operator. In the next tutorial we'll add an audience and flags to the stadium and explore a range of randomisation techniques.


