Tutorials
Learn new skills with our bite sized lessons
Resources
Requirements
Forest Pack Pro, RailClone Pro, V-Ray
Featured Products
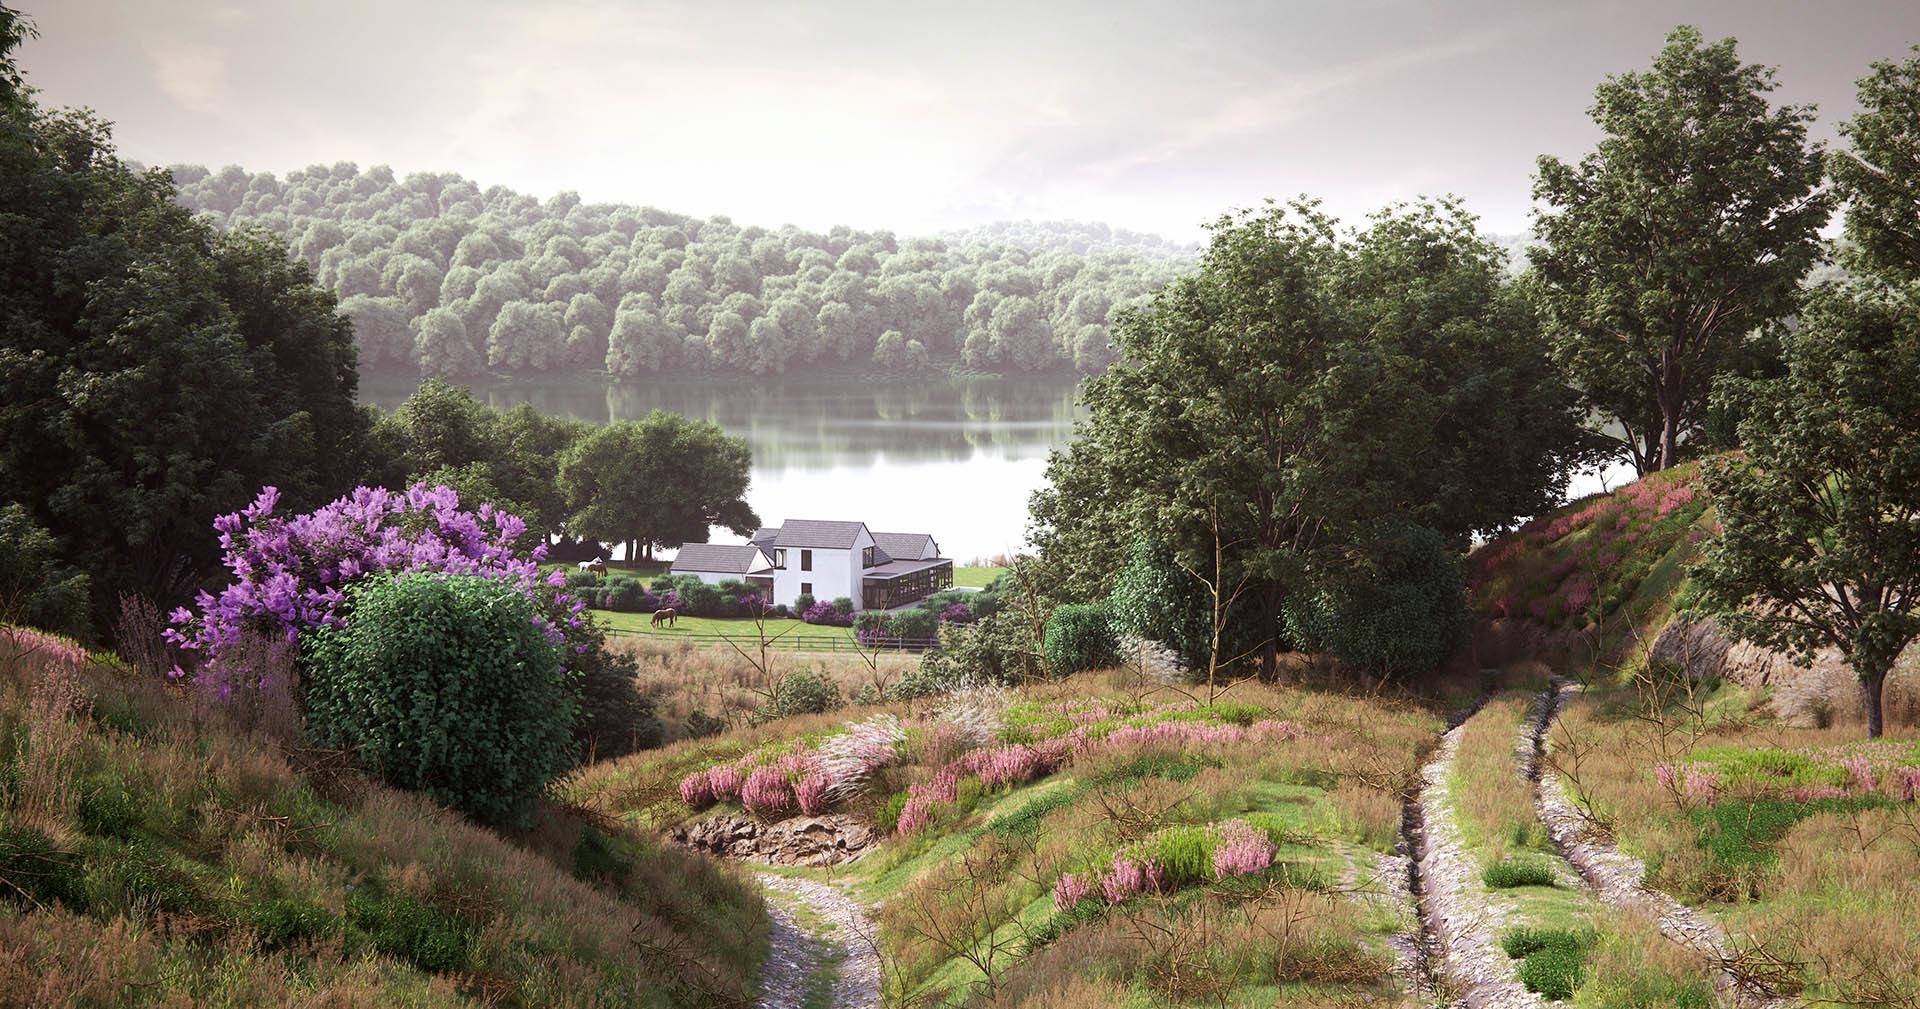
Get ProductsYou know how it goes - a client tells you they want a huge landscape, rolling hills and wild moors with a footpath leading the eye to their latest creation nestled next to a lake.
“Fine” you say, “what’s the deadline?”
“Tomorrow!”
Sounds impossible? Not so. Creating rich foliage-filled environments may look like time-consuming work, but once you’ve mastered the basic features of scattering tools like iToo Software’s Forest Pack Pro for 3ds Max, it’s possible to turn around nature renders remarkably quickly.
In this tutorial, we’ll focus on Forest Pack’s various area modes that can be used to populate scenes with realistic ground cover in a matter of minutes. Using these techniques you will be able to create nature renders in little more than an afternoon.
A few caveats. For this tutorial, all the plant models are from libraries. Modelling and texturing foliage is a specialised and lengthy task that’s beyond the scope of this article. The house has also already been supplied, but everything else we will build from scratch.
If you want to follow along, a starter file is available containing the landscape and the building. You’ll just need to source your own plant models. The majority of the tutorial can be completed using the assets that come free with Forest Pack and RailClone, but the final image has supplemented these with a few heather models from 3D Mentor, and a bush and additional grasses from Evermotion.
1 - Frame The Composition
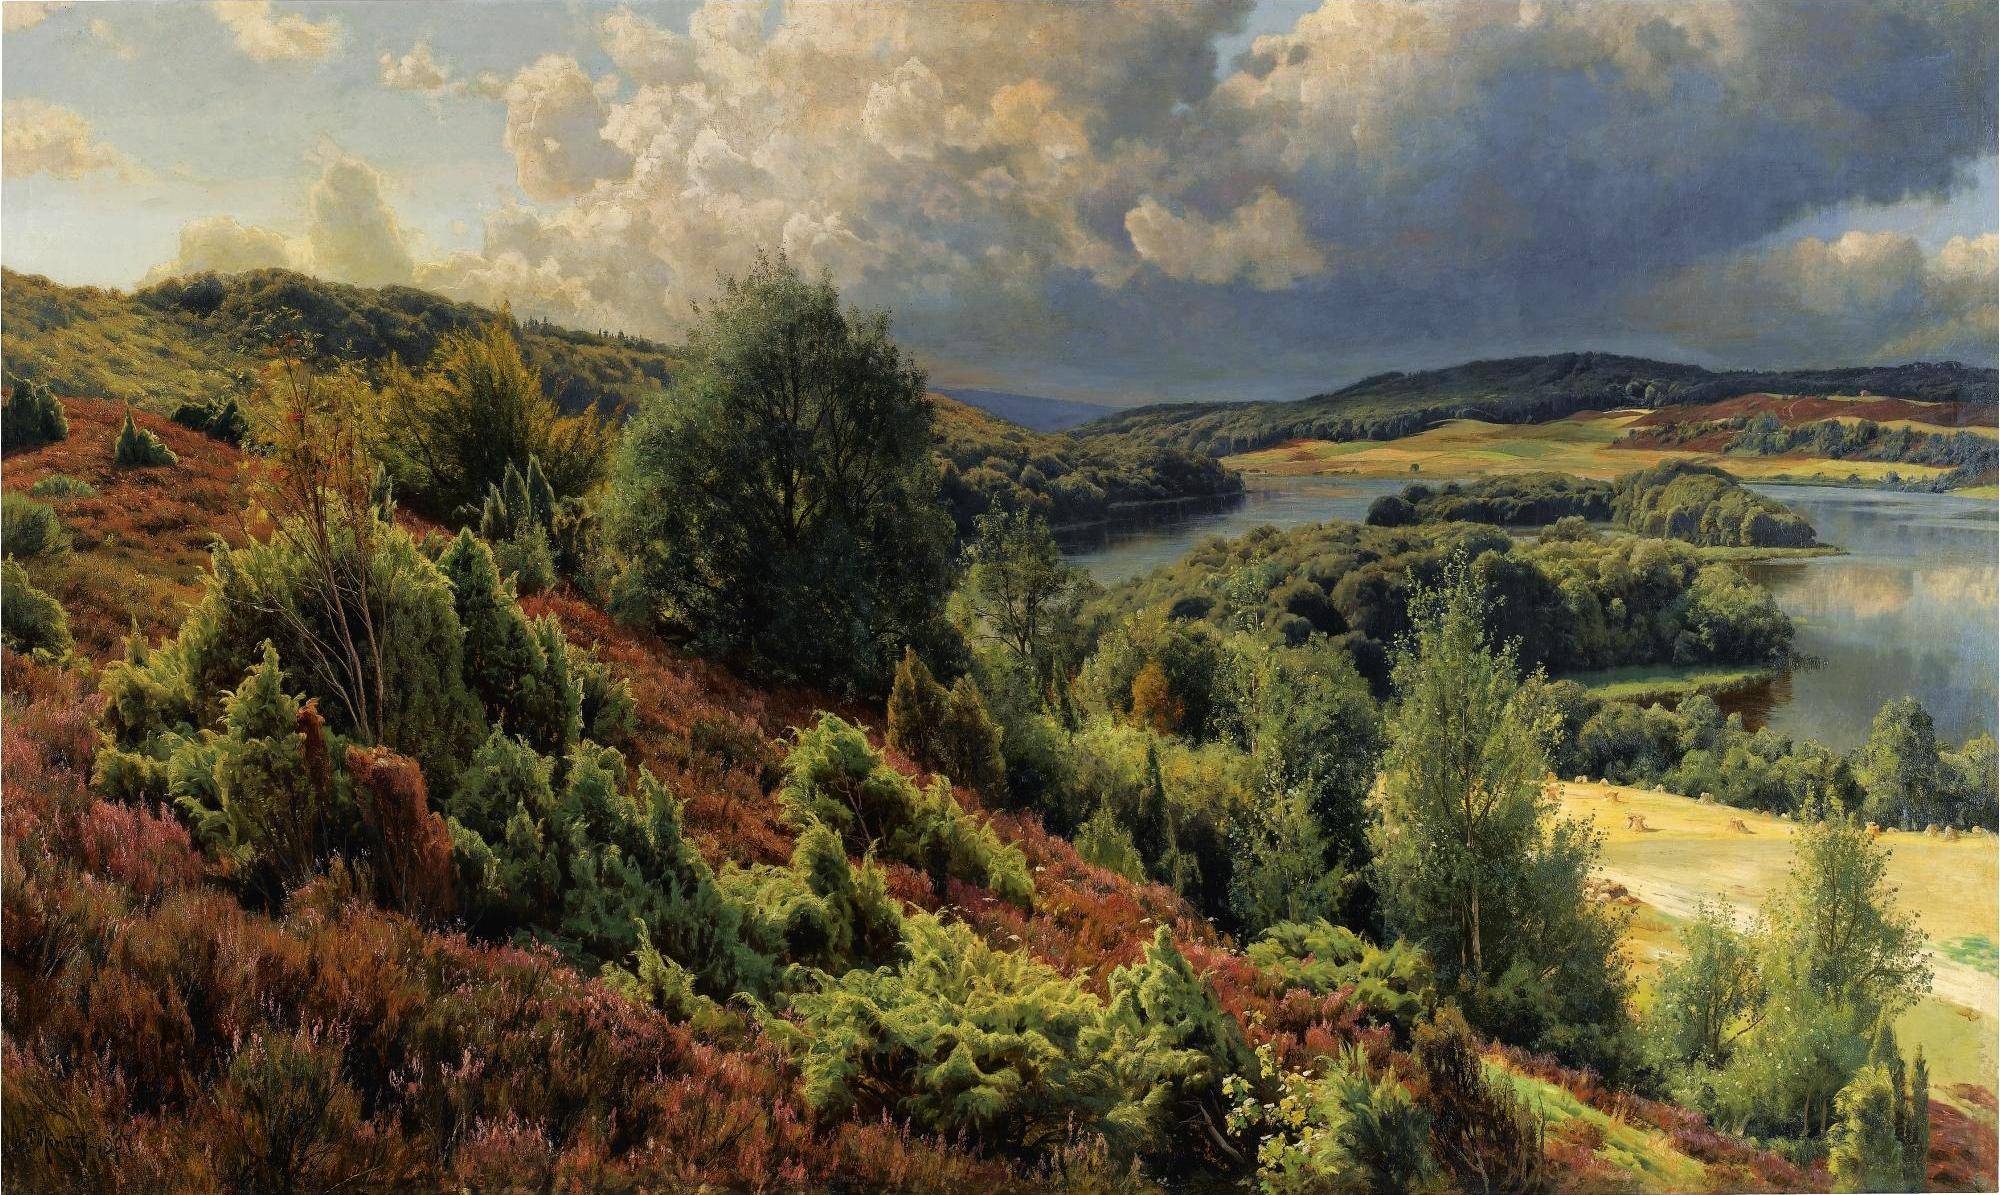
When deadlines are tight, you can’t afford to spend time modelling every detail. Try starting with a clear idea of the final image so you can save time and create only what’s visible from the camera view. As a shortcut for finding a composition, it can be helpful to look to painters and artists for ideas. The scene in this tutorial was inspired by the art of Peder Mörk Monsted, a Dutch painter born in 1847. His compositions often include pathways that lead the viewer through the image, strong delineation of foreground, midground and background, and the use of land, water and trees as framing devices.
2 - Model The Landscape
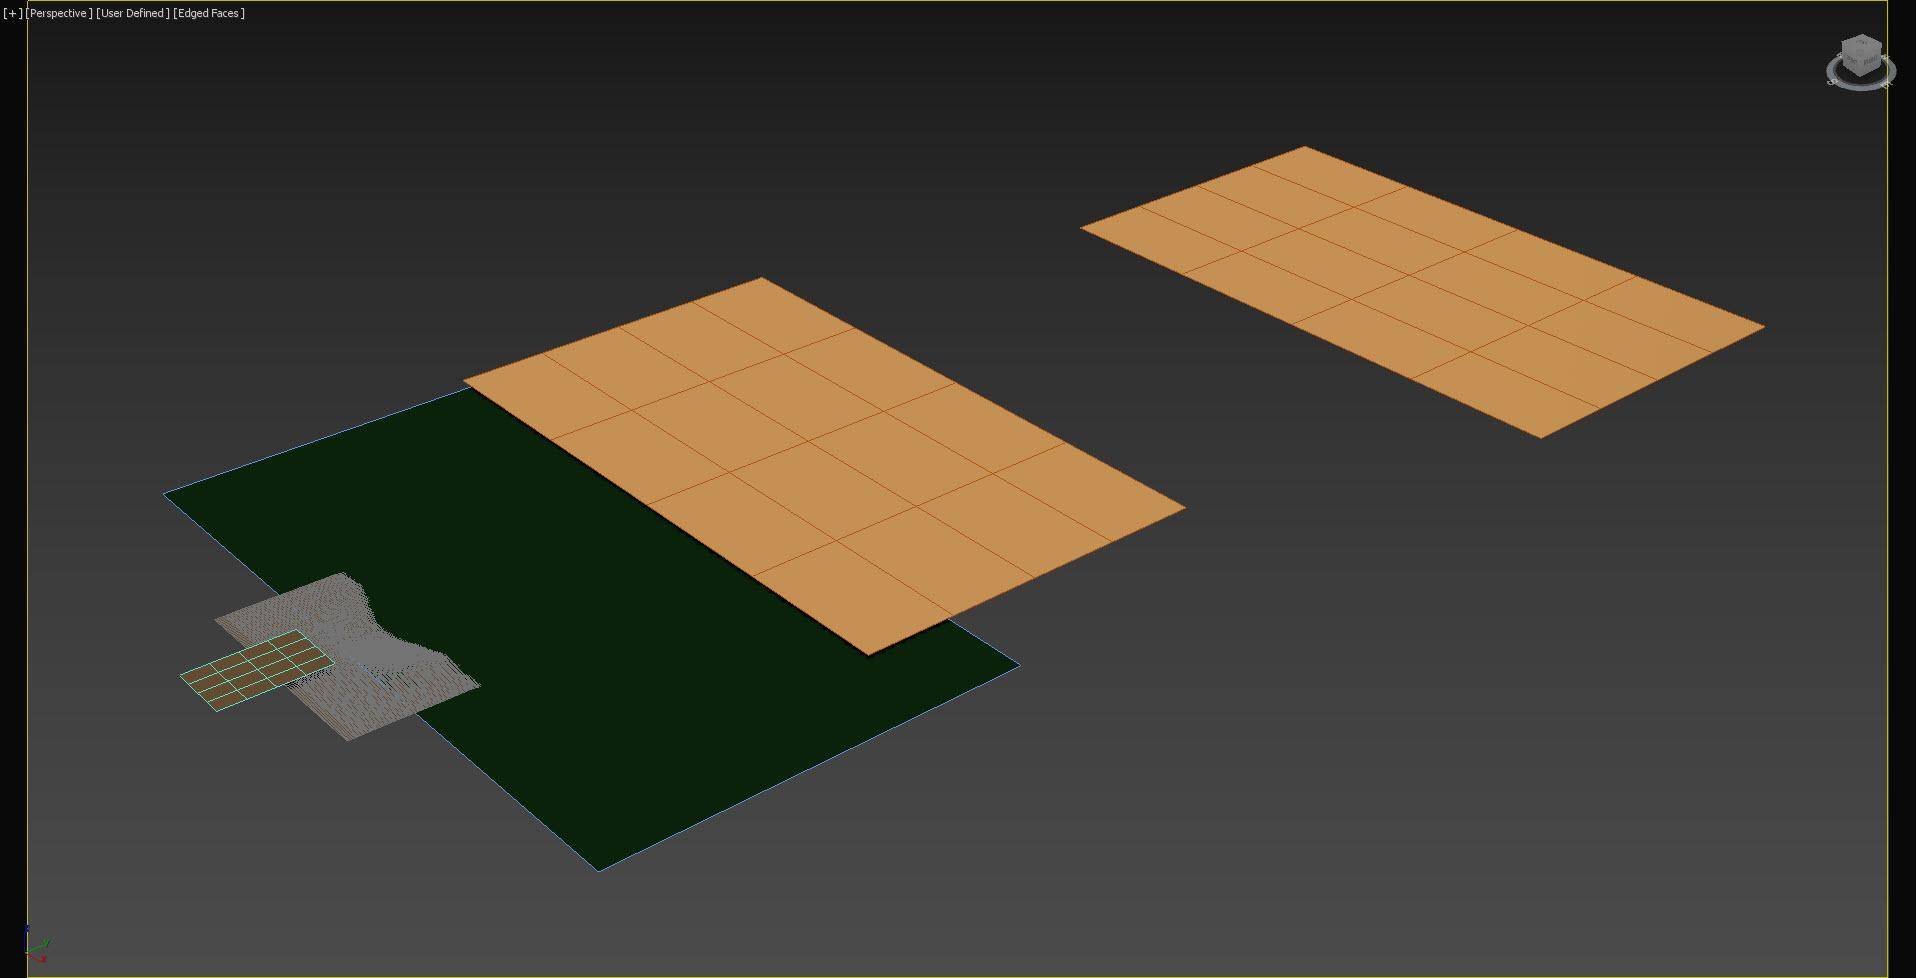
Start with planes and use simple poly-modelling techniques in combination with the Turbosmooth modifier to rough out the terrain. This approach has two benefits. First of all, if you retain the low poly version, it’s very easy to modify the landscape by moving just a few vertices, and secondly, by maintaining good edge flow you can easily extract splines to be used with Forest Pack. In this scene, we created 5 large planes to define the foreground, midground, lake, background and far background.
3 - Use Spline Deformer Scripts
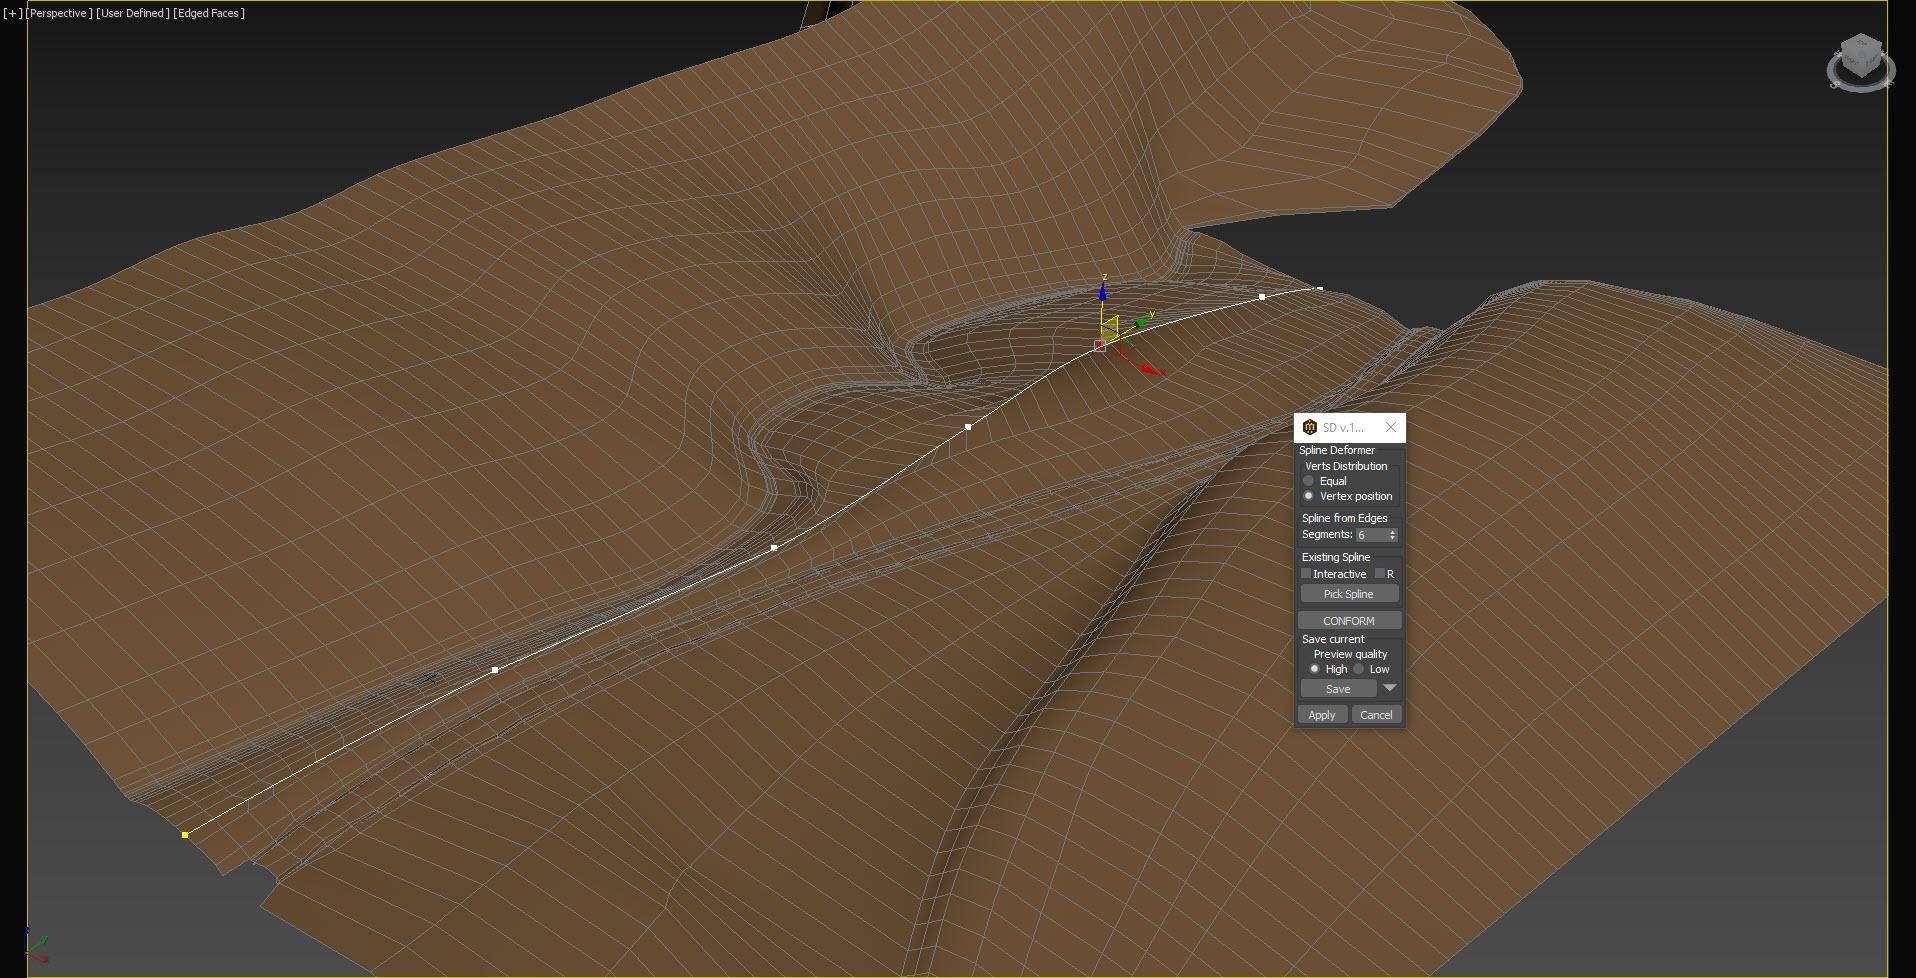
To sculpt the landscape quickly from the camera’s point of view, a neat trick is to start by adding edge loops that run from left to right and then use 3ds Max’s Paint Connect tool to add perpendicular edge loops to define the footpaths, hills and other features that lead the eye through the image. Once you’ve created these edges, an easy way to make bold changes to the landscape’s topography is using Miauu’s Spline Deformer script. This tool works by creating a simplified spline based on an edge selection that can then be used to warp the geometry.
4 - Use Basic Materials
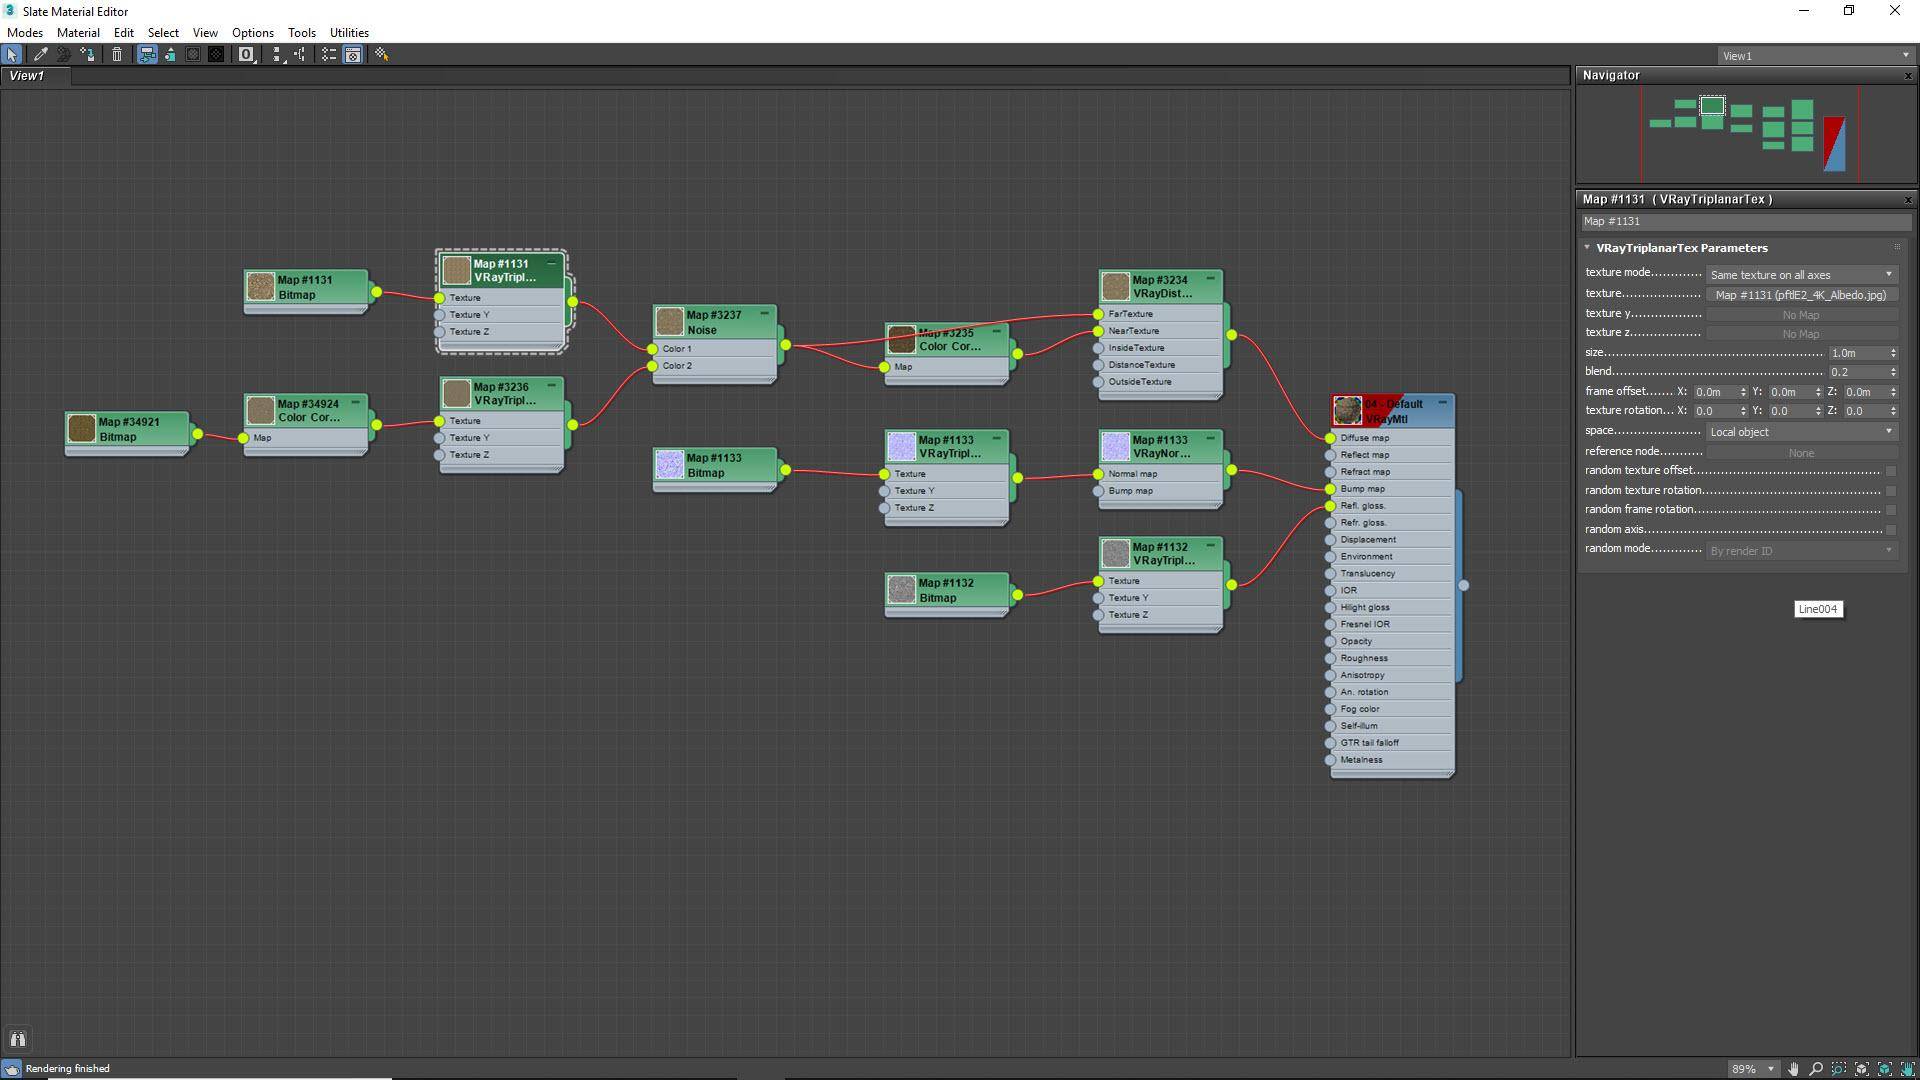
The material setup on the terrain is very simple. In the final render, very little if any of the landscape mesh will be visible so we just need something for those little glimpses you’ll get between ground cover or on the paths. To avoid wasting time UVW mapping, use Triplanar maps to project and blend the material from 3 axes at render time. They’re a huge time-saver for big landscapes. For the water, use a reflective material with noise added to the glossiness channel to create an impression of turbulence on the surface.
5 - Extract Splines
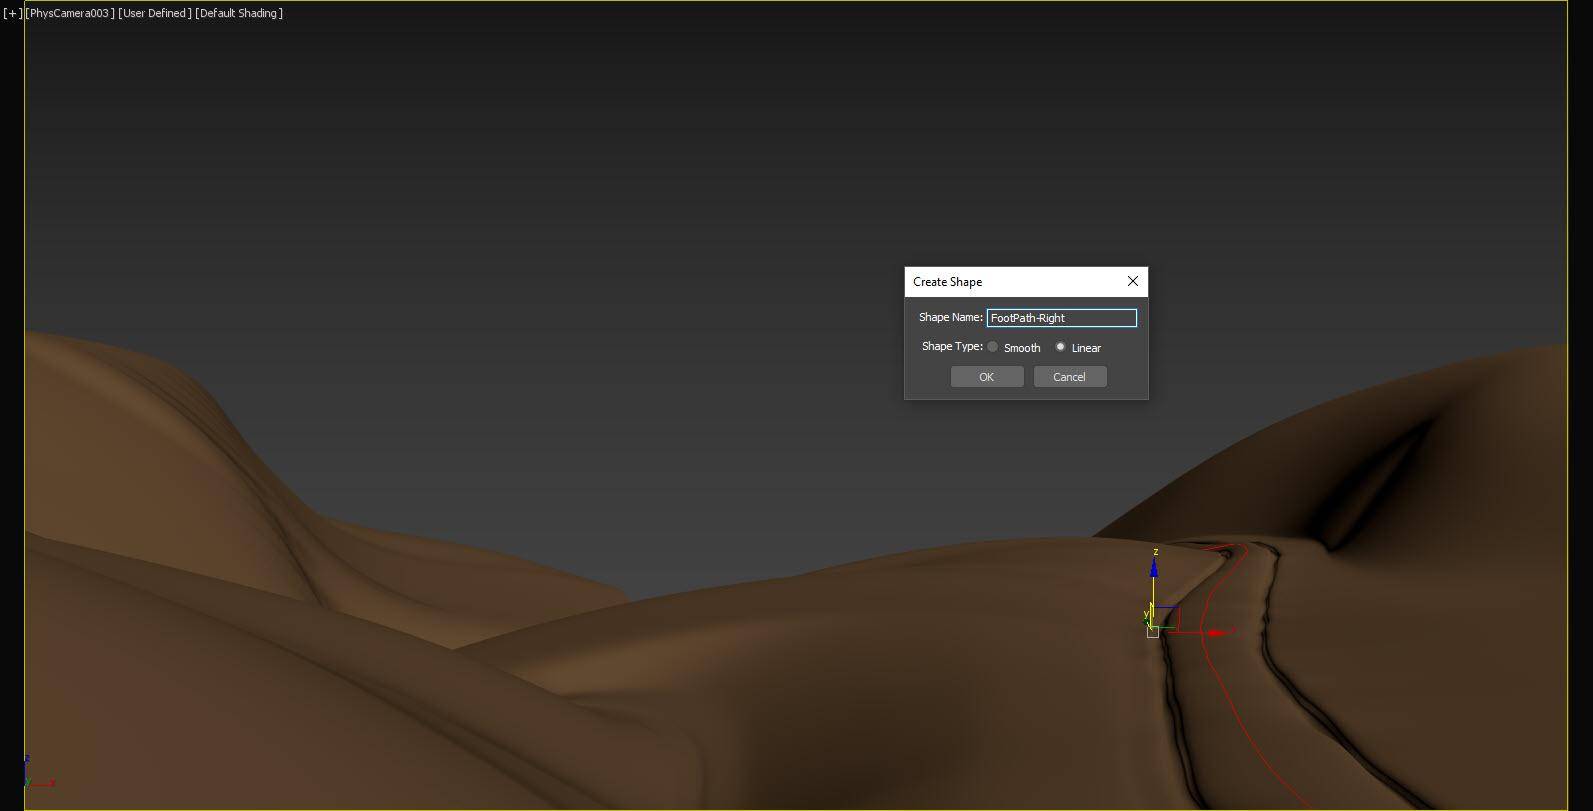
Later on when we scatter items on the paths, we’ll need splines that run down their centre. Thanks to the fact that we poly-modelled the terrain, it should have a decent edge-flow that will make the splines very easy to create. Just select an edge loop from the middle of each footpath and click on the Create Shape option in the Edit Poly modifier. Choose Linear mode so that the spline will match the terrain’s topography perfectly. Follow the same procedure to create any other splines that would be helpful to control scatters later. You can’t have too many options!
6 - Add Fences
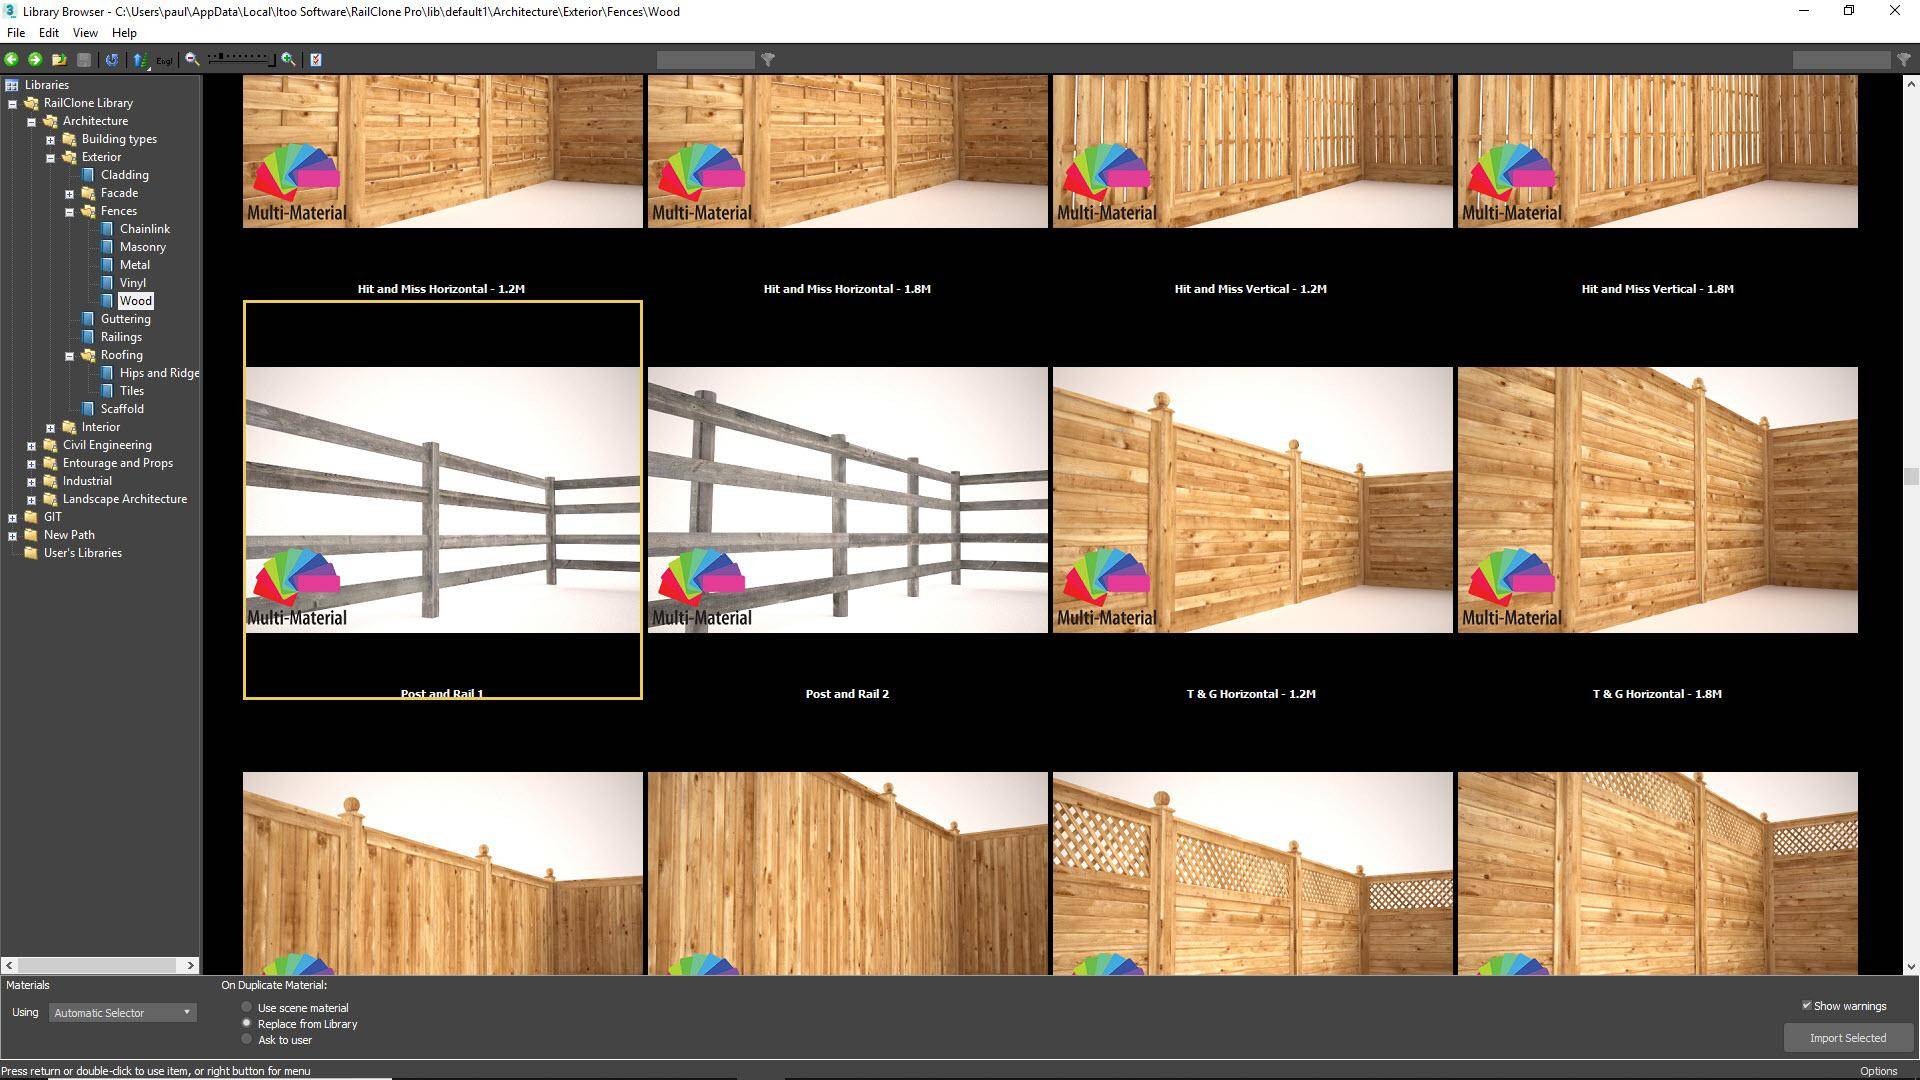
To add interest and more detail to the area around the building, we’ll create fences using RailClone’s built-in library. Draw a spline in the top viewport curving from the front of the building across the midground of the camera view. This defines the centre of a road. Next, create a new RailClone object and open the library browser. Load the Post and Rail 1 preset. Assign the spline to the Fence Path parameter found in the Base Objects rollout. In the Parameters rollout you will find several properties that allow you to adjust the height of the fence, the distance between the rails, the spacing between posts, and more.
7 - Modify the RailClone Style
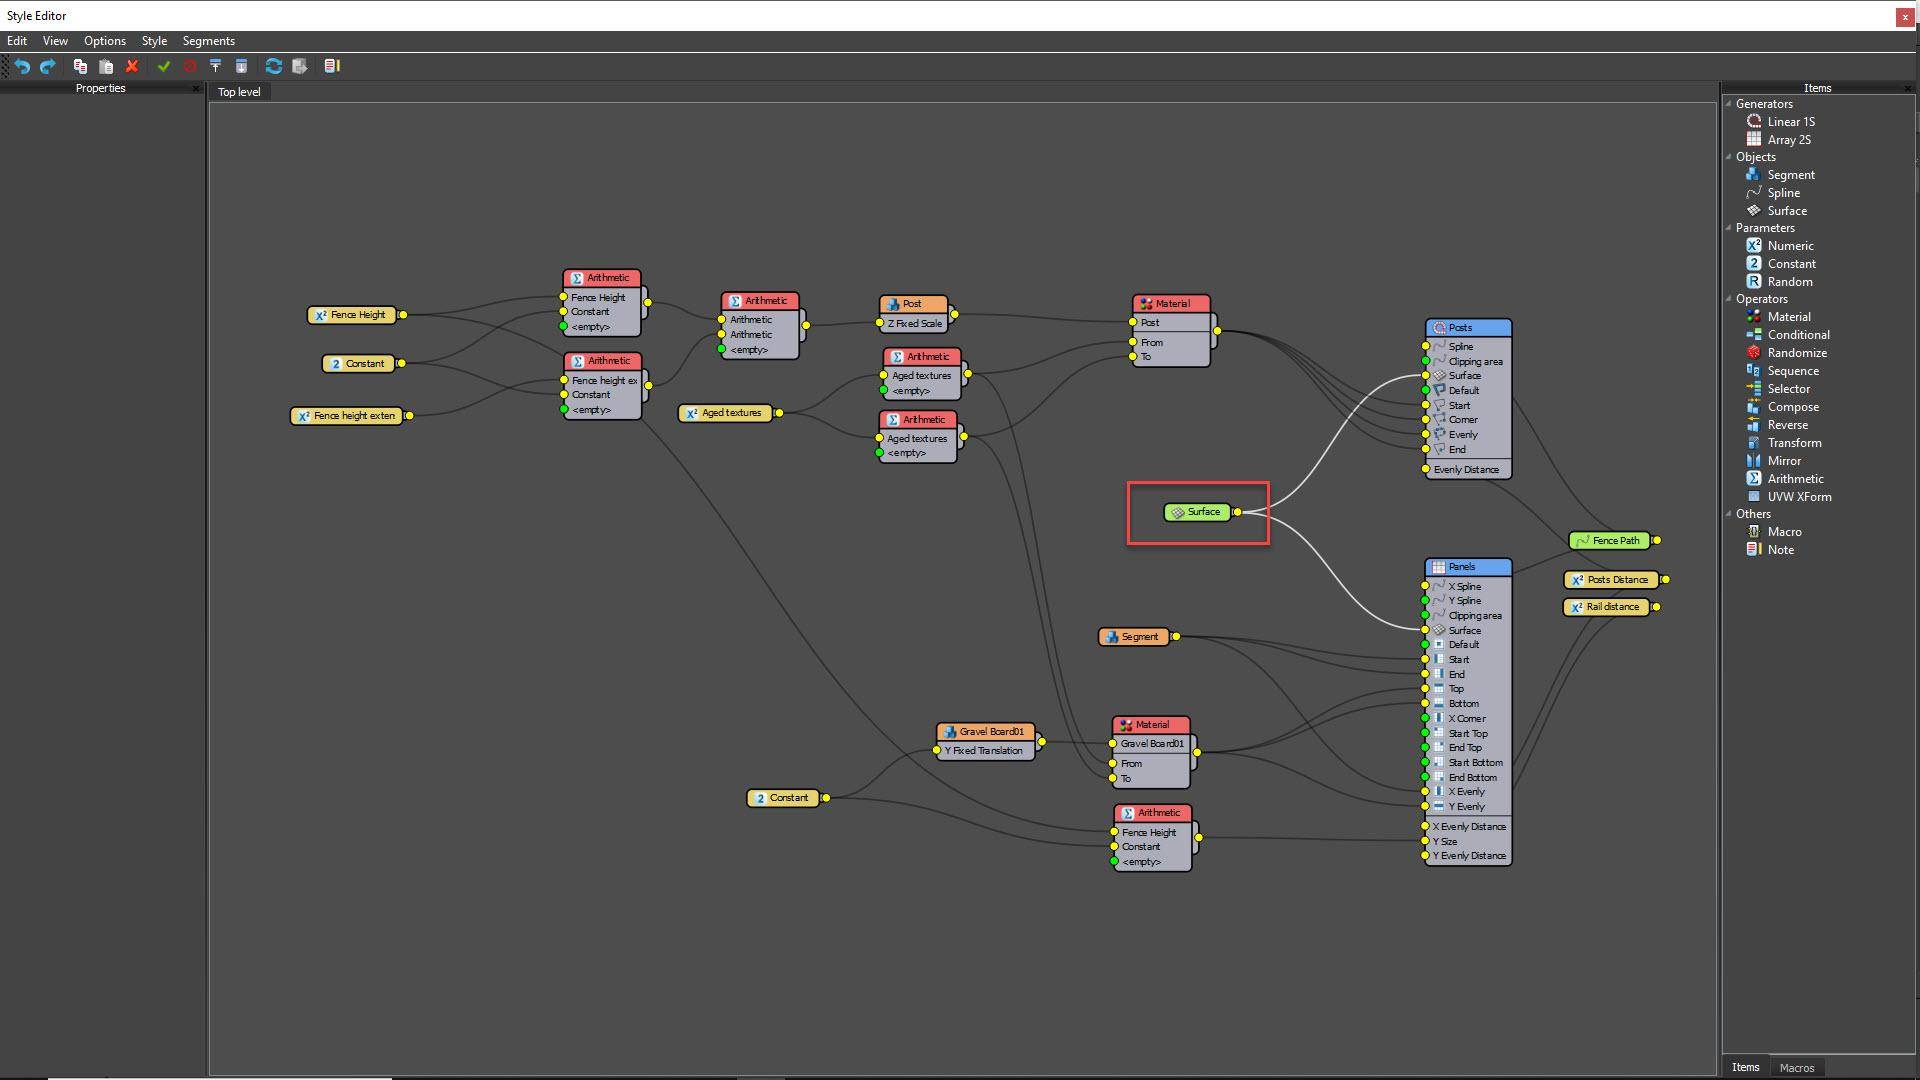
This fence style doesn’t have a built-in ability to follow a surface, but fortunately RailClone presets are simple to edit. Open the Style Editor by clicking the button in the Style rollout. Add a new Surface node to the graph and wire it to the two Generators’ Surface inputs. Select the Surface node, go to the Properties panel, and assign the terrain to the Object property. The fence will now deform to follow the landscape. Change both Generators’ Y Offset values to move the fence to the side of the path. Finally, select the L1S generator and enable Rules > Evenly > Sync Offset so that the posts and the rails align correctly.
8 - Add Roofs
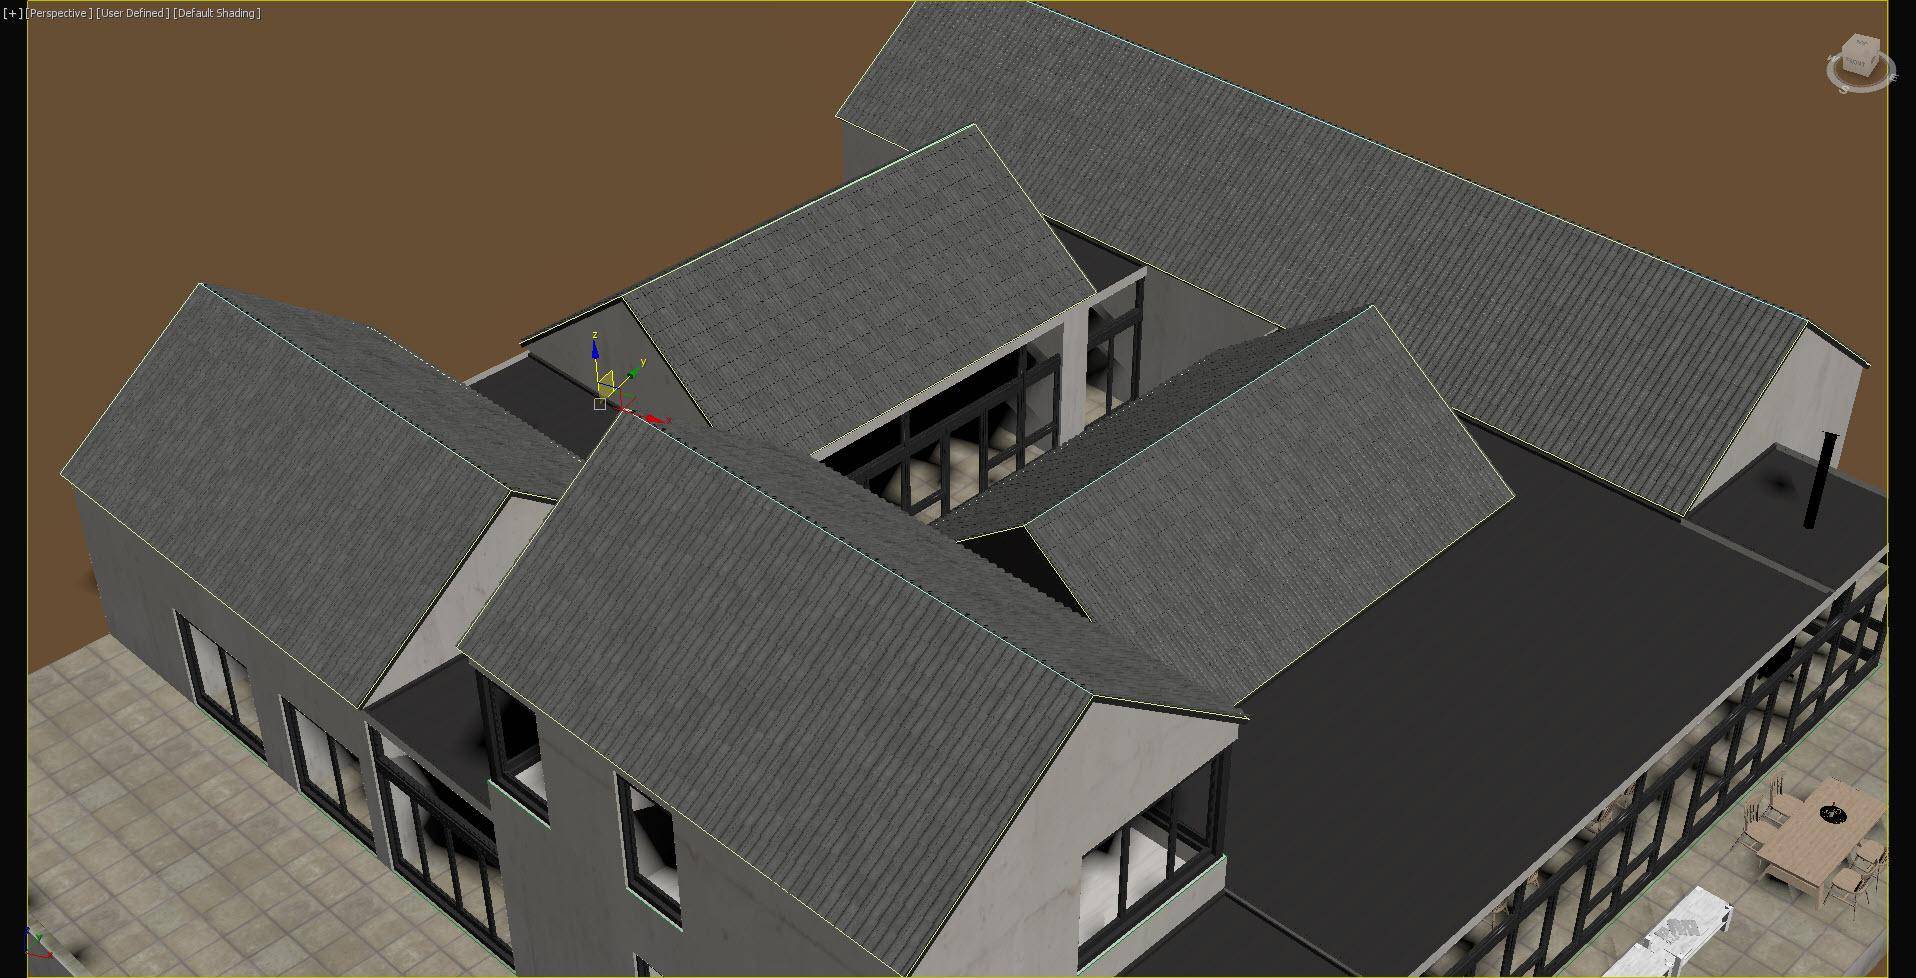
In the scene there are already closed splines to define the pitches of the roofs. We can use these with another built-in RailClone preset to quickly add roof tiles to the building. To do this, create a new RailClone object and load the Regent Tile preset from the library. Go to the Base Objects rollout and assign the roof spline to the Clipping Spline property. That’s it, you’ve just added 3D roof tiles to all the roofs! From the Parameters rollout you have the option to enable or disable verges and choose from one of twenty material presets.
9 - Add ridges to the roofs
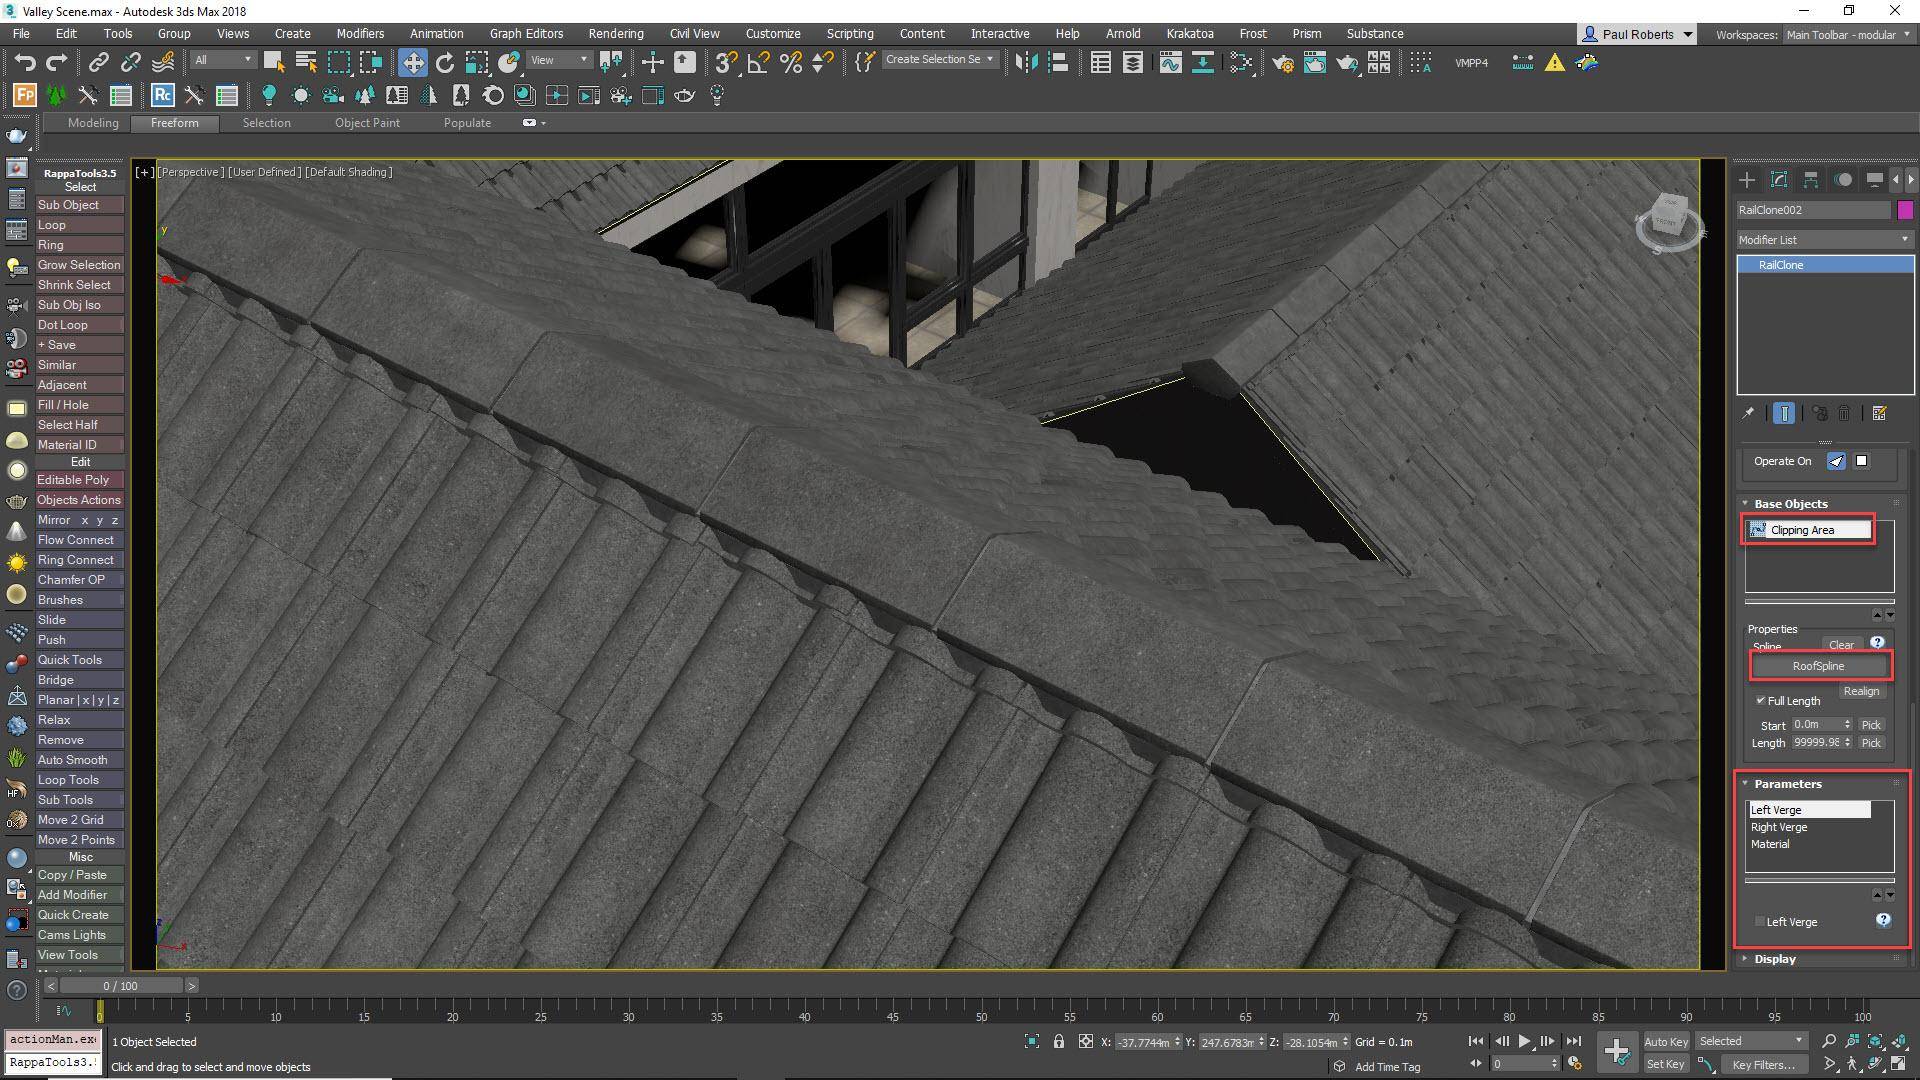
To finish the roofs we’ll add ridges. Turn on Vertex Snapping and draw paths on the apex of the roofs, one for each ridge. Ensure that the splines are part of the same Editable Spline object so that you can create all the ridges in one go. Create another new RailClone object and load a ridge style from the library. Go to the Spline properties in the Base Objects rollout and assign the paths you just created. The ridges are created and you can now adjust the material, z offset, and overhang on the ends from the Parameters rollout.
10 - Define Rocky Areas
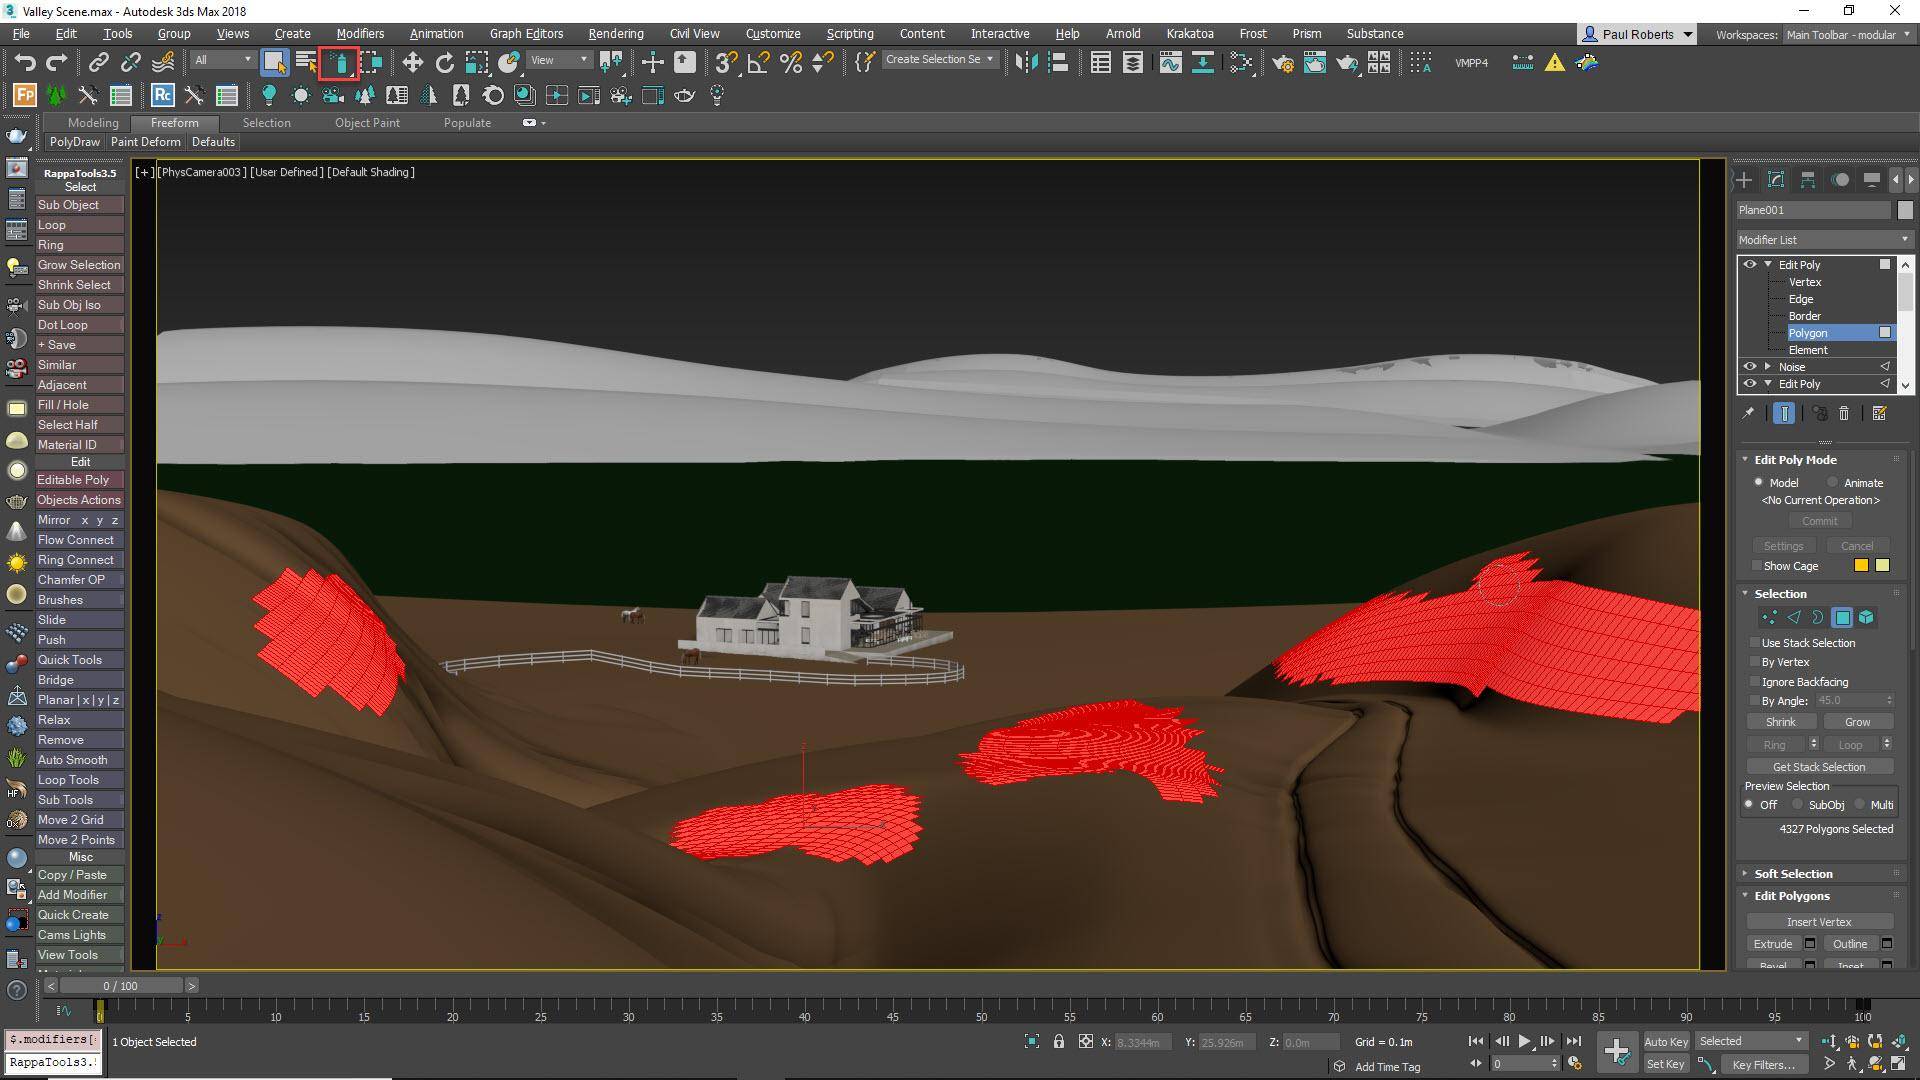
The landscape looks too homogeneous, so let’s break it up with some rocky areas. To do this, select the foreground landscape and make a rough selection of the polygons where you’d like to add a rock face. Detach these as a copy to a new Editable Poly object. Add a Push modifier that we’ll use later to move the polys behind the existing terrain’s surface. Assign a rock material that uses Triplanar maps to avoid having to worry about UVWs and then add a V-Ray Displacement modifier and assign the rock material’s displacement map to the Texmap slot.
11 - Sculpt The Rocks
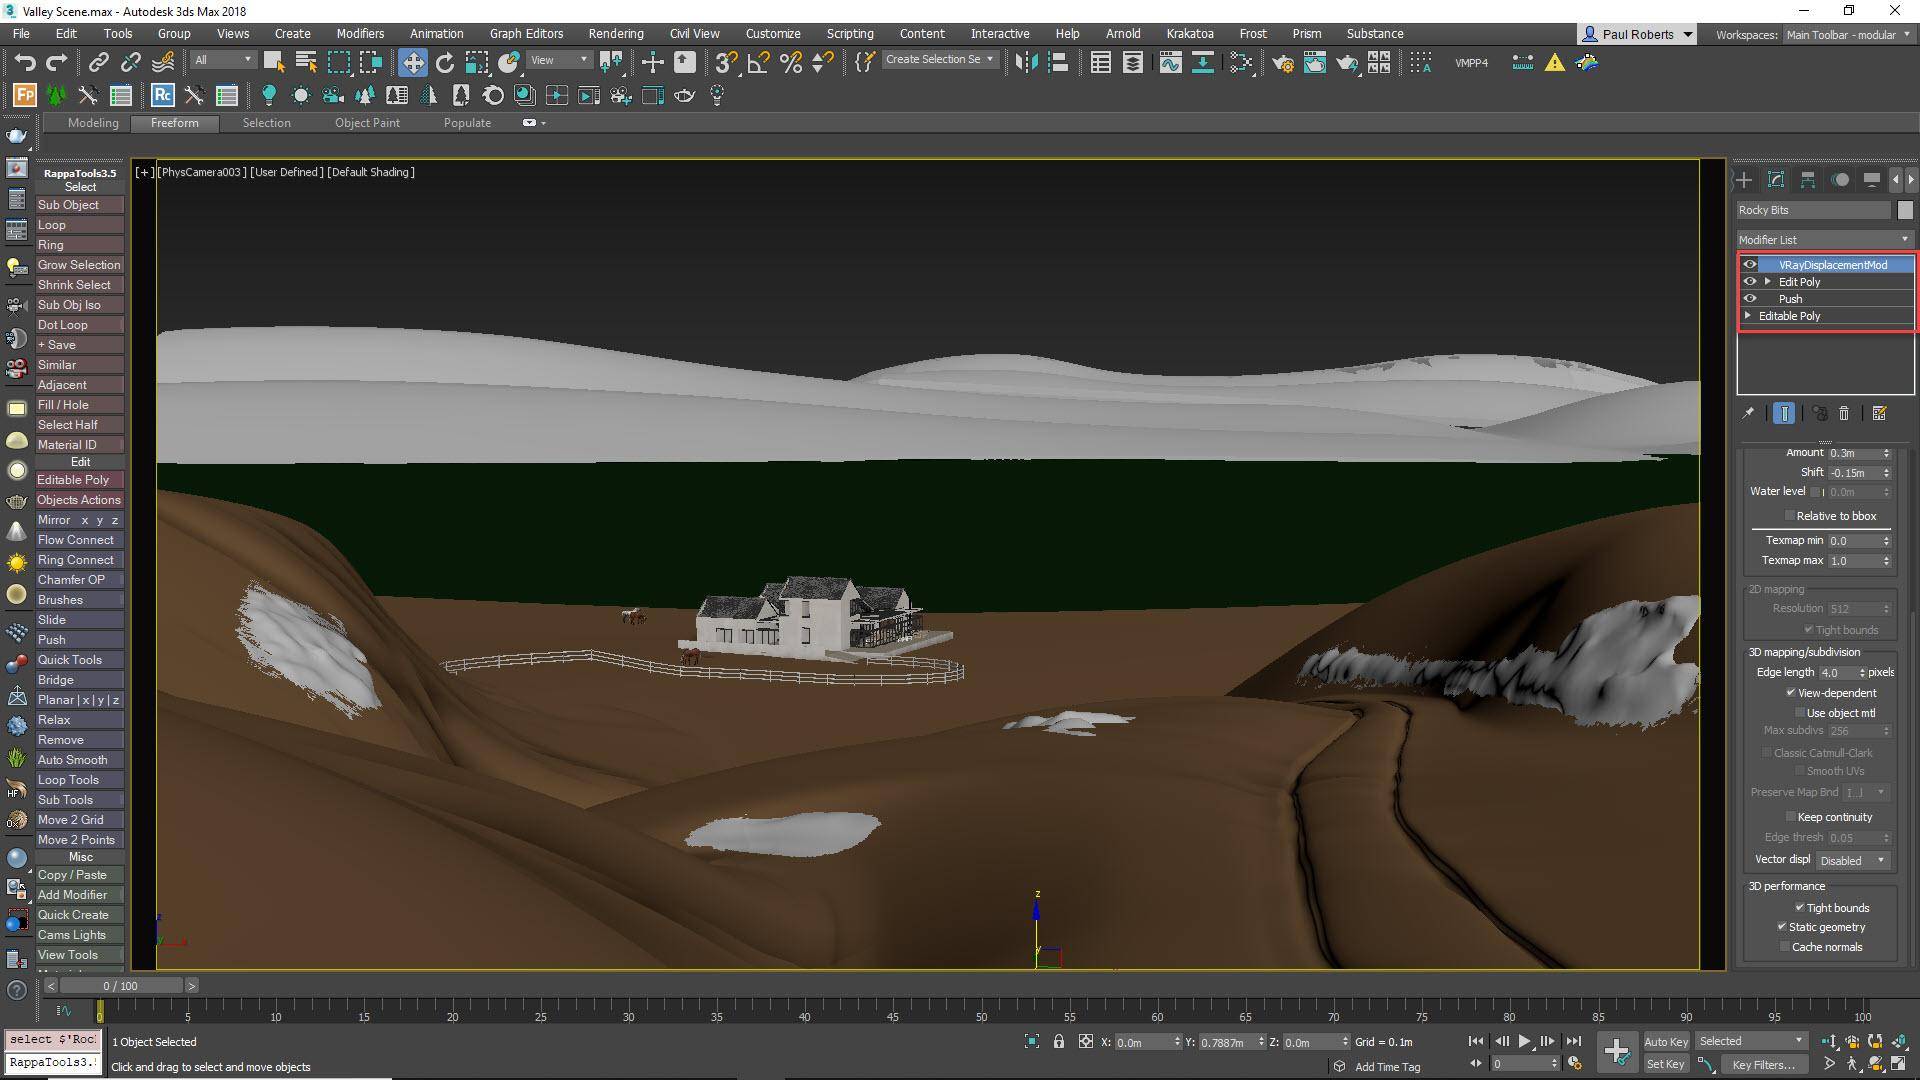
Increase the Displacement amount until the rock face has the desired ruggedness, and then add a negative Value to the Push modifier so that the rocks do not protrude from the surface. Add an Edit Poly modifier between the Push modifier and the VRayDisplacementMod modifier and use 3ds Max’s Freeform tools to sculpt the rock surface so that it protrudes through the terrain’s surface. This technique gives you a lot of control on where the rocks appear, and it’s very easy to edit and art direct by simply resculpting the rock layer.
12 - Create Splines Around Rocks
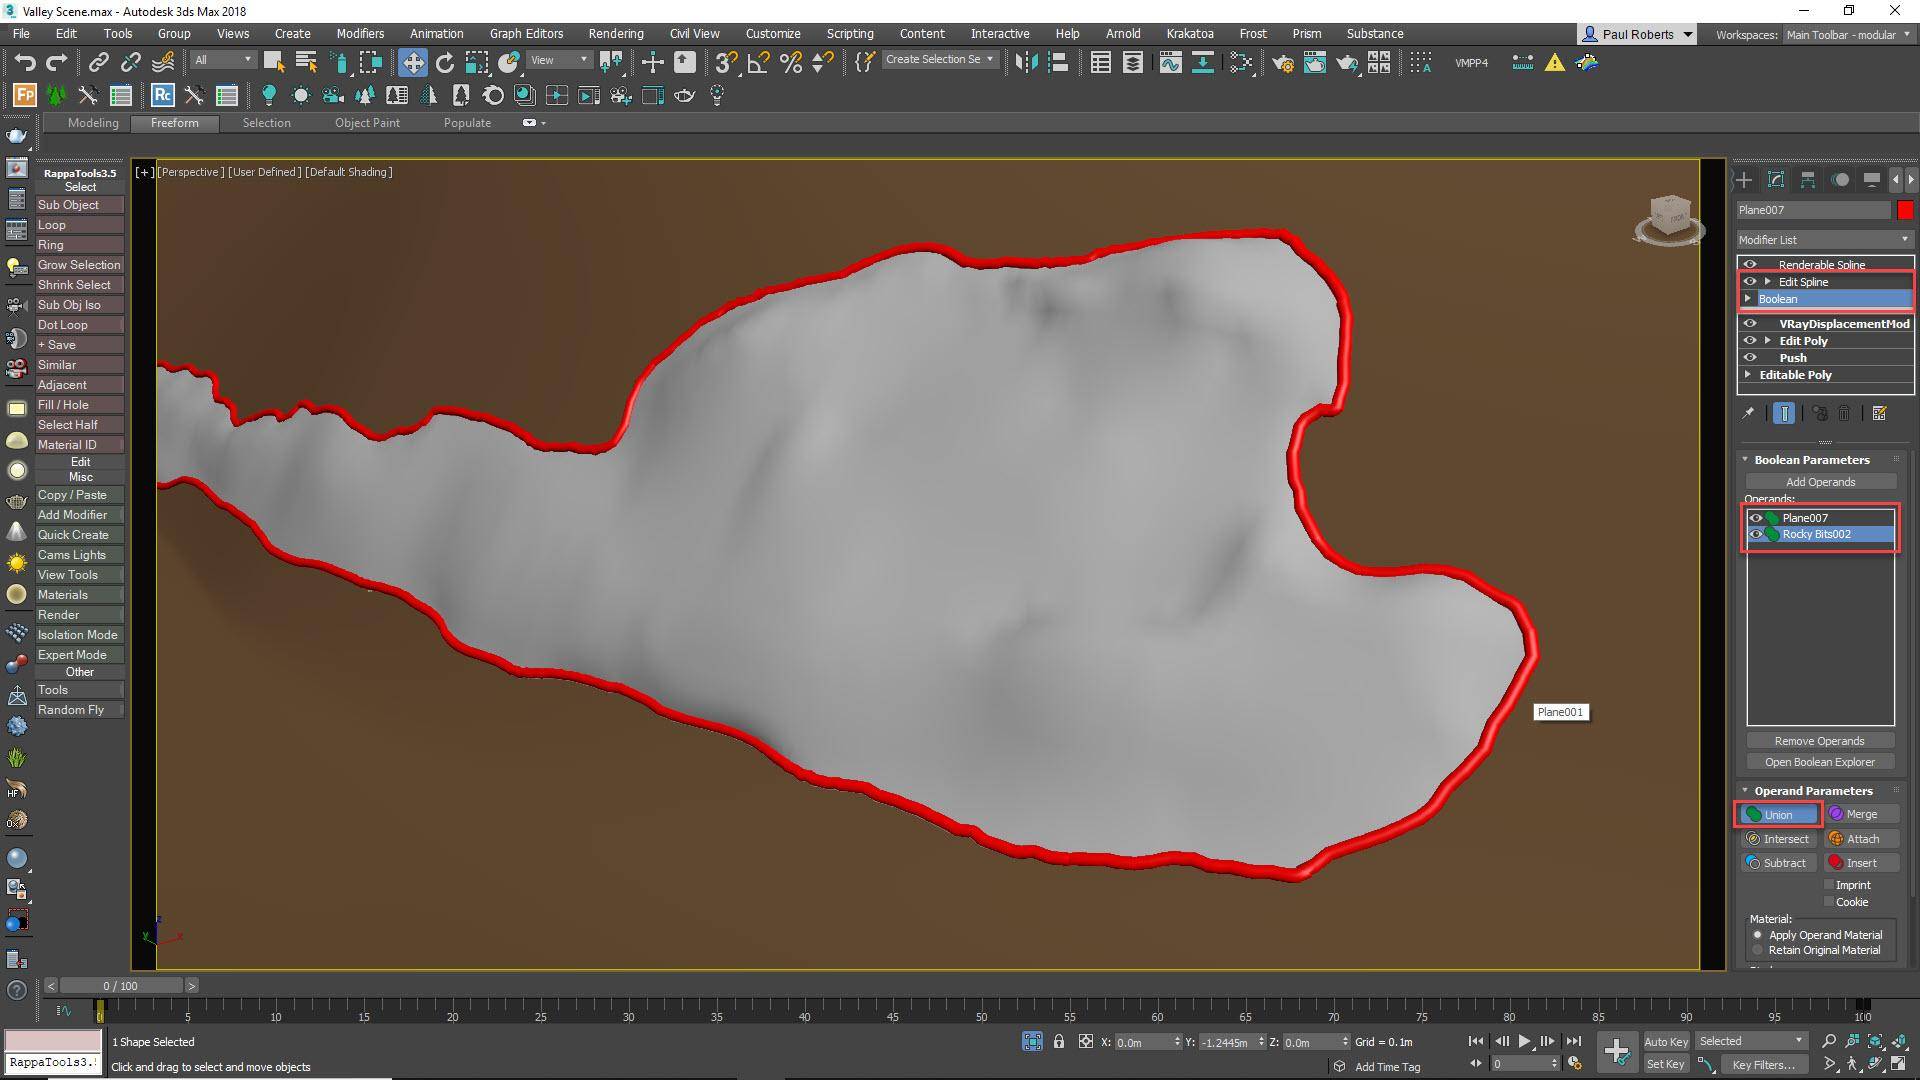
To prevent plants from growing on the rocks we will exclude them from these areas using closed splines. You have two options to create splines: Either draw them manually or if you are using the latest version of Max, you can use one of the lesser known features of the new Boolean tools to create splines procedurally. To do this, instance the foreground terrain and rocks and add them both as Union operands to a Boolean Compound object. Add an Edit Spline modifier and splines will be magically created where the two surfaces intersect. Best of all, if we update the original rock layer, the splines update as well!
13 - Decide On The Plants
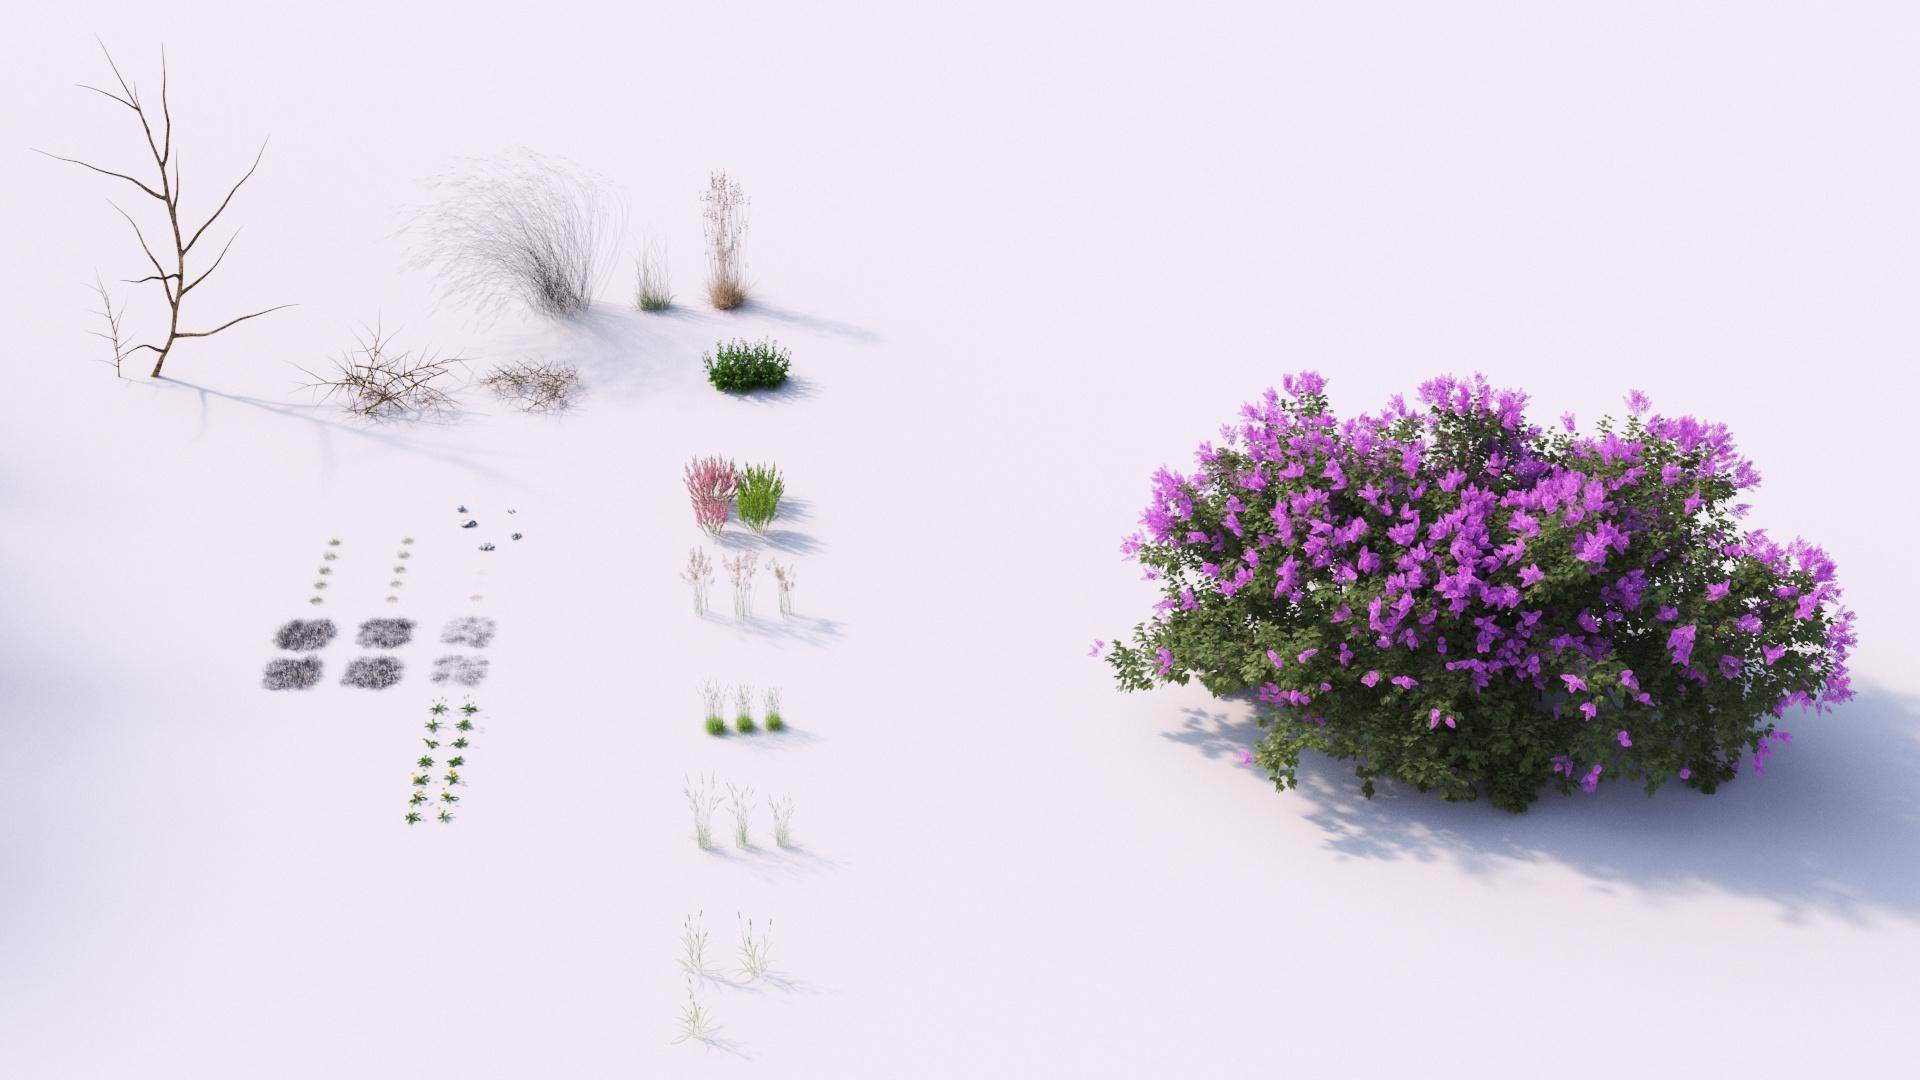
Now that the landscape meshes are finished it’s time to add the plants. It’s useful to decide in advance which plants you are going to require and render them in a simple scene under similar lighting conditions to the final image. In that way you can make sure that the colours complement one another, and if the assets are from different sources, you can also check that the shaders look similar and adjust them if necessary. In this scene we will use strong greens, browns for the bracken and dried grass of the moorland, and mauve as an accent colour, to be created by adding heather and lilac.
14 - Add Background Trees
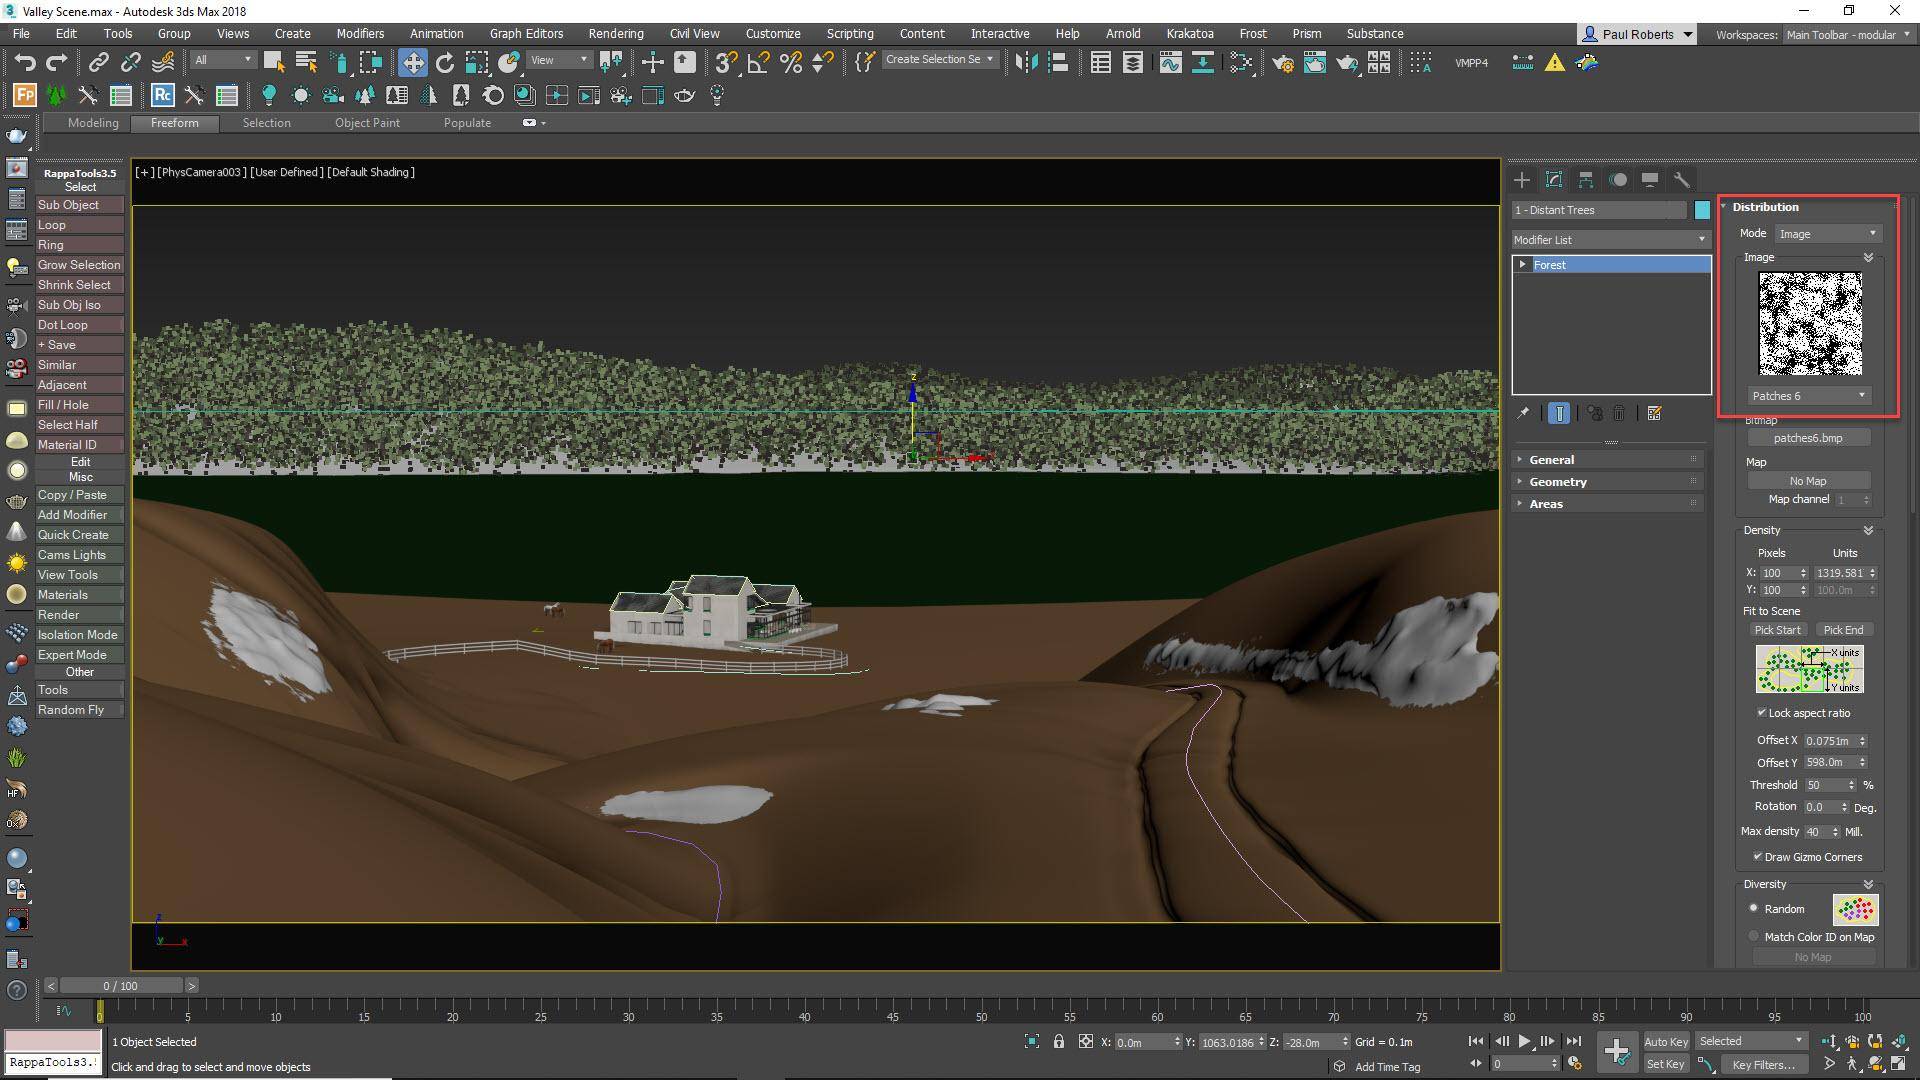
To add the distant trees, create a new Forest Pack object by adding the background terrain to the Surfaces list. Pick a couple of trees from the built-in Forest Pack library and choose a distribution map. Maps with a few gaps such as the recently added “Patches” options work well for suggesting small clearings in the woods. Change the number of trees using the Density -> Units property until the landscape is well covered. In the Surfaces rollout, turn on Altitude Range -> Limited and edit the Bottom property to prevent the trees from ending up in the lake.
15 - Add Foreground And Midground Trees
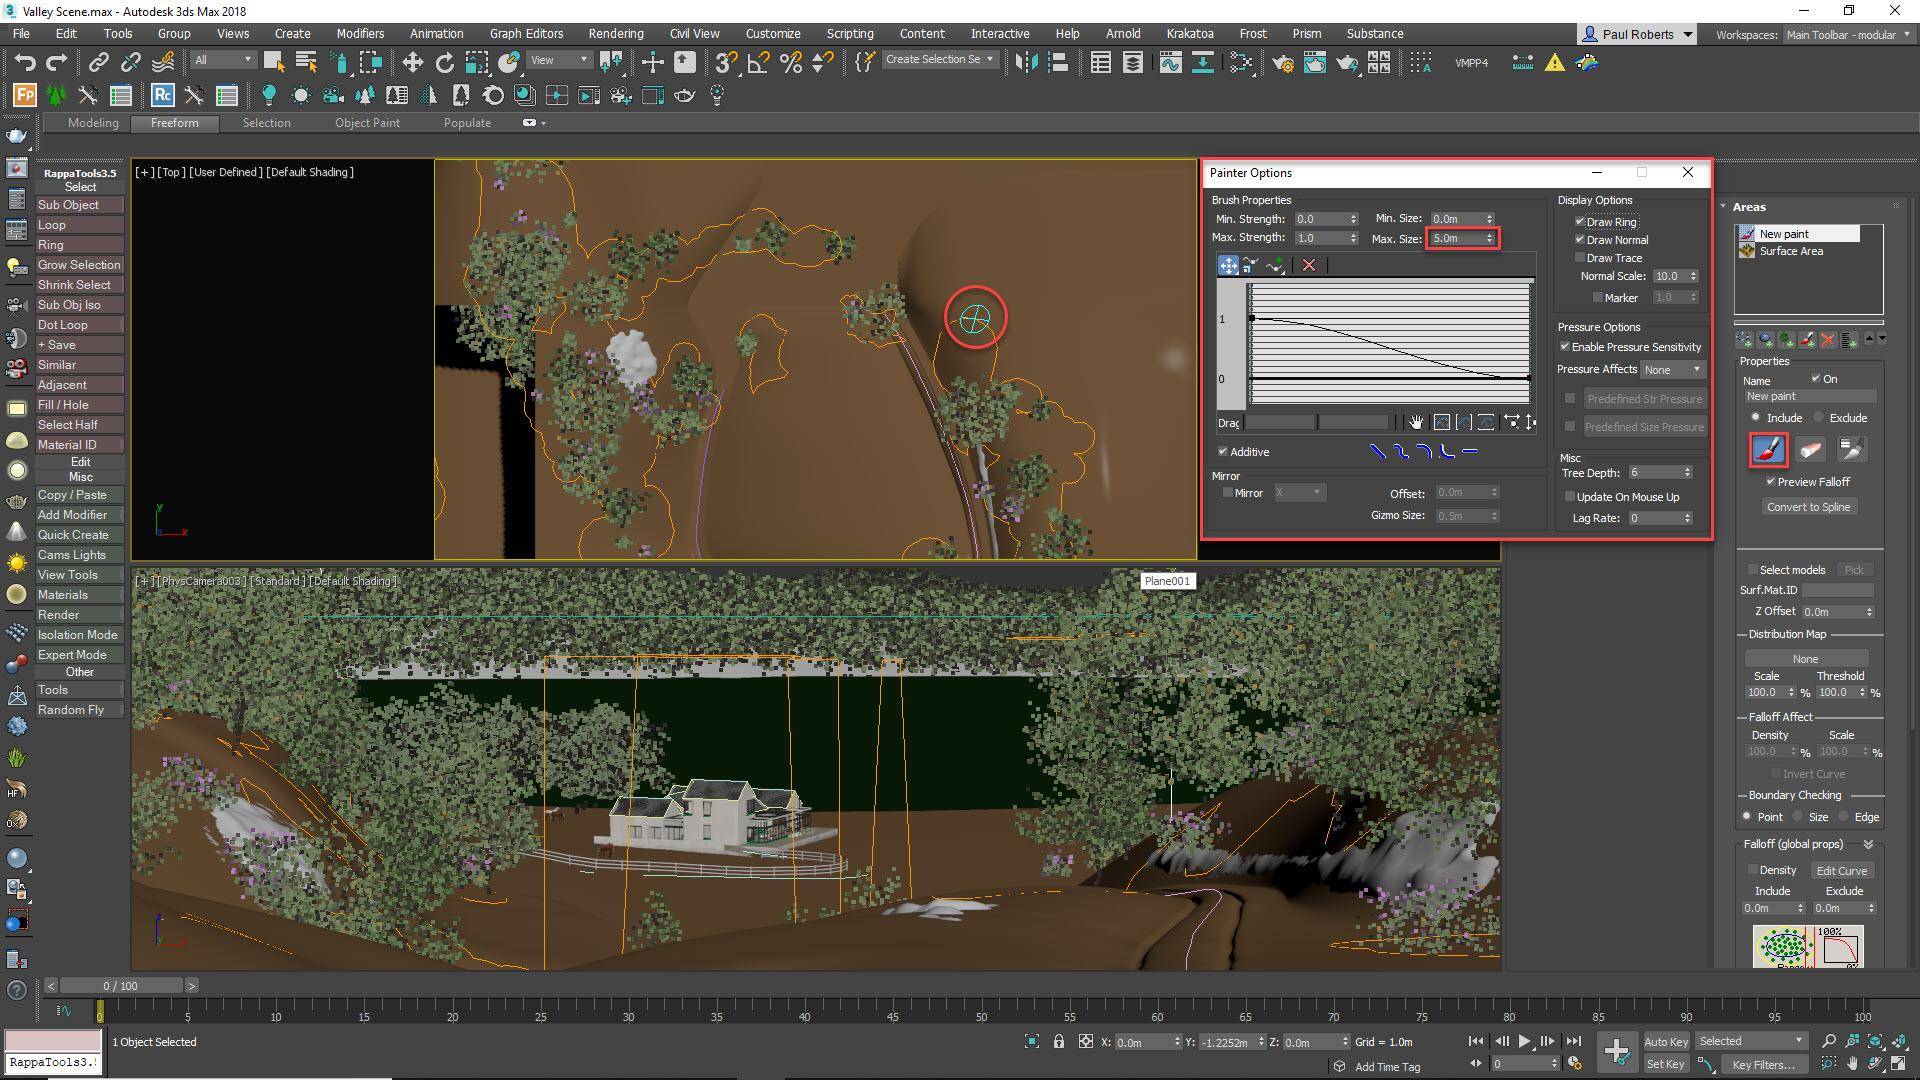
For more precise control and flexibility, we’ll create a separate Forest Pack object for the foreground and midground trees. Add the terrain meshes to the Surfaces rollout and Disable Surfaces in the Areas rollout. This will hide all the trees so that you can use Paint areas to place them precisely where they are needed. Add a new Paint area and paint the trees onto the surfaces. Pay close attention to the position of the trees from the camera’s perspective, they are important for framing the view of the house.
16 - Randomise Rotation And Scale
 To disguise the fact that we are reusing the same one or two models, go to the Transform rollout and enable Randomise Rotation and Scale. The default settings are fine for most situations, but you may want to experiment by editing the minimum and maximum scale and the XY rotation values. Randomising transforms is an essential step to create variation for nearly every vegetation scatter, so make sure you turn on these settings for all of the Forest Objects you create during this tutorial. If you load a preset (rather than a 3d model) from the library, then these values will already be set for you.
17 - Add Bushes
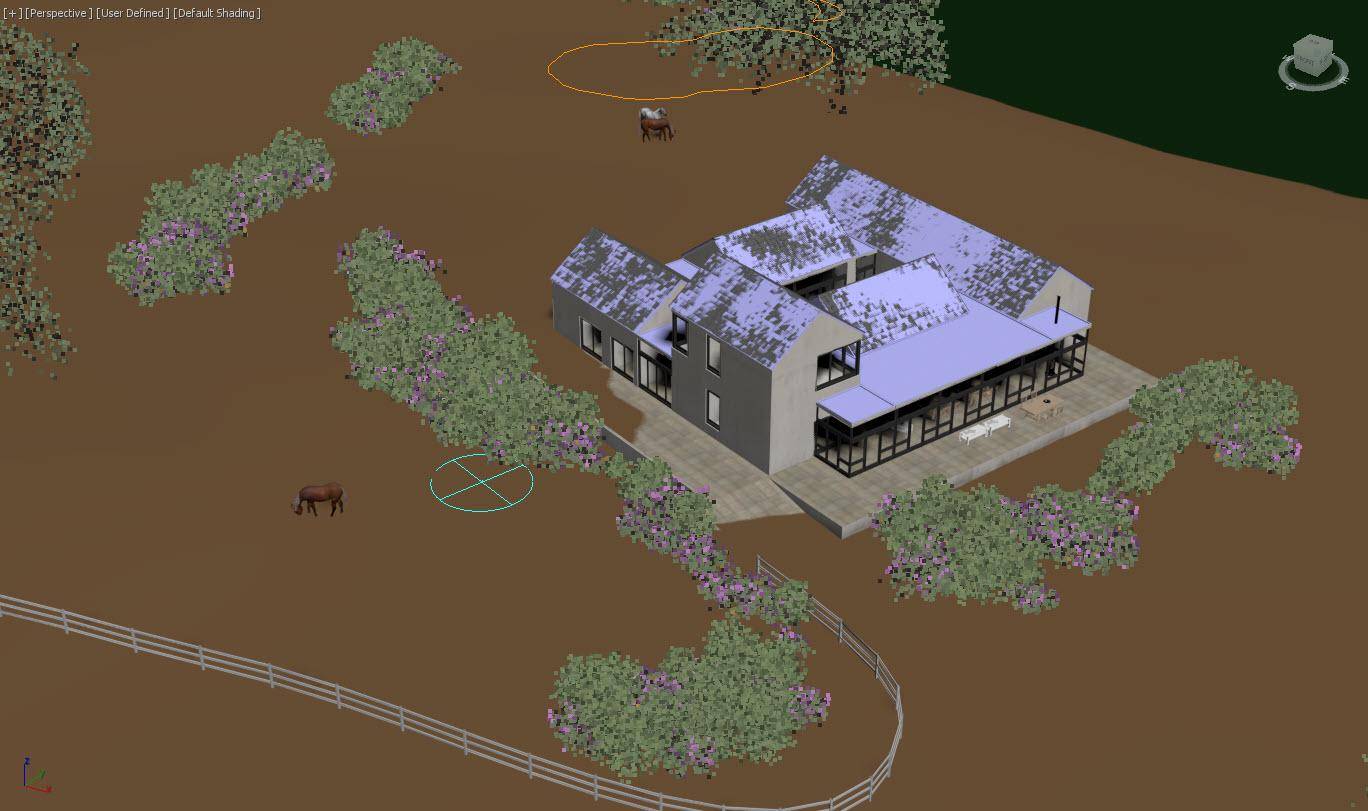
Next we’ll use the same technique to add bushes in the foreground, around the house, and along the tree line in the background. Create a new Forest Pack object and either pick some bushes from the library, use 3rd party models imported into the scene, or a combination of the two. Add the terrain models to the Surfaces list, turn Surfaces off from the Areas view and use the Paint tools to draw bushes around the house and framing the view in the foreground. If the bushes are too large and obscuring the architecture, you can easily edit the Min and Max Random scale values to reduce the size.
18 - Edit Individual Items
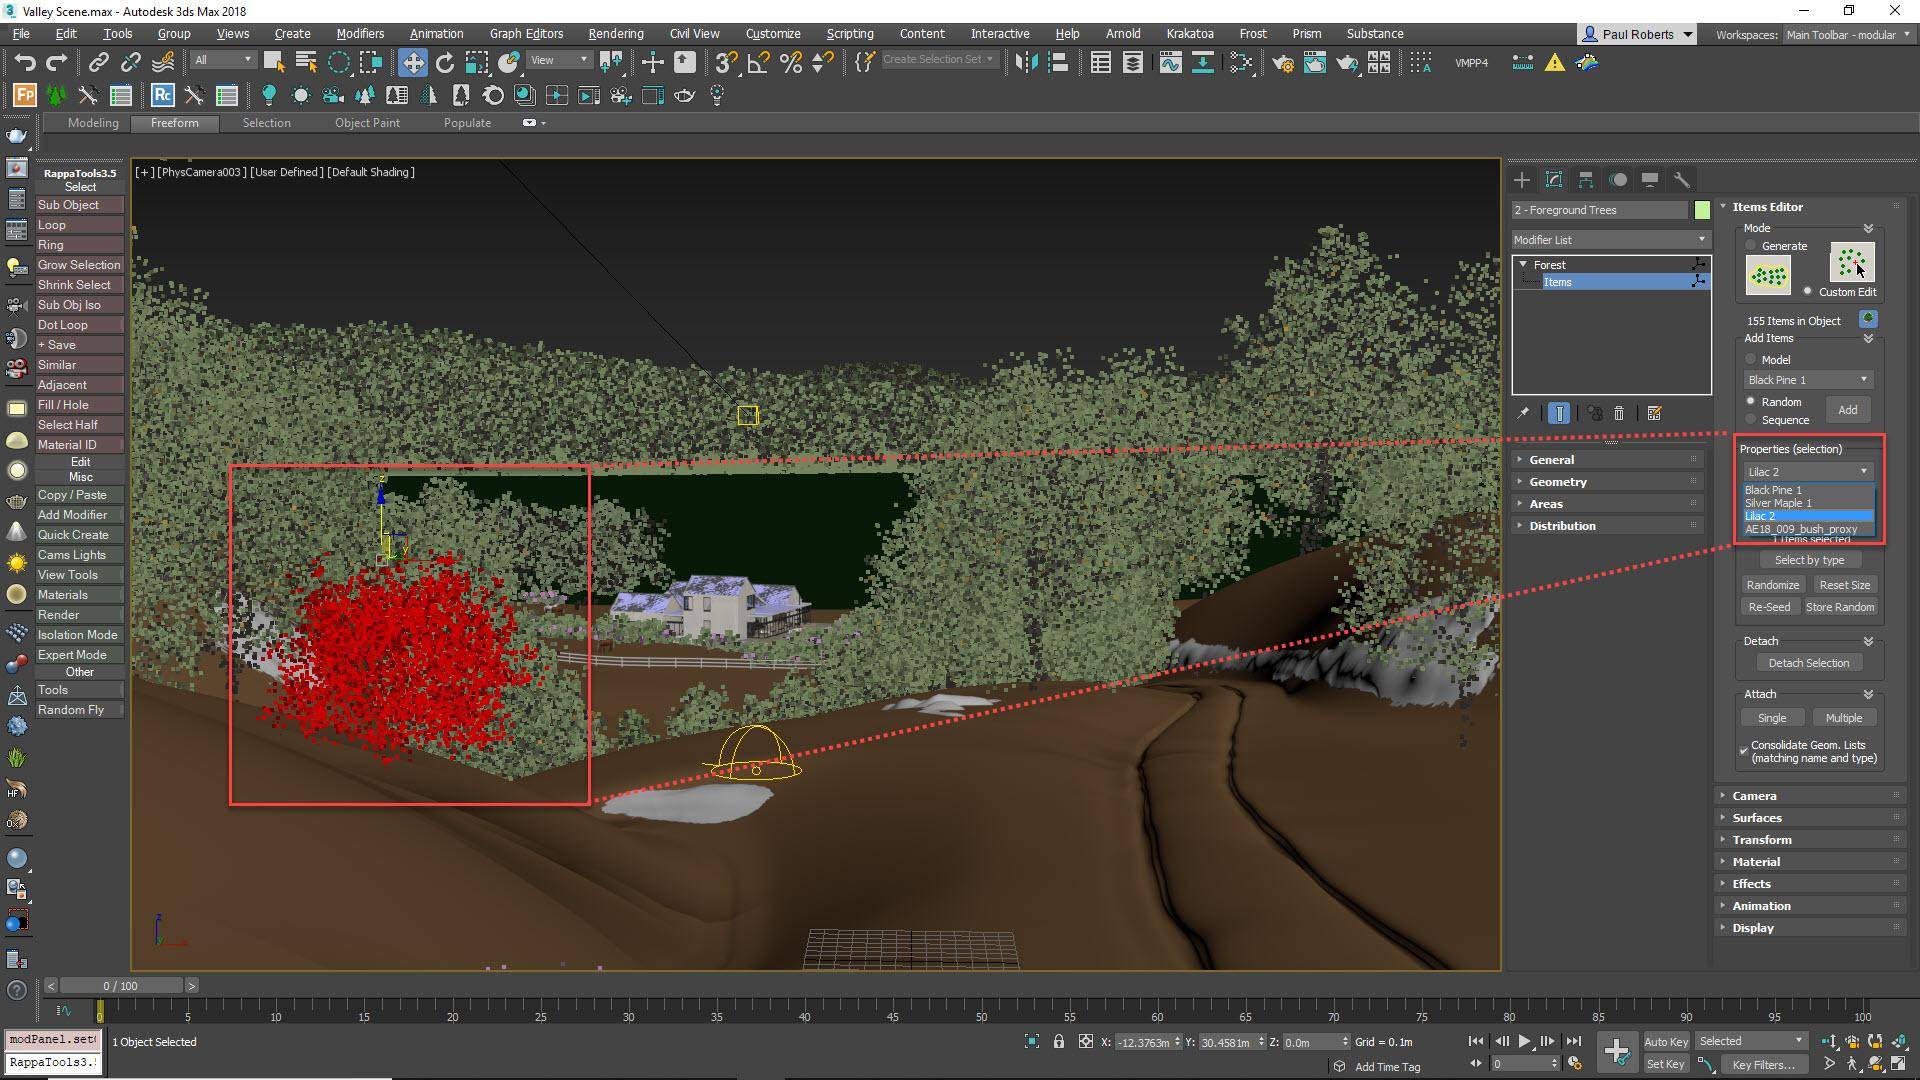
No matter how carefully you paint your trees and bushes, there comes a point when you need to tweak the composition by editing individual items. Go to the Items Editor rollout and change the mode to Custom Edit. You can now move, rotate and scale individual items, for example, to make final adjustments and make sure the view of the house is framed correctly. You can also change the model used for each item to perfect the composition. For example, I ended up using only a single lilac bush in the foreground, to avoid the bright colour stealing focus from the house.
19 - Using Clustering Mode
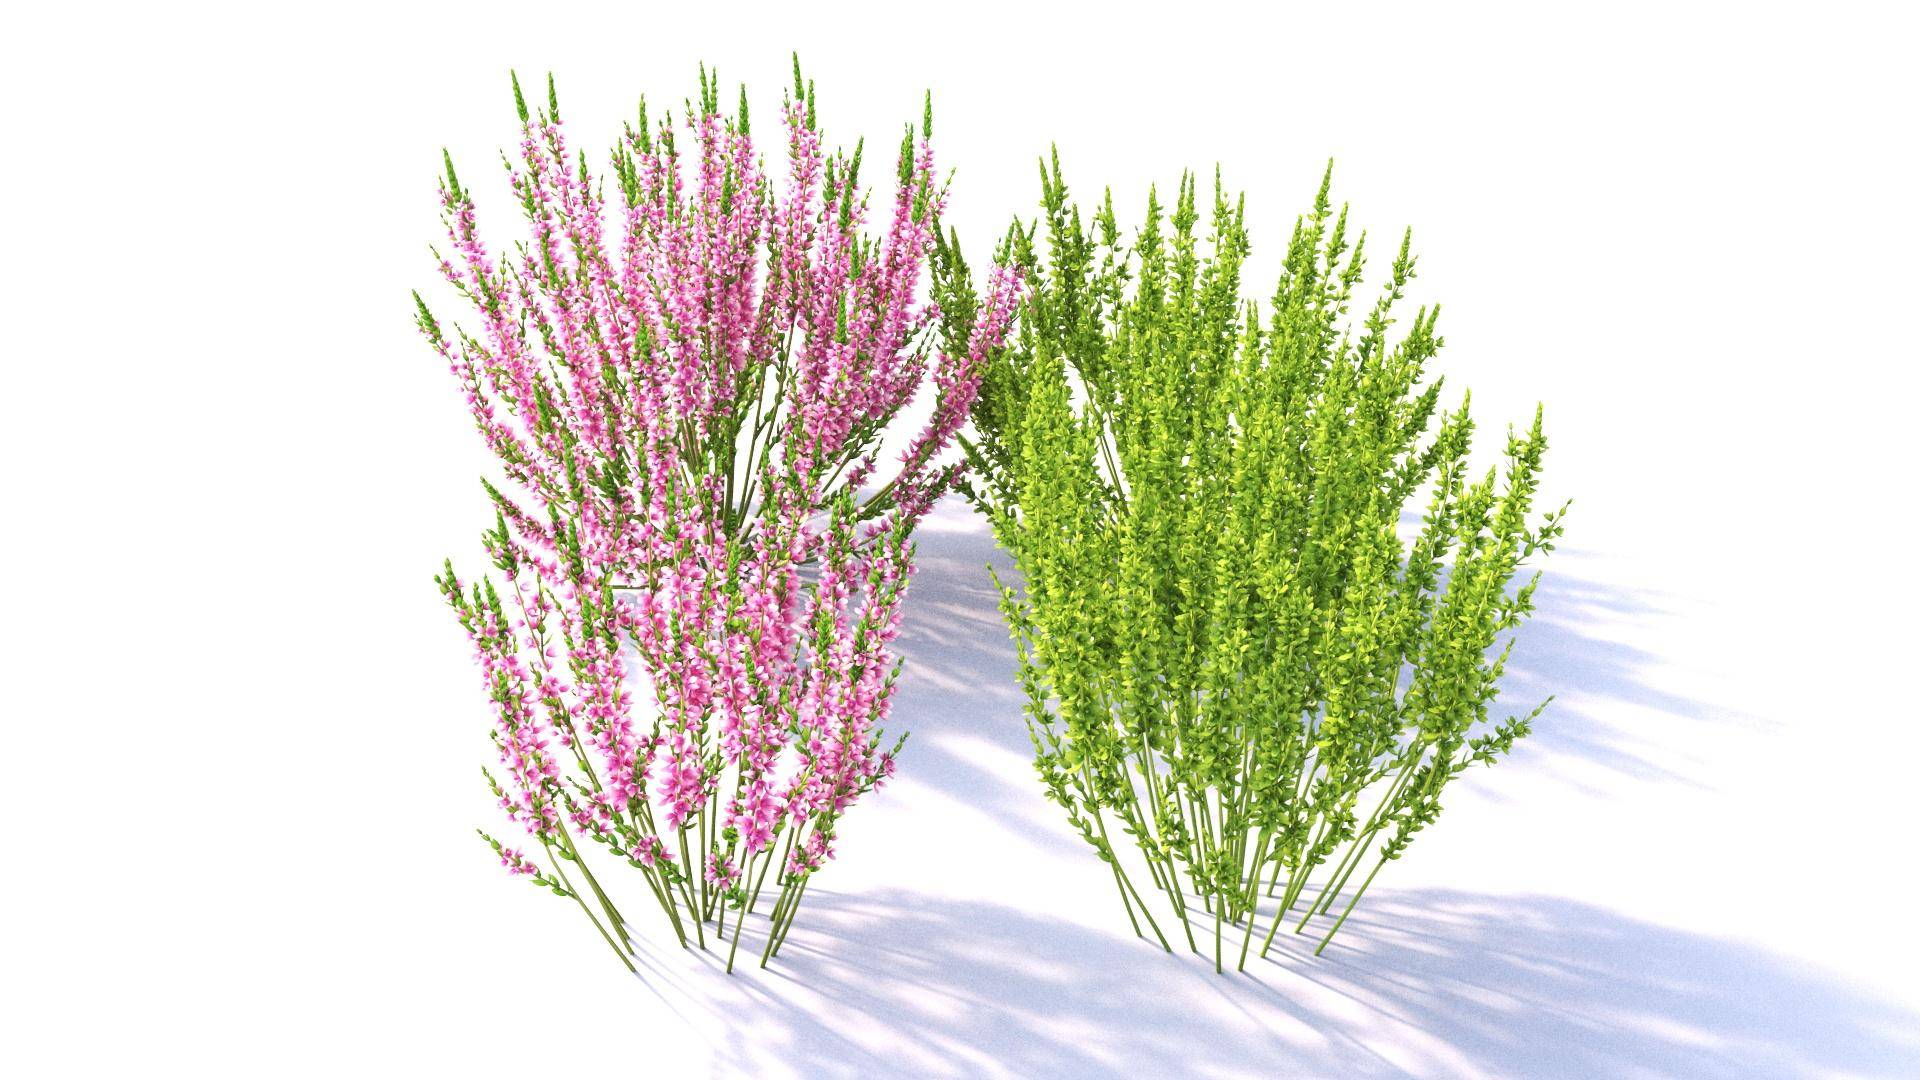
As they are also important compositional elements, the painting technique is used to carefully position the heather. These plants don’t flower all at the same time, so I used a couple of models, one in bloom, and the other mostly still green. Instead of randomly scattering these which would create unpleasant visual noise, it’s more realistic to create small groups of the same type of plant. This simulates the growth patterns found in nature caused either by the propagation habits of plants, or the way in which soil and environmental conditions can affect their growth rate. Forest Pack’s Clustering featuring simulates this effect.
20 - Grouping Heather
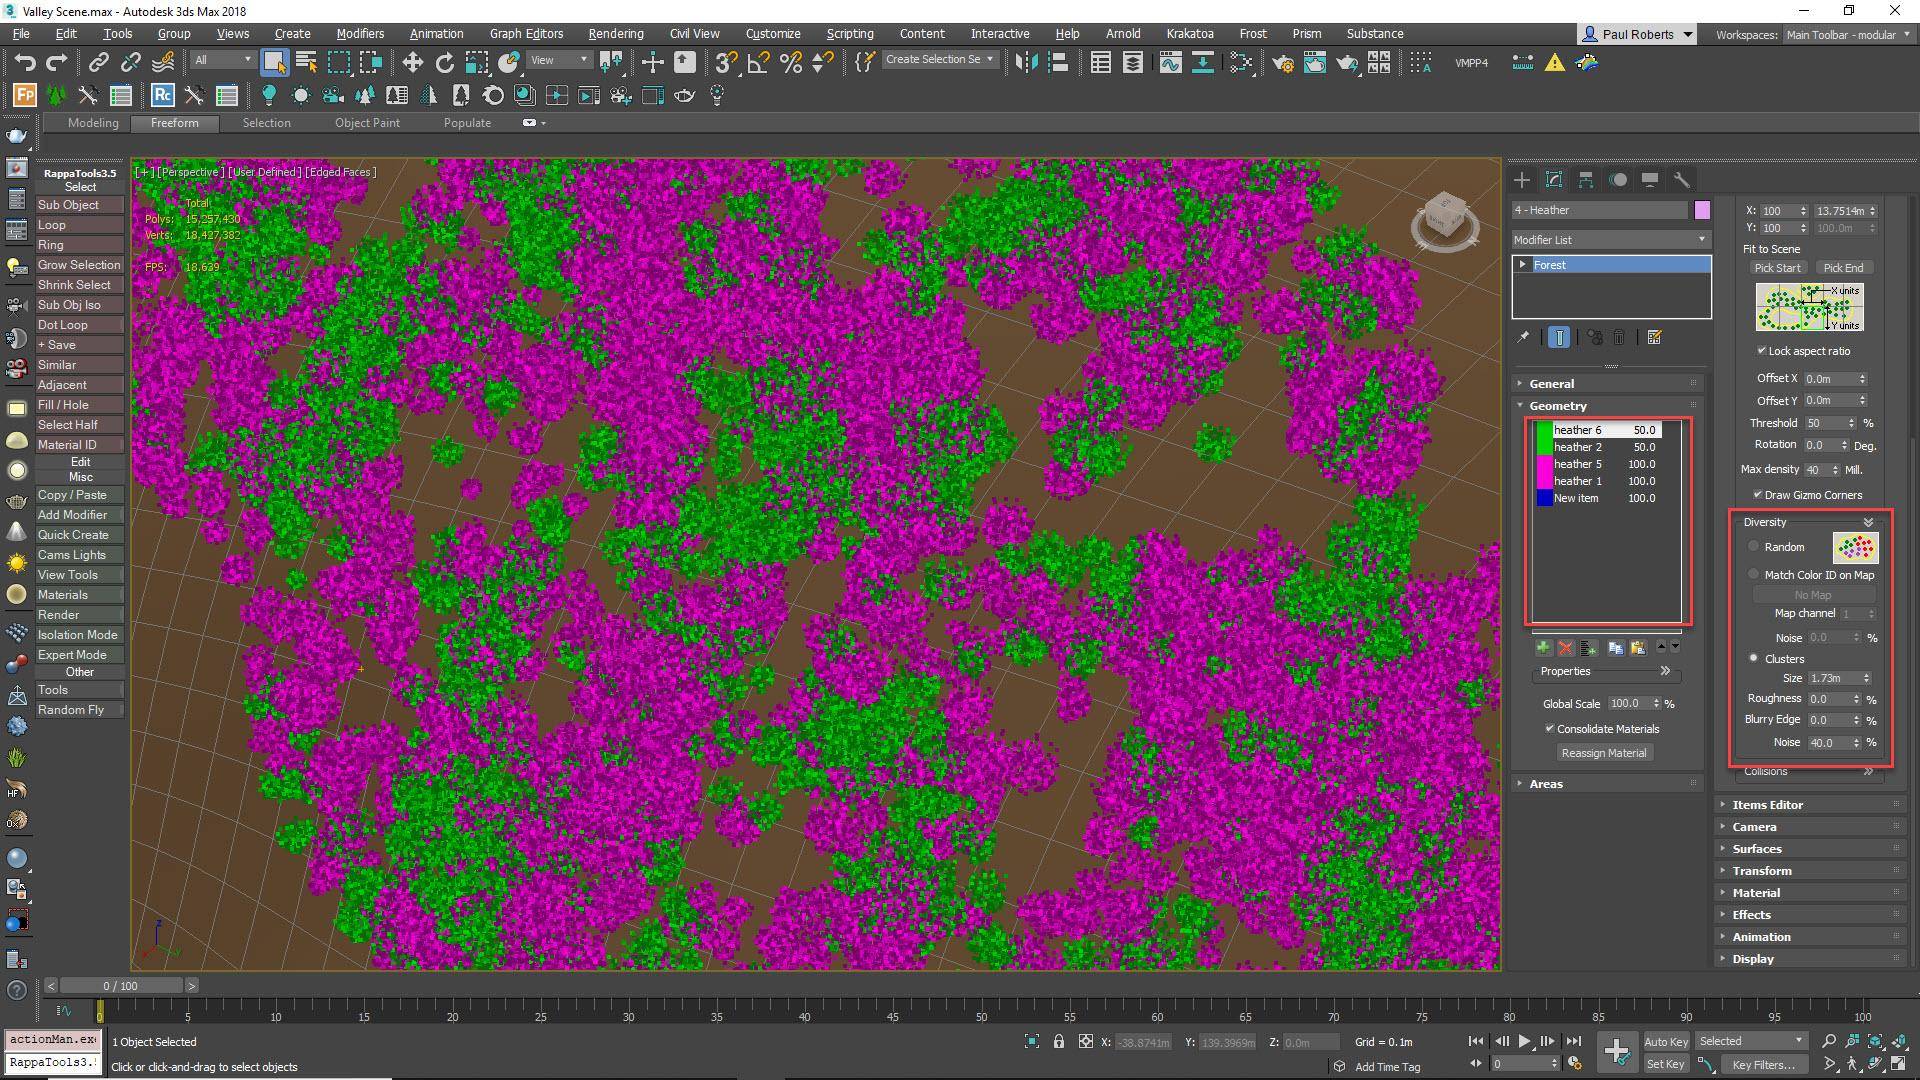
To use Clusters, first group together plants by assigning them the same Colour ID in the Geometry rollout. Next, go to the Distribution rollout and change the Diversity Mode to Clusters. You can now use the Size parameter to set the size of the clusters, Roughness to change the shape of the clusters, Blurry Edge to gradually dissolve between adjacent clusters instead of seeing a hard border, and Noise to introduce random plants. An item’s probability values also affect the proportions of clusters, and adding disabled items in a separate cluster is a great trick for introducing gaps to the distribution for another layer of randomisation.
21 - Add Bracken And Dead Plants
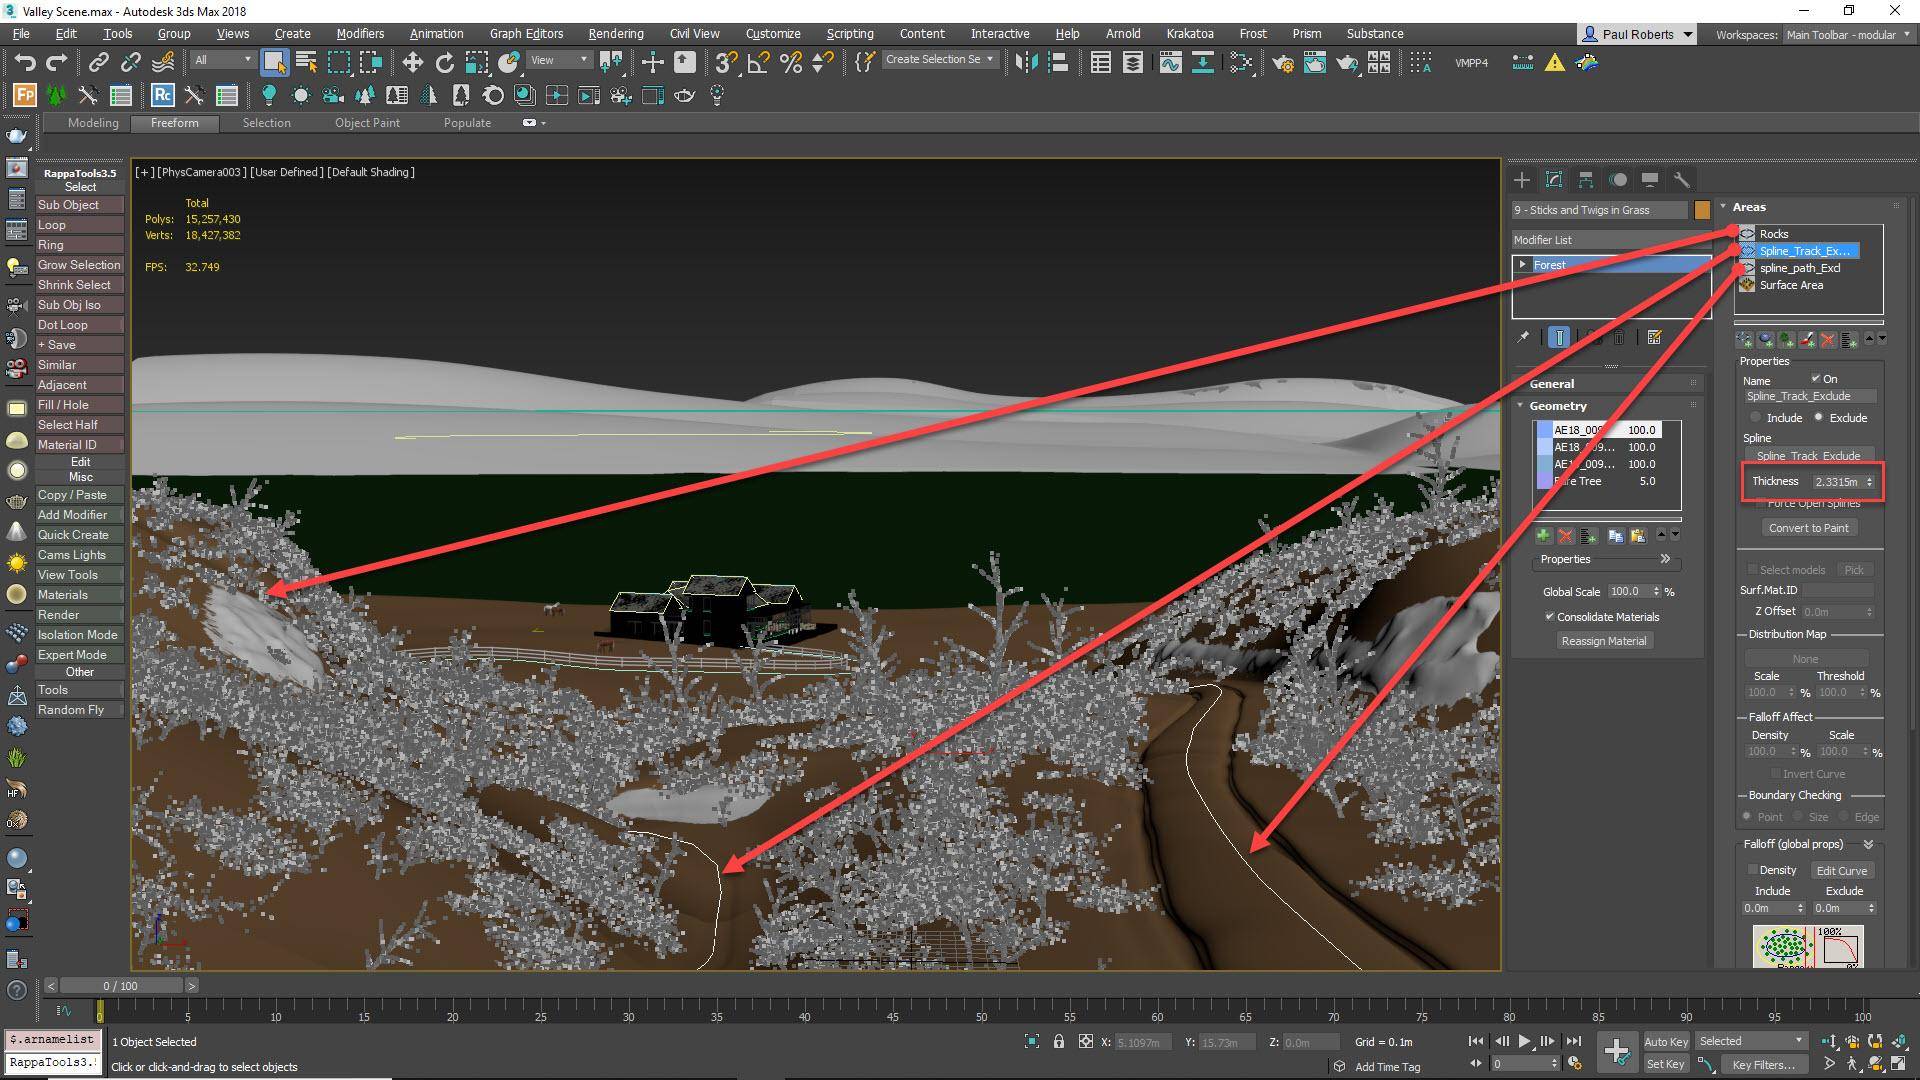
To add bracken and dead plants to the foreground, use a high level of scale randomisation for maximum variation. In the final render a minimum value of 50% and maximum of 150% was used. A patchy distribution map was used to create clusters of dead plants instead of an even distribution. Most importantly, these plants would have been cleared from the paths, so add the splines that follow the centre of the paths to the Areas list. Change the mode to Exclude and increase the Thickness values until the paths are clear. Add the spline created earlier using the boolean technique as an exclude area to remove items from the rocks.
22 - Forest Object can exclude Forest Objects
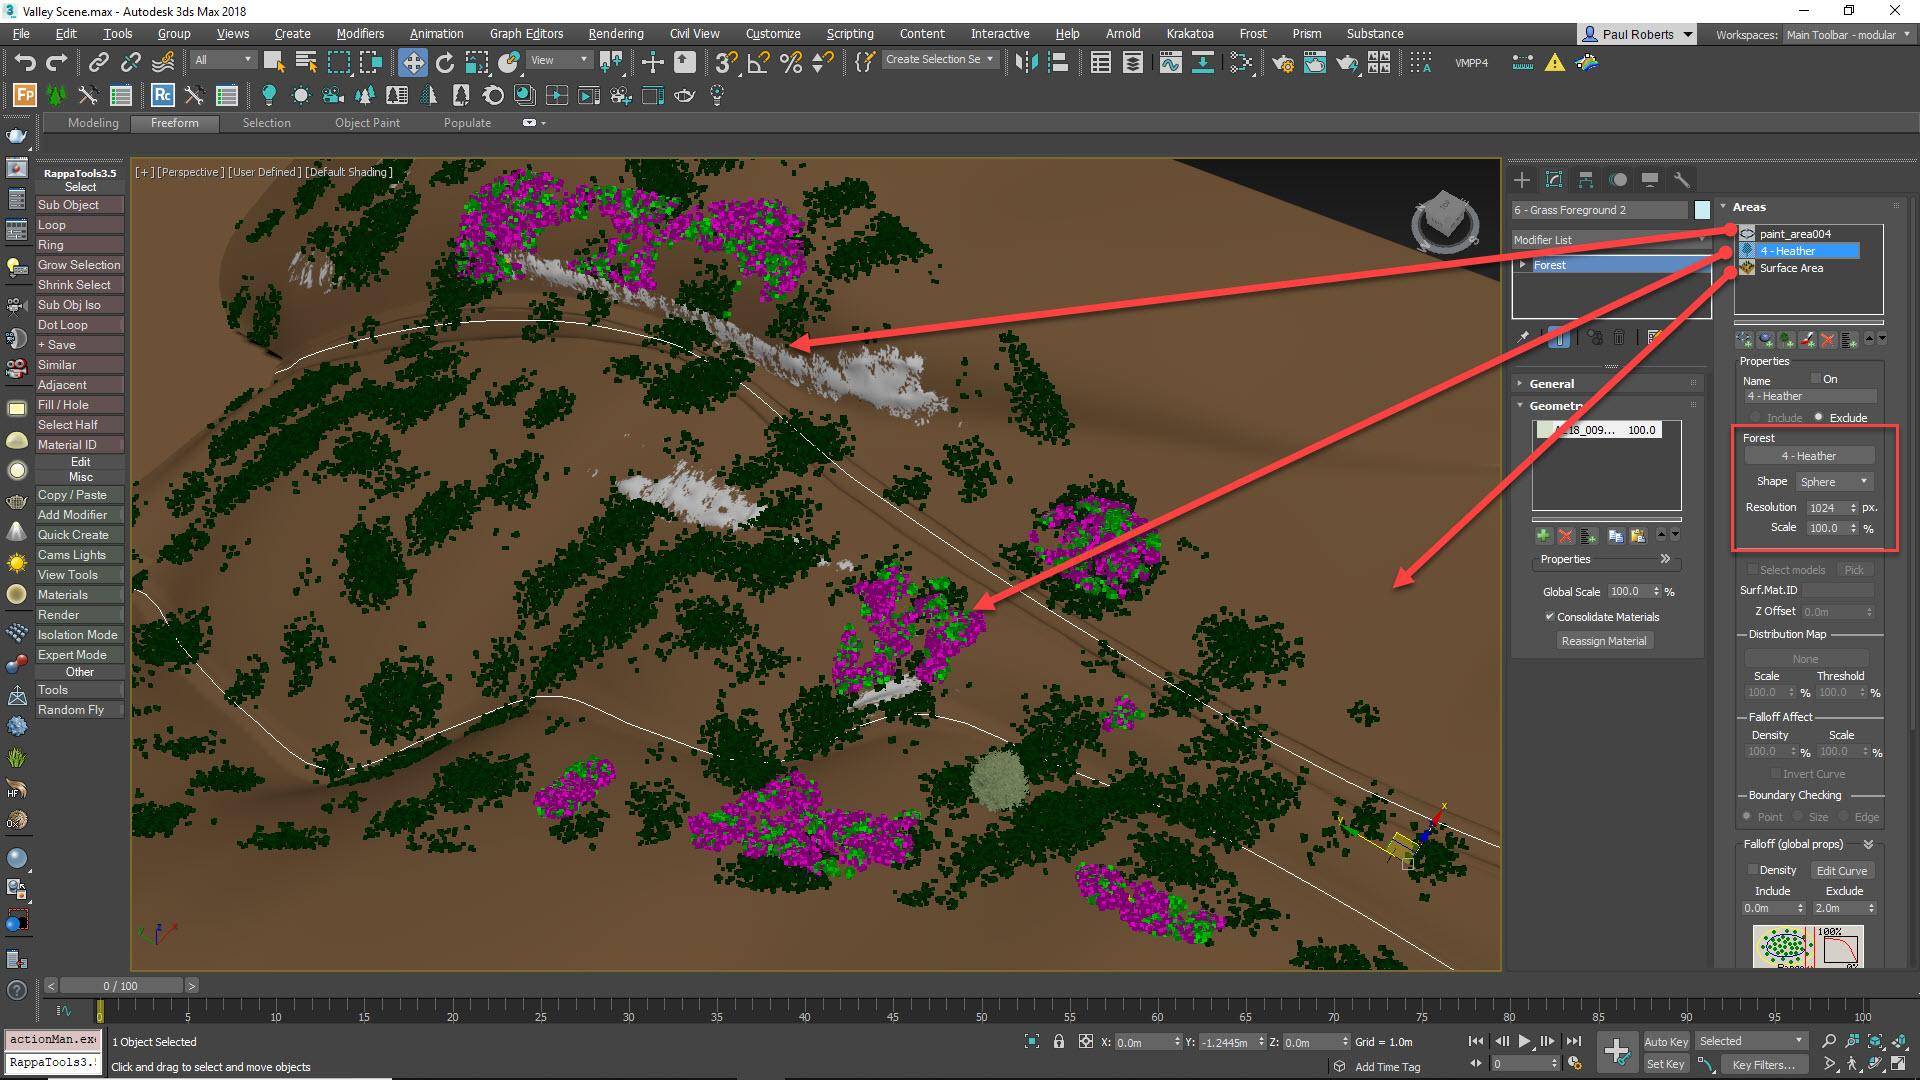
The key to believable ground cover is to use several layers of plant types. So we’ll add another species of tall grass in the foreground, but we don’t want it growing on the same area of land as the heather. Fortunately there’s an easy solution. Create a new plant layer on the terrain using a Patches distribution map. In the Areas rollout, add a new Forest area and pick the heather Forest Pack object. The grass will now be removed from all the areas where the heather grows. This is a live link, so if you adjust the heather layer, the grass also updates automatically.
23 - Remove Objects From The Path
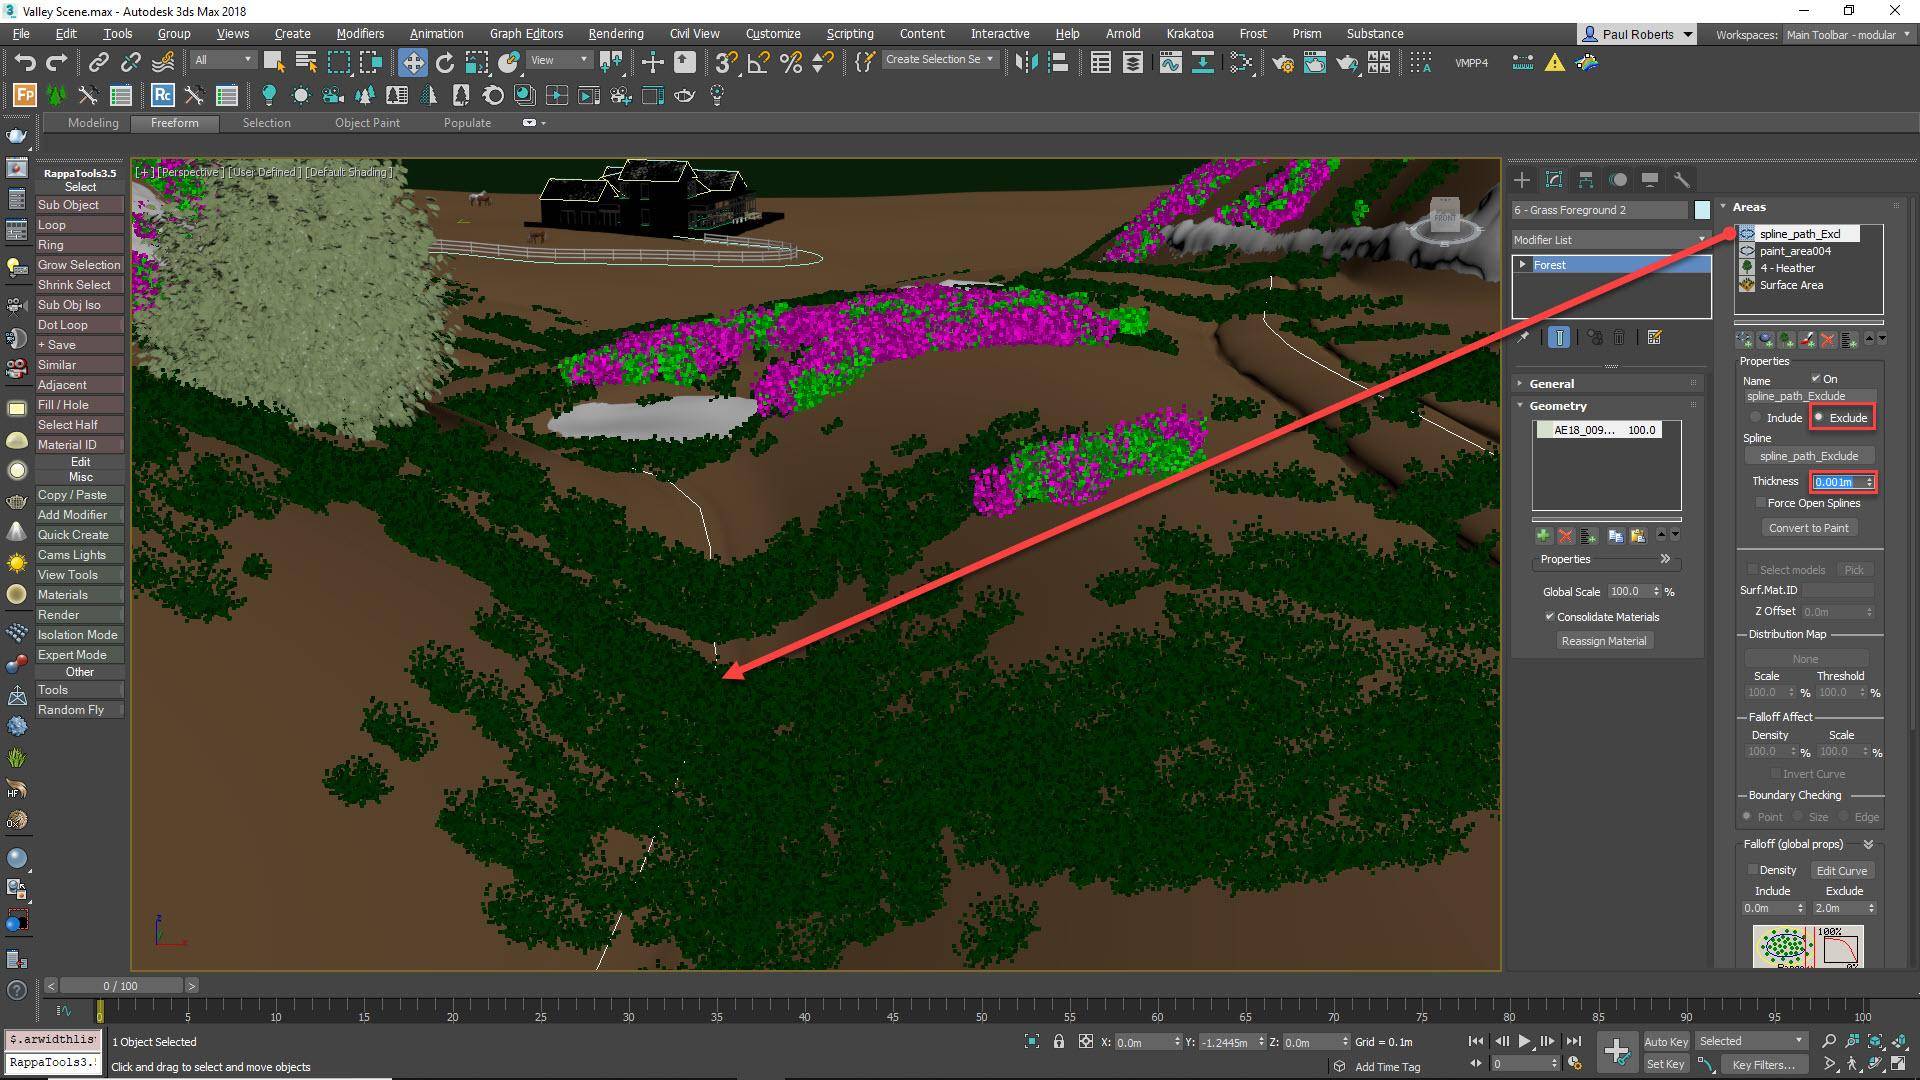
To remove grass from the pathways, add to the Areas list the splines from the centre of the path that we created earlier and change the mode to Exclude. Instead of using the Thickness parameter, this time we will use Falloff Curves to remove the plants from the path. This technique gives us much more control over the Scale and Size of the plants. To minimise the effect of the spline’s thickness so that all the work is being done by the falloff feature, reduce the size to something very small like 1mm.
24 - Using Falloff Curves
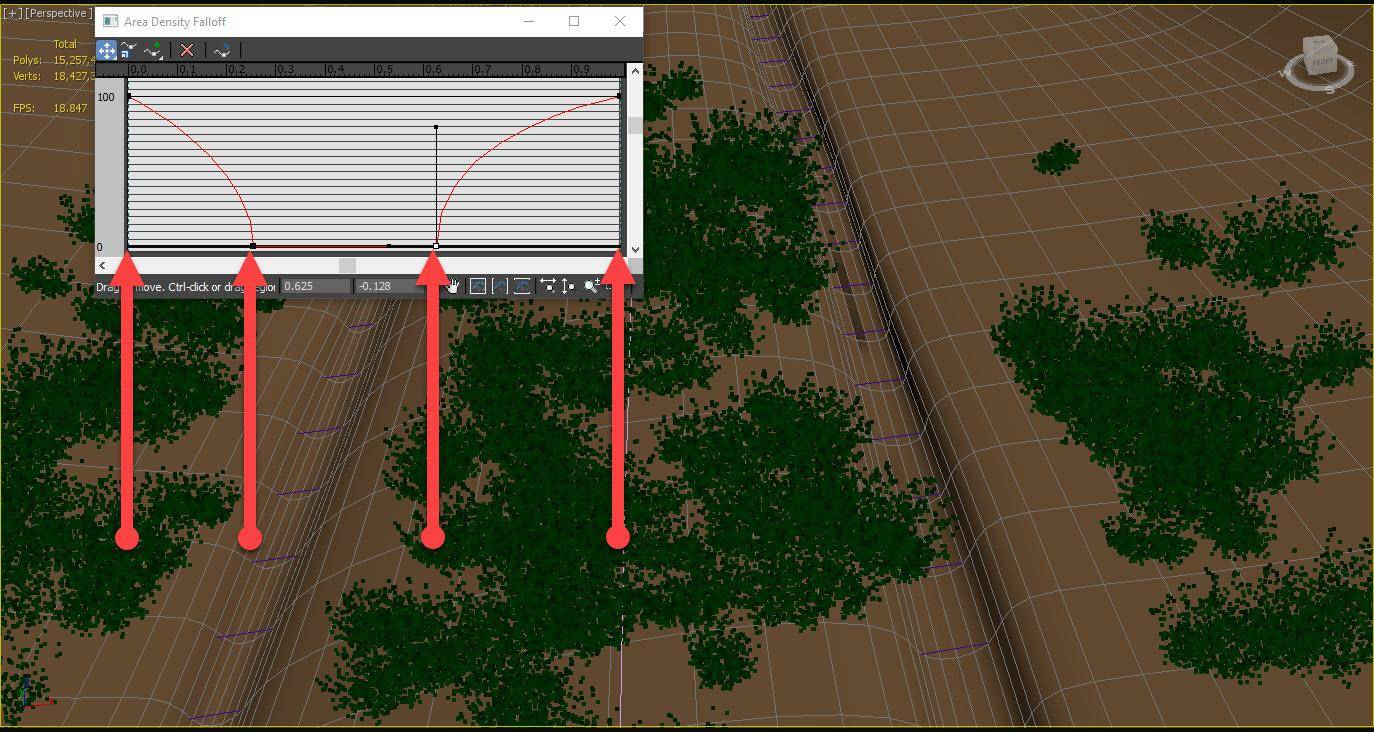
Enable Density Falloff and increase the Exclude size so that it is roughly half the width of your largest path. Click Edit Curve to bring up the falloff graph. On the X Axis, the start represents the outside of the path and the end represents the centre of the path. Therefore, to create a distribution that removes plants in two strips either side of the path’s centre, you would create a graph that peaks at 100% at both ends and dips to 0% in the middle. For the narrower path, you can reduce the Exclude effect by reducing the area’s Falloff Affect property.
25 - Use Forest Objects As An Include Area
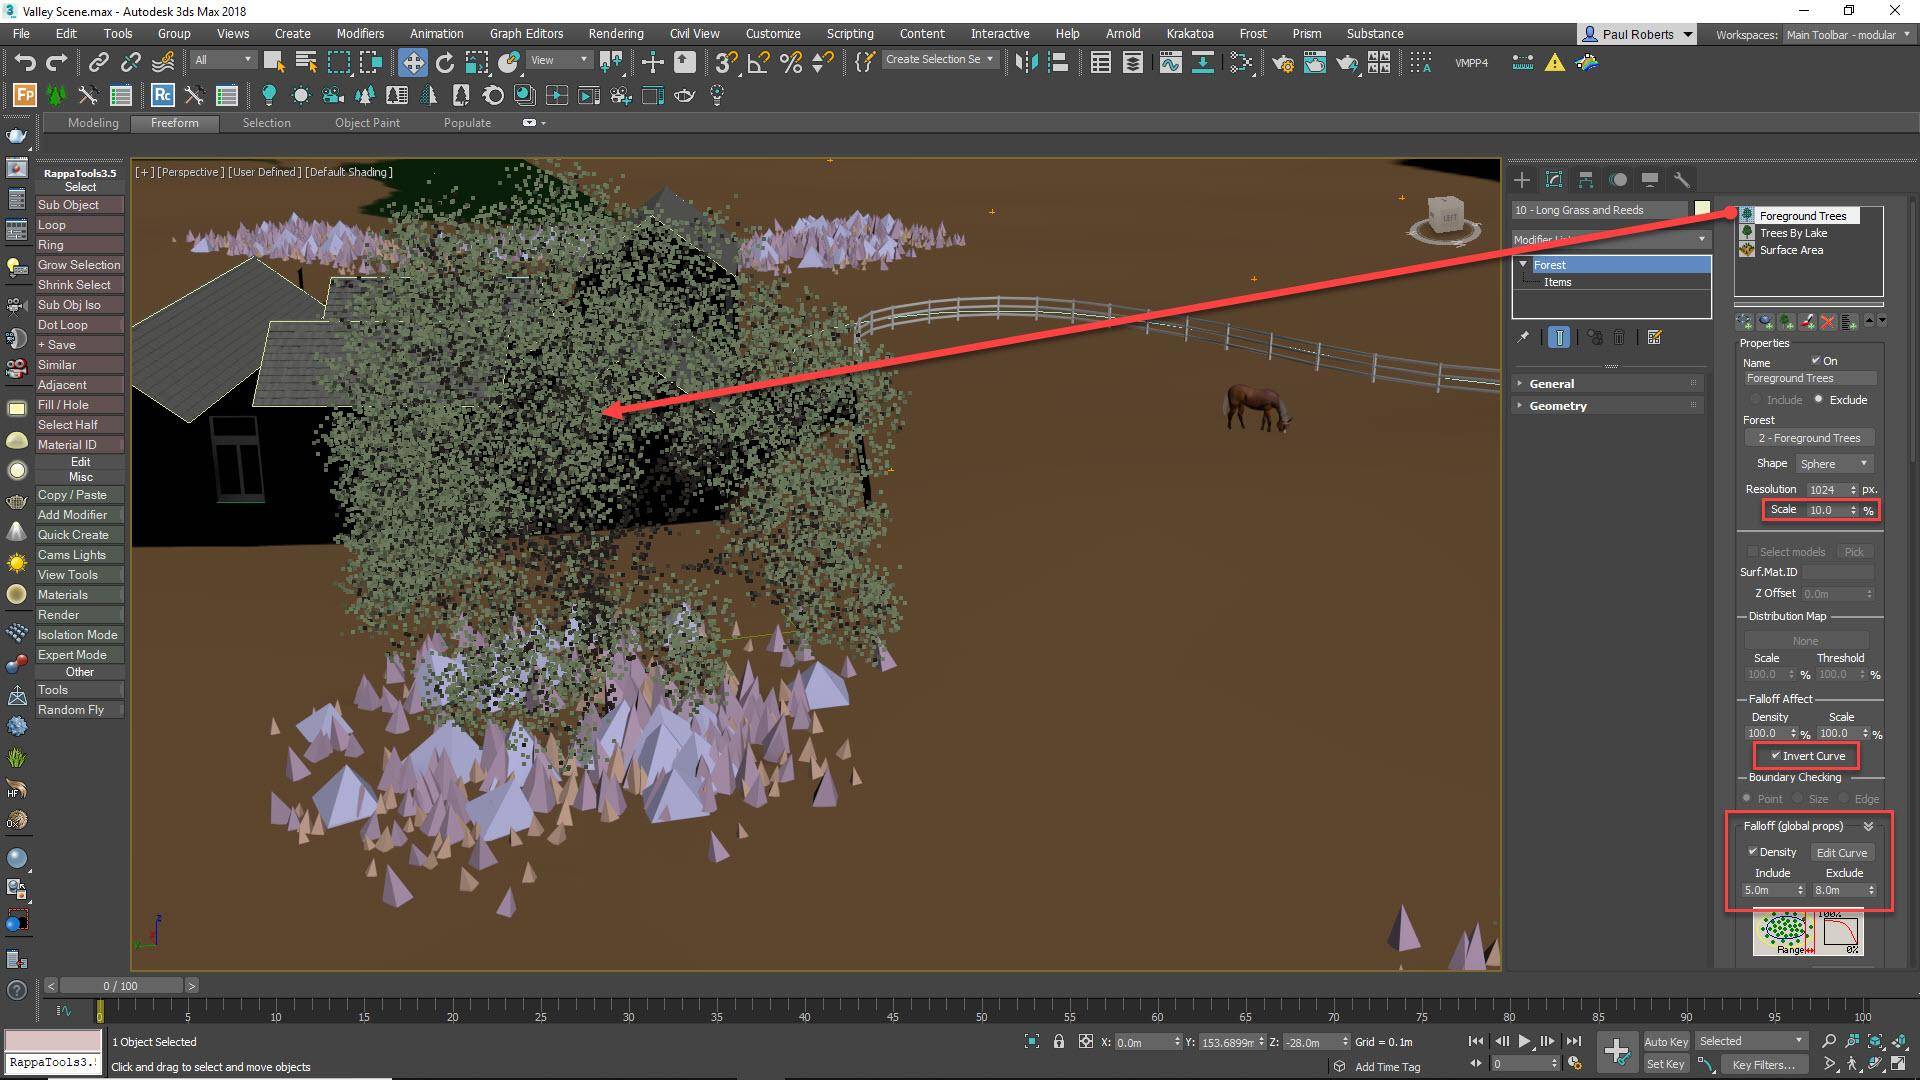
It’s possible to use another Forest Pack object as an include area, even though that option is greyed out. To illustrate this, we’ll add tall grass and weeds under the trees. Start in the usual way by assigning the terrain as a Surface, then add a new Forest Area to the Areas List. Add a Density and optionally a Scale falloff value. At this point there will be plants everywhere except under the trees. To fix this all you need to do is enable the Invert Curve checkbox. To bring the grass closer to the trunk of the tree Reduce the Area’s Scale percentage value.
26 - Filling the landscape
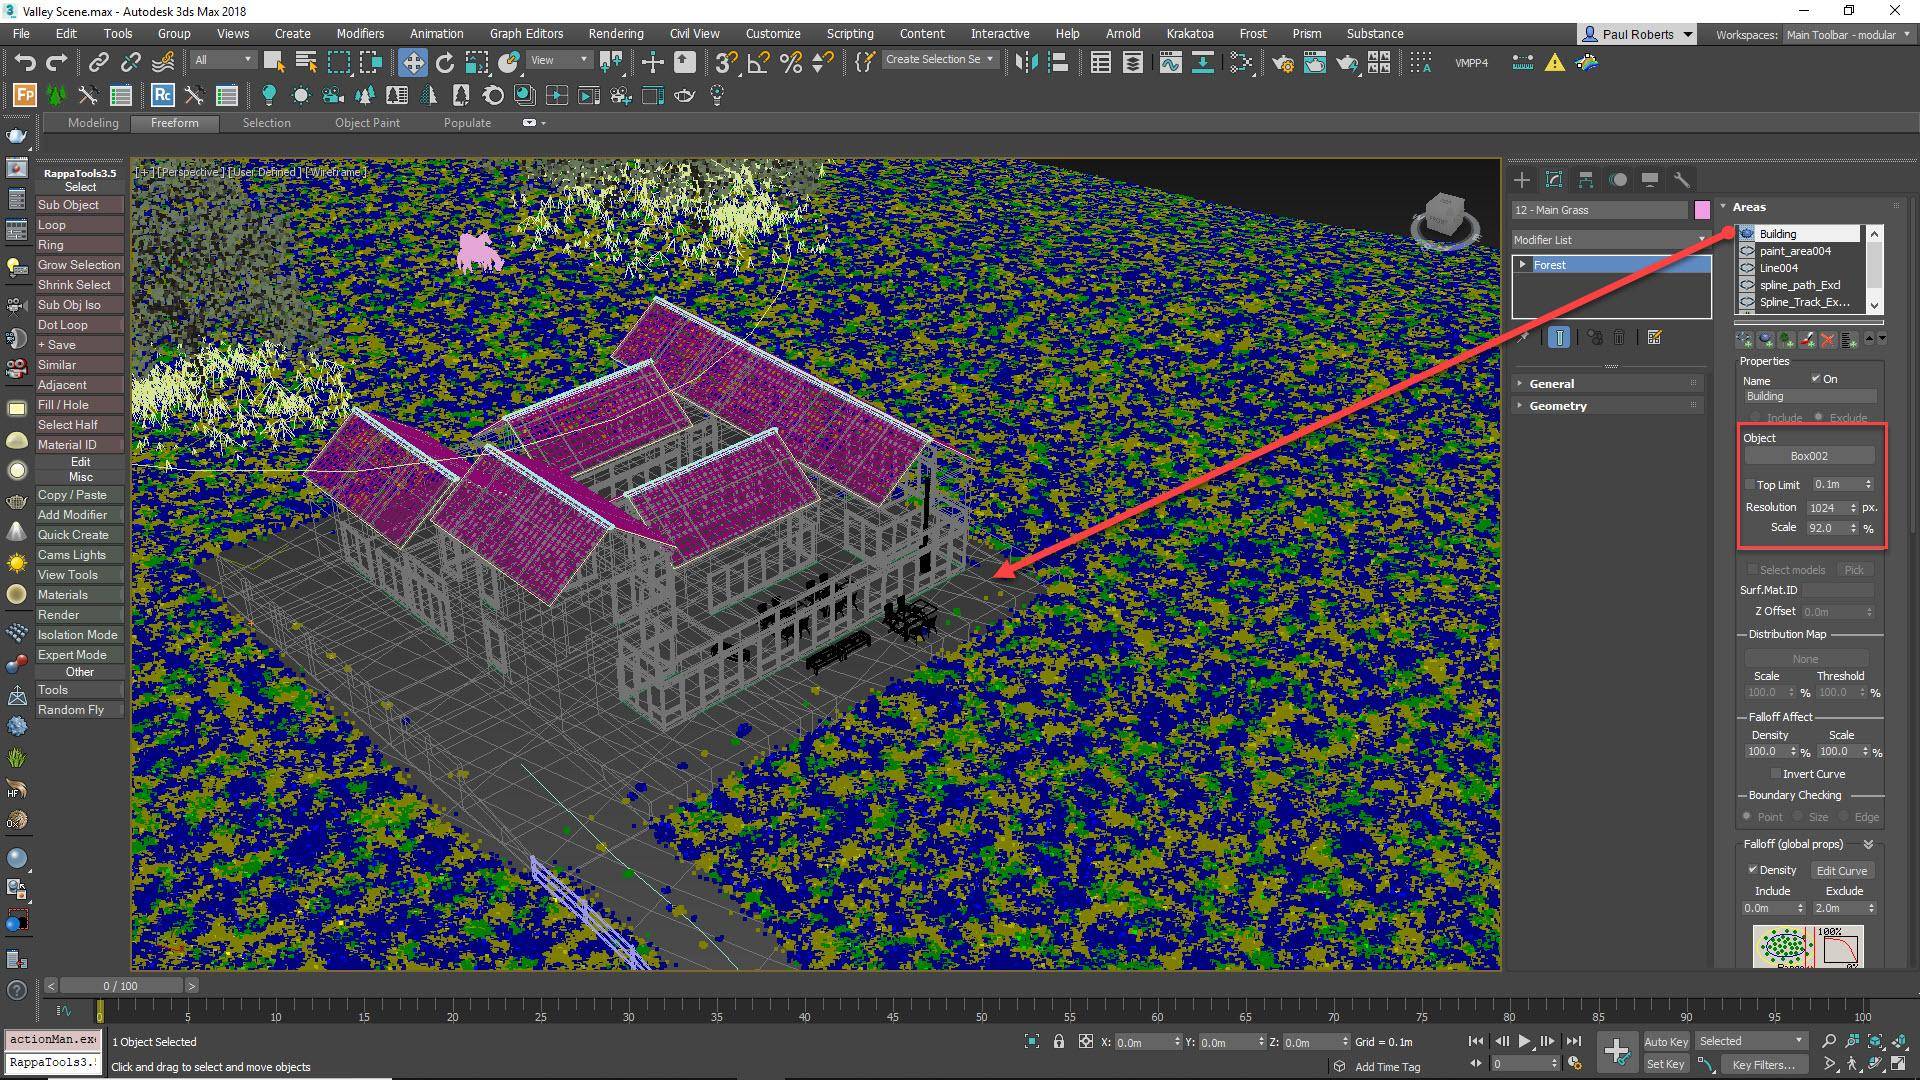
The library contains two types of grass presets: Large and Detail. Large presets contain 50cm to 1m patches of plants that are designed for filling big areas. Pick a couple of these to fill the remaining uncovered midground and foreground. Add the building as a Mesh Exclude area so that grass does not grow on its interior. Make sure you exclude items completely from the rocks and the path, the patches are too large to use the falloff trick we demonstrated in the previous step. Instead we will use a detail preset to add plants back to those areas.
27 - Using Detail Presets
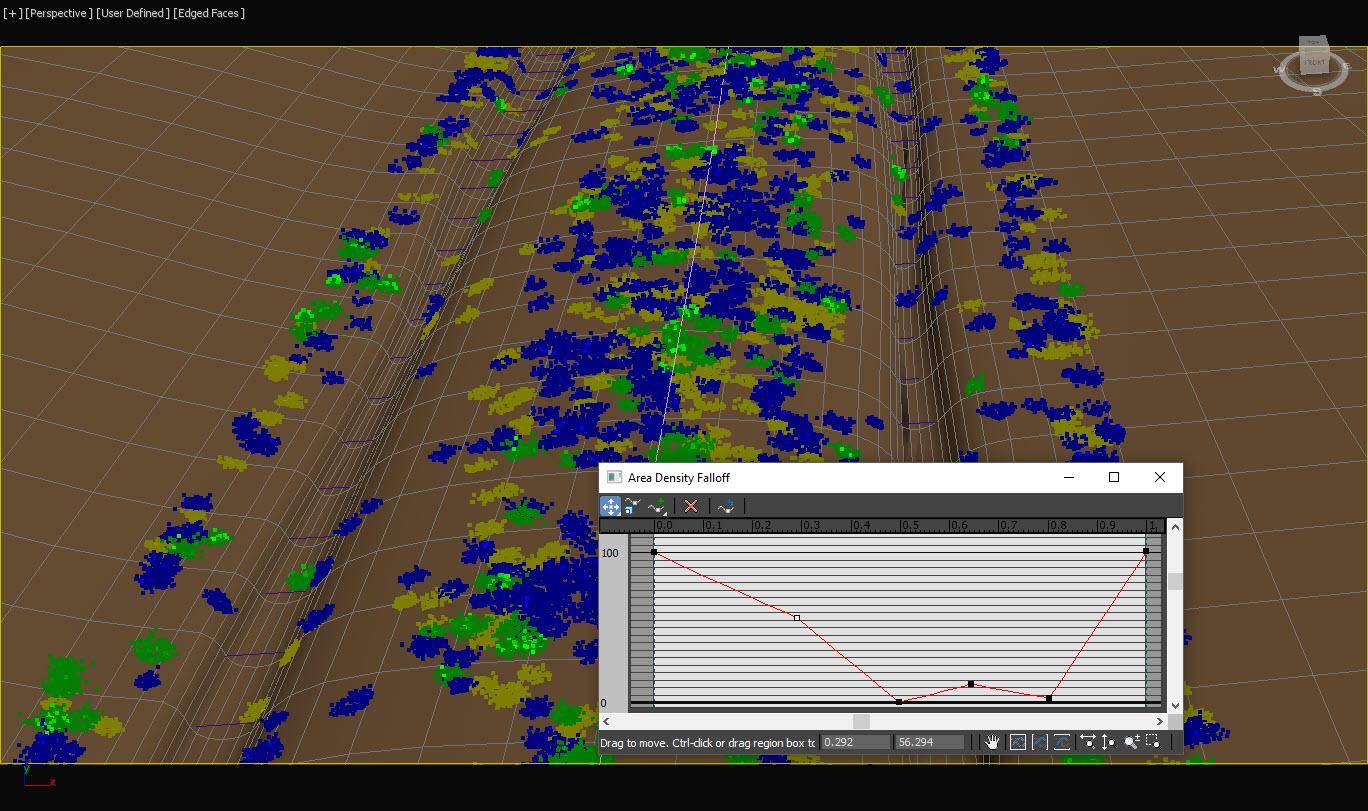
Load the matching detail presets to add grass to the middle of the paths. These presets contain individual plants, so they’re ideal where intricate detail and control is needed. Add the terrain and the footpath’s splines as Include areas and set the Thickness value to match half the width of the widest path. Enable Density Falloff, entering the same value you used for the largest spline thickness for the Include amount. Open the graph editor and edit the curve so that you have plants growing only on the outside and centre of the paths.
28 - Layering presets adds more believable complexity
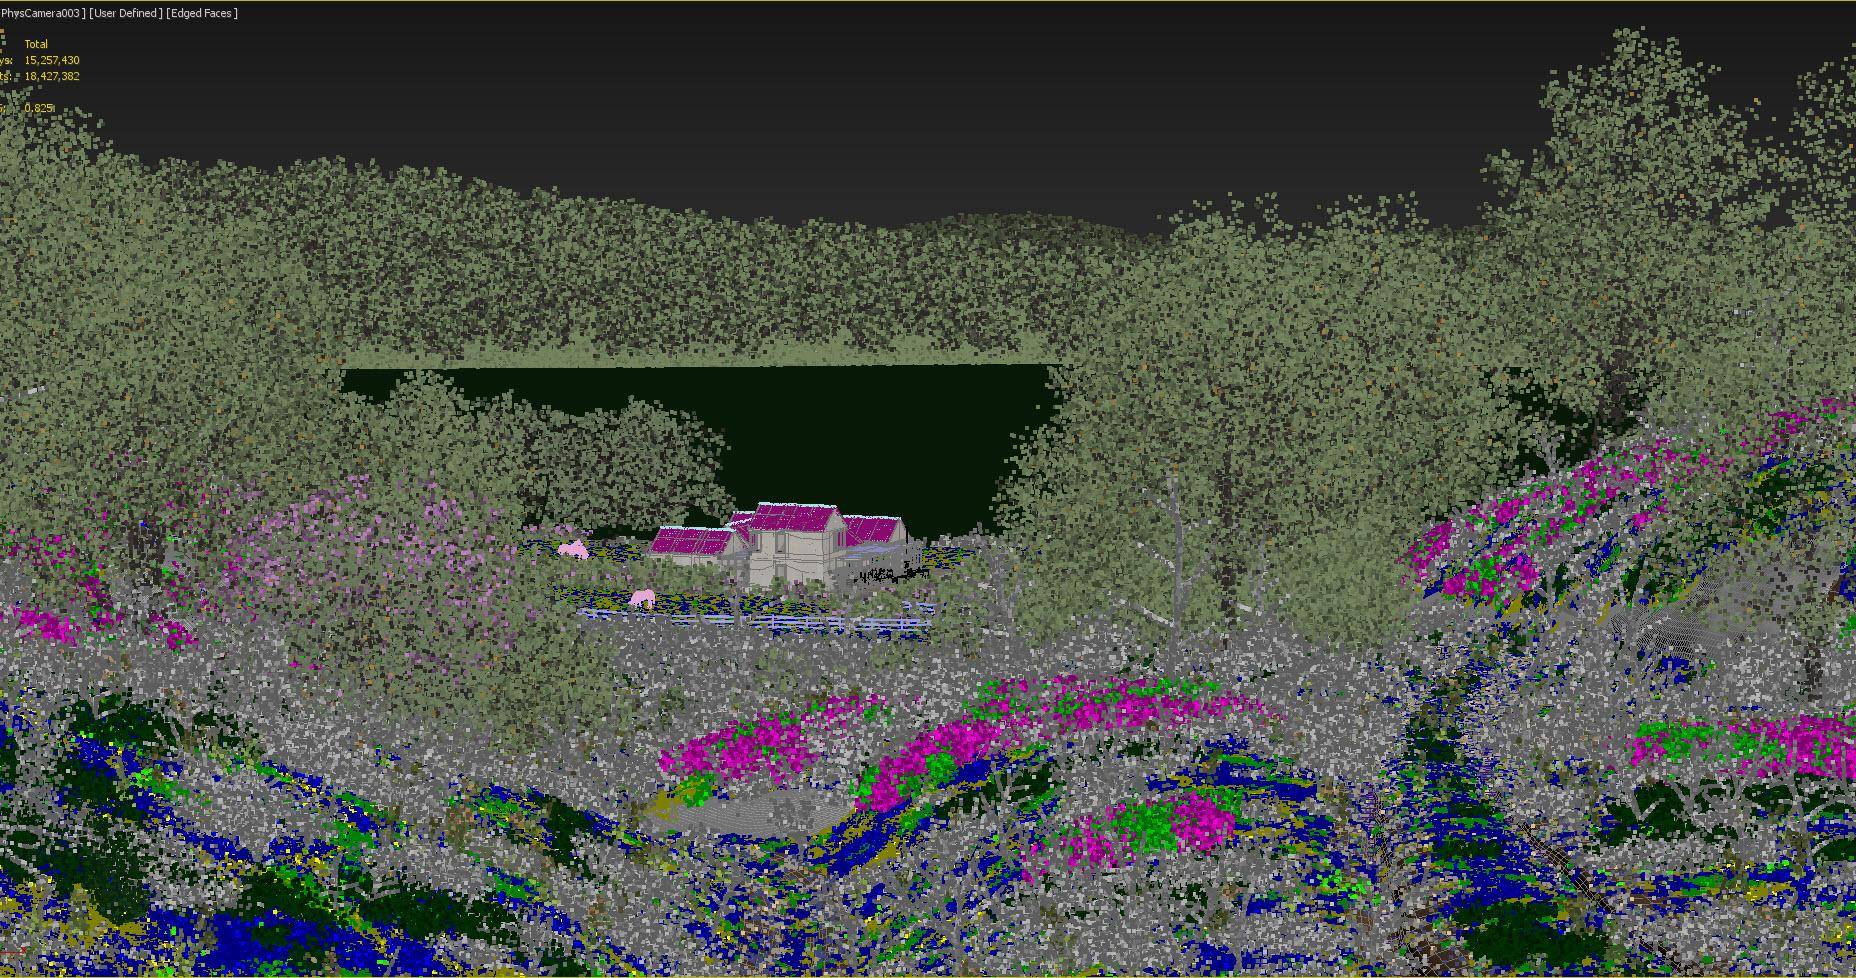
Layering up several interconnected scatters in this way is the key to creating fast believable environments that are easy to art direct. The final scene was created using only the techniques discussed in this tutorial to add background trees, foreground trees, bushes, heather, sticks and bracken, 3 types of grass (each in their own Forest object), small flowers, and finally stones and more grass on the footpaths. Best of all, because all the Forest Pack objects are interconnected, it’s really easy and enjoyable to update and experiment with the scene.
