Tutoriels
Des cours de qualité pour devenir un expert
Fichiers de ressources
Conditions
3DS Max 2010, Forest Pack Lite, RailClone Lite
Produits populaires
Obtenir des produitsUsing Surface

In the second part we'll explore Forest Pack's ability to scatter geometry on surfaces. We'll look at adding the grass to the scene and using paint areas to control distribution in exclude mode, to expose the grass, and include mode to place flowers.
Some Notes on Using Surface
- When modifying a mesh used as a surface it is important to note that Forest Pack does not automatically update the distribution. If you have changed a surface ensure that you press the update button
![Using Surfaces-update.png]() from the surfaces rollout to re-calculate the scatter.
from the surfaces rollout to re-calculate the scatter. - Surfaces can scatter using two modes, XY and UV. In the former the trees are first scattered on the XY plane of the forests local axis then moved along their Z axis until they meet the surface. In the latter Forest will calculate the scatter based on the UV coordinates of the surface.
- Direction lets you control the objects rotation in relation to the local normals of the surface. At 0 the object is aligned to the surface normal, at 100 it ignores the normal and points upward, at -100 it points down.
- Tree distribution can be controlled using Altitude Range to set a minimum and maximum height for growth. If for example we wanted to keep the top of the embankment clear of bushes we could activate this feature and reduce the top value until the higher bushes disappeared.
- It is also possible to control distribution based on the angle of the terrain. A minimum and maximium angle is used. Any polygon that falls within that range is a potential location for a tree.
- To get started go to the Create panel and click on Forest Pro. In the previous examples we have selected a spline to start distribution. In this example we will start by selecting a surface. Pick the Ground_Left object to the left of the canal.
- Name the new object Forest_Grass_Left
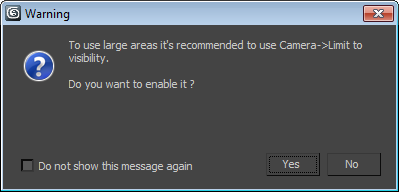
- A warning will pop up recommending that you use Camera->Limit to Visibility. Click on yes to accept this change
- Now let's pick the grass objects. Go to the Geometry rollout and click the buton to Add Multiple Custom Objects
- Select the three Wild Grass meshes and click Add, make sure that you delete the default object to ensure it doesn't appear as part of the scatter.
- The grass is now being scattered but it's very spread out. To fix this, go to the Distribution rollout and set the map to Dense. Change the Density Size to 4.25m to give a much more convincing coverage.
- Add some variety in the transform rollout by activating Scale, setting the minimum to 70%, and the maximum to 120%. Set the rotation minimum to -5% and maximum to 5% for the x and y axis. Leave the Z at its defaults.
Forest Pack Lite
Forest Pack Lite only can handle a maximum of three elements in the Geometry List. To avoid overpass this limit, you will need to add the items once at time instead multiple.
Painting Exclude Areas
That completes the grass on the right. To create the grass nearer the camera we'll simply duplicate the grass we just made.
- Make sure Forest_Grass_Left is selected and press CTRL+V to duplicate. Name the new object Forest_Grass_Right
- Open the Surface rollout. At the moment you'll see Ground_Left in the surfaces list. Delete this by clicking on the X button with it highlighted.
- Click on the Add New Surface button and select Ground_Right the ground plane (not the road) directly in front of the camera.
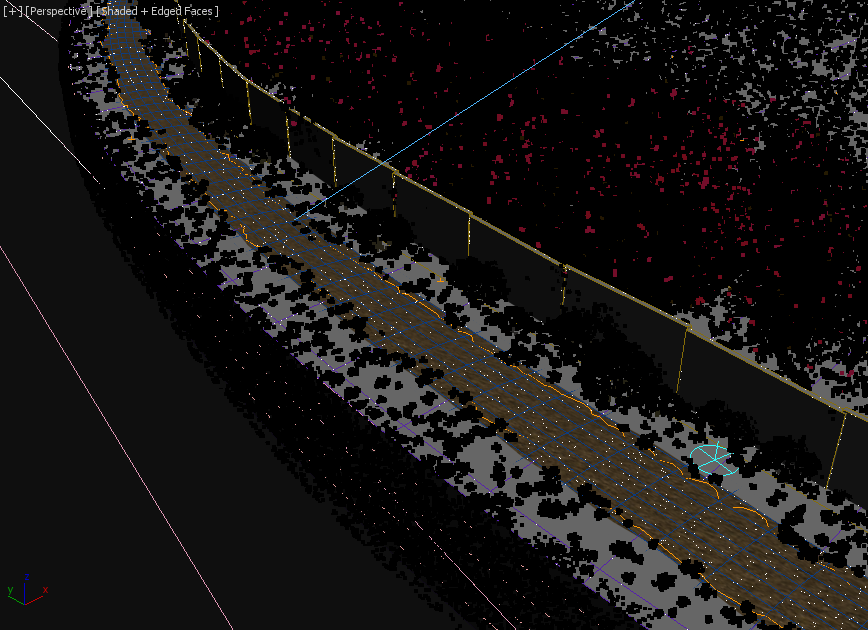
- We now have a nice distribution of grass on the right bank, however the path has also been covered. There are several possible techniques for revealing the path but in this example we will create a paint area so that we can create more irregular edges.
- Switch to perspective or top view so that you can easily see the path, you may find it easier to temporarily hide the trees so that they don't obscure the view.
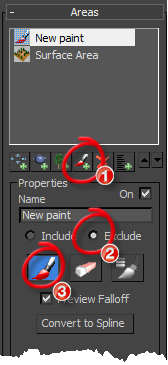
- Go to the Area rollout and click the New Paint Area button
- Set the paint area to Exclude
- Click on the Paint icon, your mouse cursor will turn into a circle when over the surface.
- Click and drag in the scene to paint a spline, any grass objects that fall inside will be removed. Continue to clear the path, if you wish you may also rough up the edge where the grass meets the stone wall a little.
- If you make a mistake, you can use the Eraser to remove painted areas.
- When you are finished press the Brush button again to finish painting.
Painting out the path
Adding some flowers
This technique is a great way of precisely placing or removing objects without having to manually create a spline objects. Let's place some flowers using the same technique.
- Create a new Forest object clicking on Ground_Right as the scatter surface.
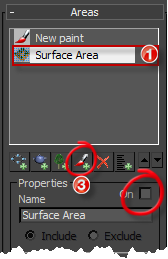
- Go to the Area rollout and turn off the surface area. This is to stop the flowers scattering over the whole surface, instead we will paint the areas we wish to use.
- For the geometry select Flower01, Flower02, and Flower03.
- In distribution change the map to Dense and the density to 9.5m
- Change to transform settings as follows:
Rotation: x min=-5, x max=5 , y min=-5, y max=5, z min=0, z max=359
Scale: 60 - 120%
- We're now ready to start painting. Go to the Areas rollout and click Add New Paint Area.
- Activate the paintbrush and click and drag either side of the path near the camera to place some flowers.
- Continue to add flowers anywhere you feel appropriate, when you're happy press the paint button again to deactivate paint mode.
Using irregular surfaces.
In the final section we'll look at using irregular surfaces to distribute bushes on the embankment in the background. Note that this is the only step in the tutorial that can only be completed by Pro users.
- We'll start by duplicating the Forest_Bushes object already in the scene, rename this Forest_Embankment.
- For ease you might find it easier to temporary isolate the new Forest object and the embankment mesh.
- Go the the Areas list and delete any existing spline areas. You should now have no bushes, Forest will display a F in the viewport to indicate it is not currently creating any geometry.
- Go to the Surface rollout, this has it's own list and it possible to scatter objects on multiple surfaces.
- Click on the Add Surfaces button and select the Embankment mesh.
- If nothing appears double check that the surface is switched on from the Areas rollout.
You should now see bushes that conform to the shape of the embankment mesh. This concludes the forest creation part of the tutorial. In the next section we'll add some colour variation directly from within the Forest interface and optimise our materials for faster rendering.
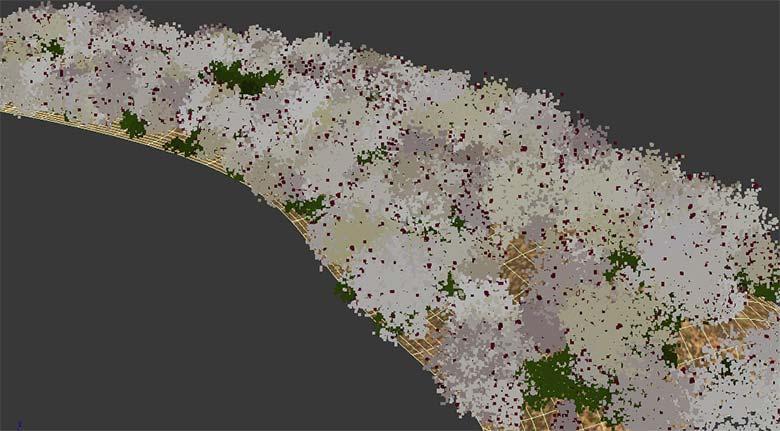
Bushes scattered on an uneven surface

 from the surfaces rollout to re-calculate the scatter.