Tutoriels
Des cours de qualité pour devenir un expert
Fichiers de ressources
Conditions
3DS Max 2010, Forest Pack Lite, RailClone Lite
Produits populaires
Obtenir des produitsAdding variation with Forest Color

The randomise transform controls go a long way to avoid noticeable repetition of trees in the scene but to really help to create the illusion of diversity we can randomly apply a colour picked from a gradient ramp. By default this will affect the hue and saturation of the existing materials with a mix selected from a range determined by the Random Strength parameters.
We'll start by adding colour variation to the bushes on the embankment we just created.
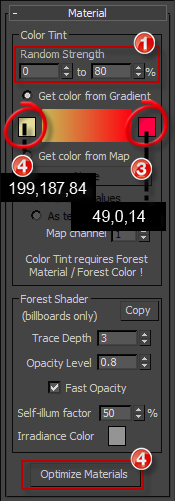
- Ensure Forest_Embankment is selected and open the Material rollout.
- Set the Random Strength minimum to 0% and the Maximum to 80%
- Change the gradient Start colour to RGB 199,187,84
- Change the Gradient End colour to RGB 49,0,14. The colours chosen are deliberately quite strong to better illustrate its effects.
Forest Color
- To randomise materials in the scene it is that the objects use a forest colour map for their diffuse materials.
- Forest Color is an map that comes with forest pack enabling not only the ability to tint materials using a selection from a gradient but also the ability to randomly apply up to 10 maps.
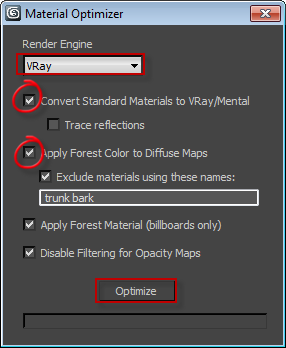
- This can be applied manually in the material editor but Forest Pack features an optimise tool that automatically assigns Forest Colour to the appropriate maps and also converts the shader to suit the render being used.
- For more information on using the advanced features of Forest Colour, see our Autumn Park tutorial.
- Click on Optimise Materials and accept the default settings. This will automatically apply a forest colour map to the diffuse slot of the bush objects and convert the material to V-Ray or Mental Ray native materials, depending on the render being used.

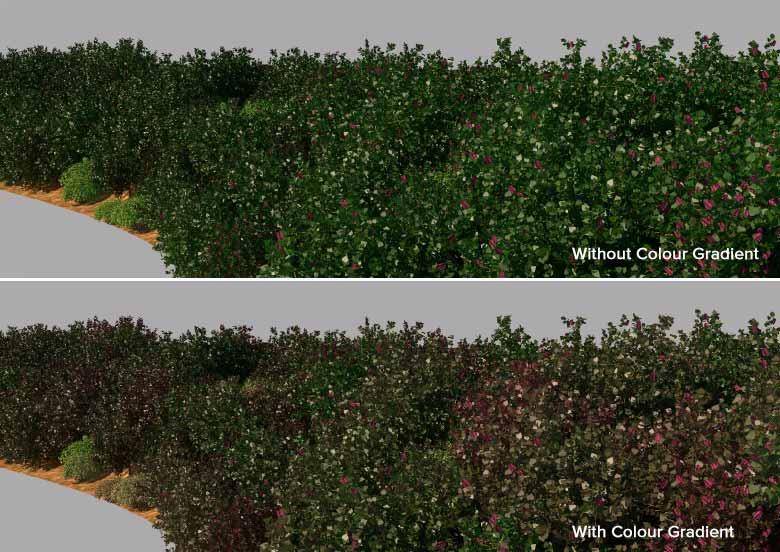
The render below shows before and after using Tint by Gradient on the embankment bushes.

- Apply the same settings to the other bushes in the scene, feel free to experiment with the colour and strength settings. You may also wish to try them on the trees.
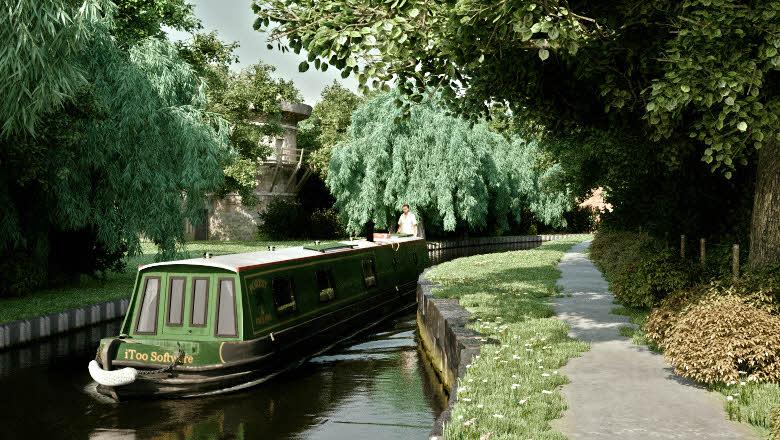
That concludes this tutorial. The render below shows the finished product, notice the colour variations in the bushes to the right of the path.
Conclusion
Once you have completed this tutorial you should be able to quickly set up and use Forest Pack including using common area types, controlling distribution and transforms, using the library and custom objects, distributing on surfaces and finally adding colour variations. If you have any questions about these tutorials or any of the techniques demonstrated here please feel free to ask on our forums. For explanations Forest Pack's other impressive features see the Moder Barn tutorialand many more on the tutorial page.

