Nouvelles
Lisez les derniers développements d'ITOOSOFT

The environments of Mafia III
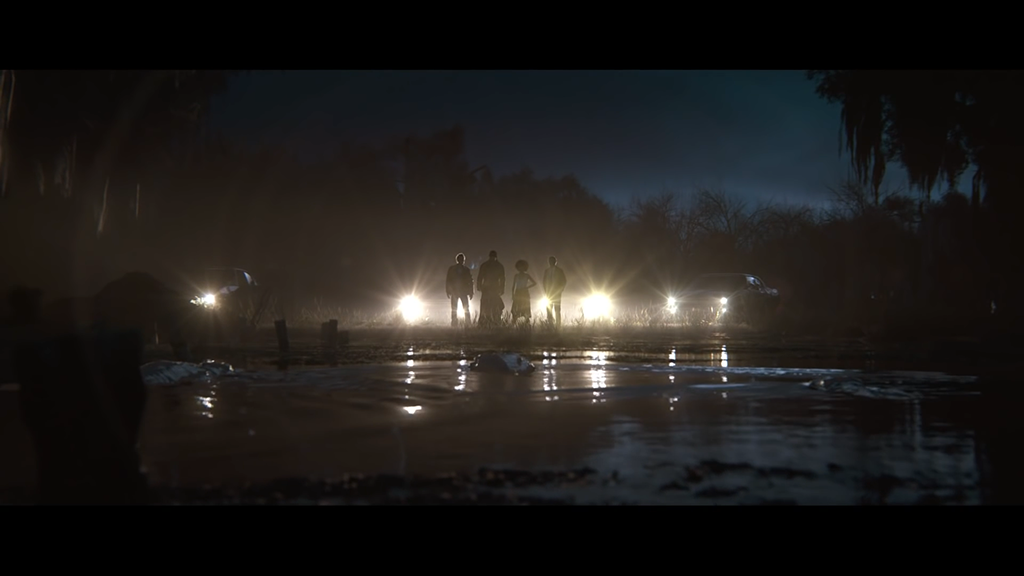
Oscar and Emmy nominated Blur Studio has long represented the gold standard for game trailers and cinematics, and the reveal trailer for Mafia III was no exception. Originally released at Gamescom 2015 to announce the latest in the Mafia franchise, the narrative of the 3 minute trailer hinges on a monologue given by Lincoln Clay as he drives through the desolate bayou surrounding 1968 New Orleans.
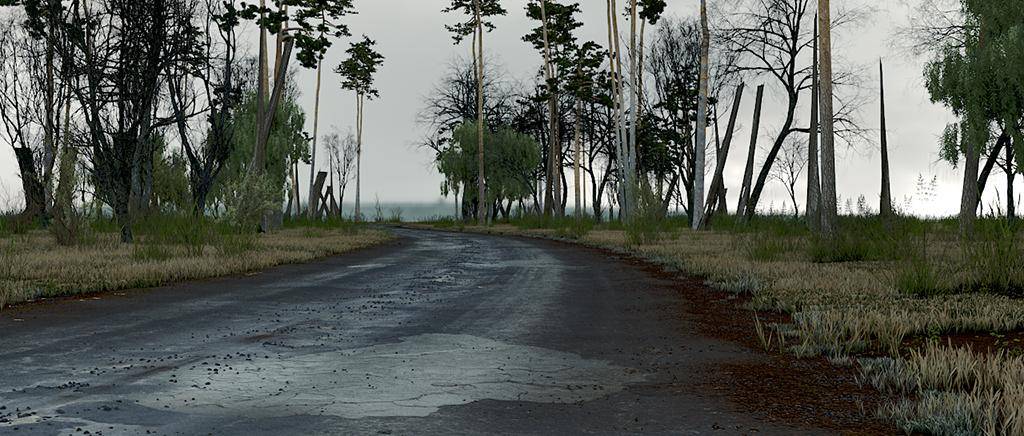
On screen,the bayou environment is extremely detailed, luxuriant and expansive. It is seen throughout the trailer, propelling the narrative, weaving together flashbacks, and providing a menacing setting for the thrilling conclusion.
As this environment is such an important part of the trailer, we were interested in finding out how Blur created and rendered several miles of densely populated swamp on a tight deadline. Blur's response? Cheat.
According to lead scene assembly artist Sergej Eichmann in an interview with FXGuide, "putting the flashback scenes aside we knew there were two environments we needed to create; while the set in the final scene was more of a standard scenario with multiple cameras facing the same direction, the road through the bayou needed some special attention. Instead of creating miles worth of road we created a setup that allowed us to adjust the environment on a shot-by-shot basis."
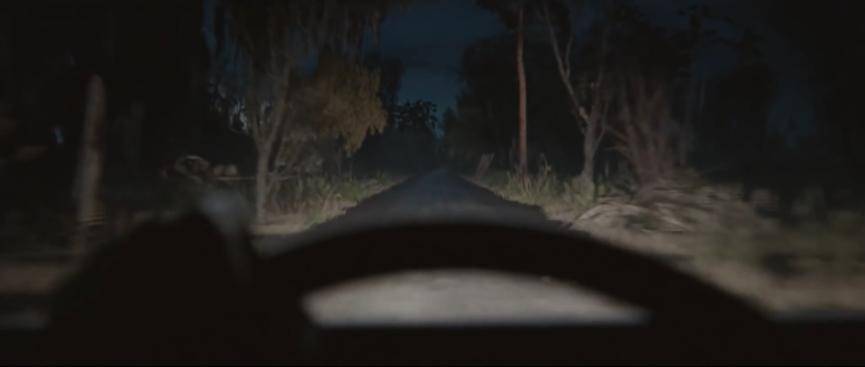
This setup used Forest Pack to cover the road with thousands of pebbles, small stones, leaves and debris as well as the grass, dense foliage and trees that flank it on both sides. According to Sergej 'ForestPack plays an important role in our environment and scene assembly departments. While it is often used to replace the same small recurring and tedious tasks with much more efficient workflows (e.g. set dressing of vegetation, dirt or pebbles), ForestPack is a great helper in a lot of scenarios.'
Blur have been kind enough to share bayou scene files with us and we're delighted to be able to showcase some of the techniques used to bring the world of Mafia III to life. The core principles explored in this study include:
- Creating a fully parametric environment, editable using a single spline.
- Using Falloff Curves to control the size of number of scattered items in relation to the edges of the road. This allows you to automatically place more and larger stones near the edges and centre of the road where they're less likely to be disturbed by vehicles.
- Using disabled scatter items and Clustering to randomly remove patches for a more naturalistic random distribution.
- Reusing Distribution maps and other settings but with small variations to get a layering effects.
- Using open splines as a scatter area.
- Using the same spline twice as an Include and an Exclude area to surround the road with trees.
The files used in this video were kindly sent to us by Blur Studios. Due to the use of copyrighted assets, there are no exercise files available for download, but this tutorial illustrates a way of working that should be easy to reproduce for anyone. Rather than go step by step through every setting, which will vary anyway from project to project, the focus is on the core principles and features of Forest Pack that Blur used to create this setup. In that way you should be able to easily adapt it for your own purposes
Creating the Bayou
Scene Setup.
The initial setup is deceptively simple. The aim was to allow for fast, easy changes to the road so that a large number of shots could be produced in minimal time. Therefore it was important to keep things simple, so in this tutorial only 3 areas are needed to control all of the Forest objects:
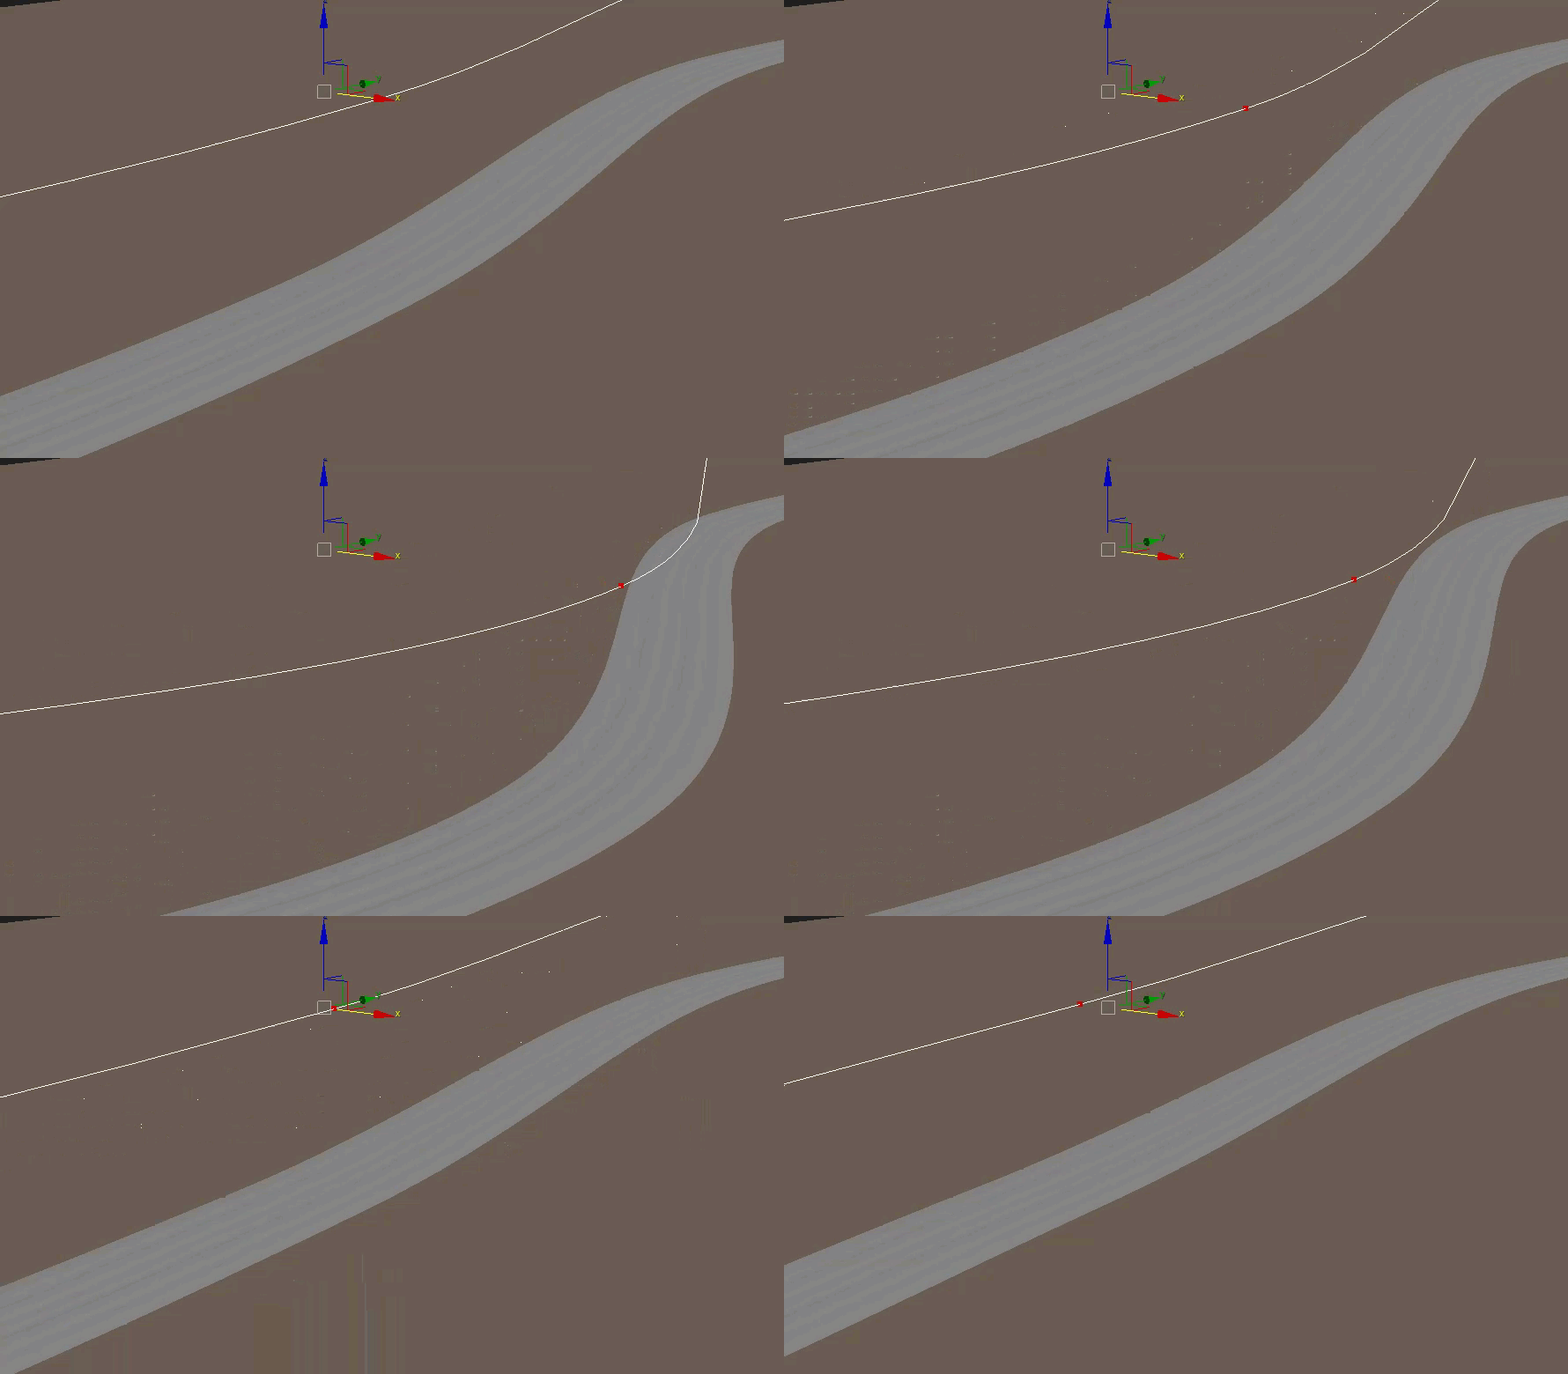
- The Bayou terrain, in the demo files this is a plane but of course it could be a more complex model.
- A single spline to define the path of the road. It is also used to drive several of the Forest objects.
- The road mesh. To create this Blur used 3DS Max's native loft tool which creates a surface using two splines: one to define the path, and another for the cross section. By using the same spine to drive both Forest Pack and the road geometry, the whole system can be updated easily. The loft tool also has the benefit of automatically generating UVWs. Of course another option could be to use RailClone, as this too could generate the geometry and UVs necessary to work with this setup.
Forest Pack
Using these 3 components the environment is populated using several Forest Pack objects. Some of these are very clear in the final render, such as the grass and trees that surround the road. But others add subtle detail, built up in several overlapping layers, and add more believable complexity than a single scatter can in isolation.
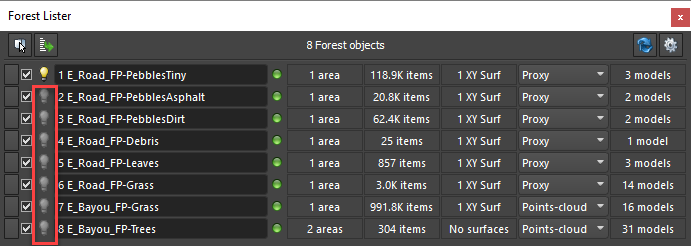
To illustrate Blur's setup, we'll start with the smallest items and work towards the largest. There are 8 Forest objects to the setup; 3 are used for pebbles of various sizes, 2 for leaves and debris, and 3 for the surrounding foliage and trees. That's not to say that 8 is the magic number, you can add add more or less depending on your particular needs.
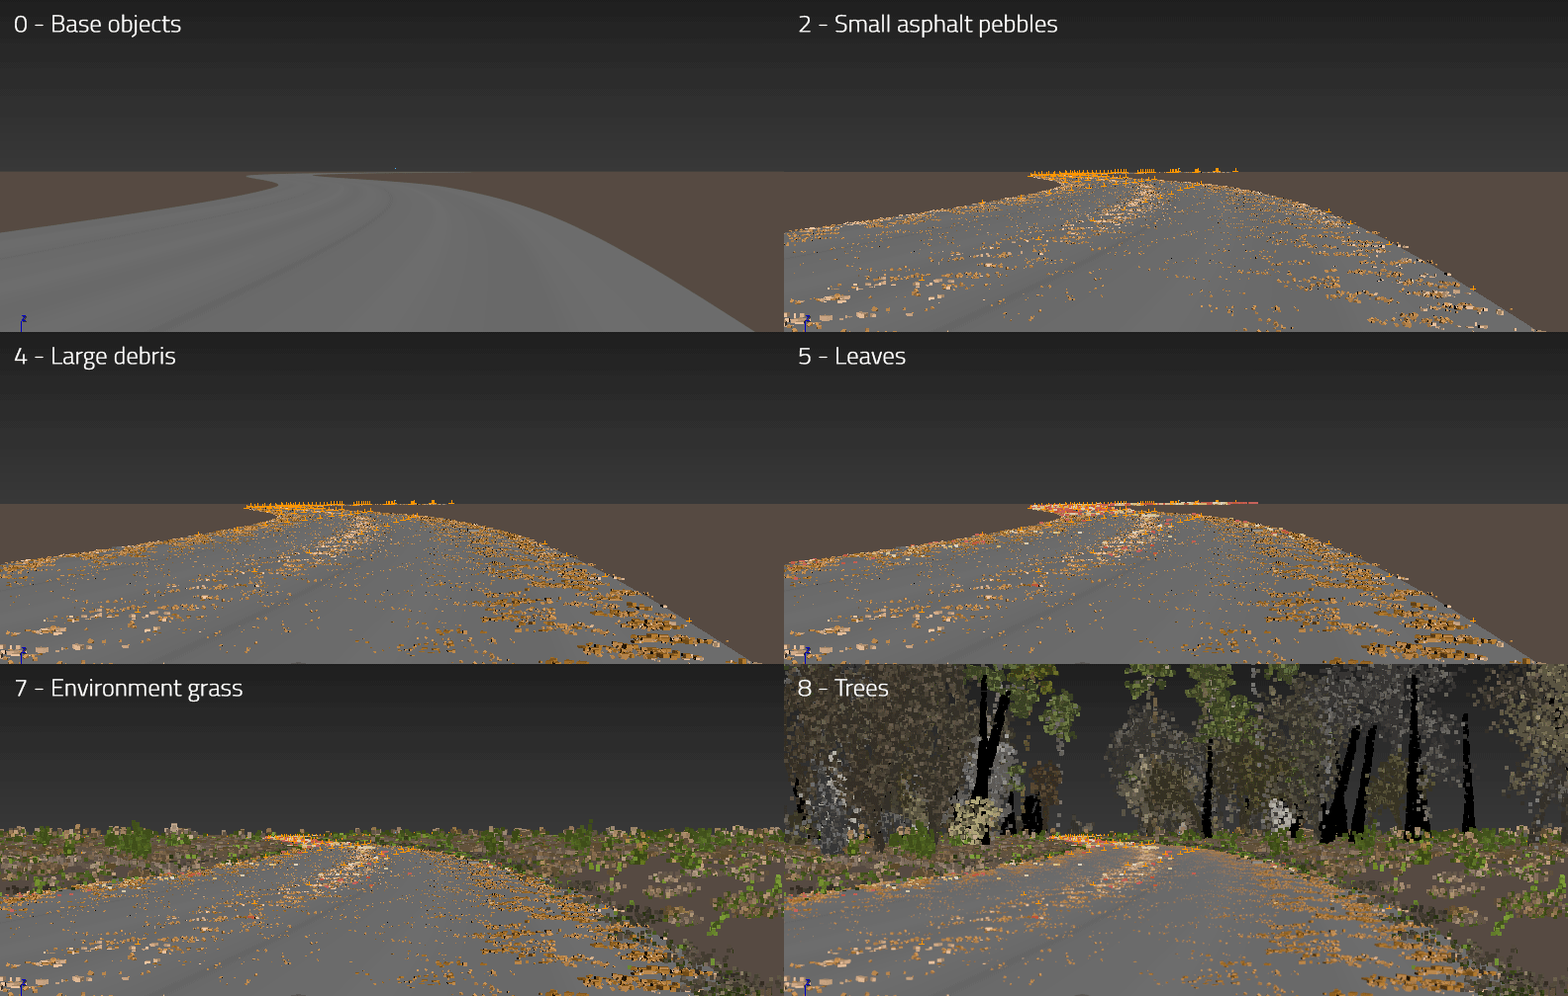
This case study assumes a basic understanding of Forest Pack. To save time all the Forest Pack objects have already been created and the necessary geometry been added to the items list, however no other crucial settings have been changed so that we can explain what we're doing and why.
Scatter Items
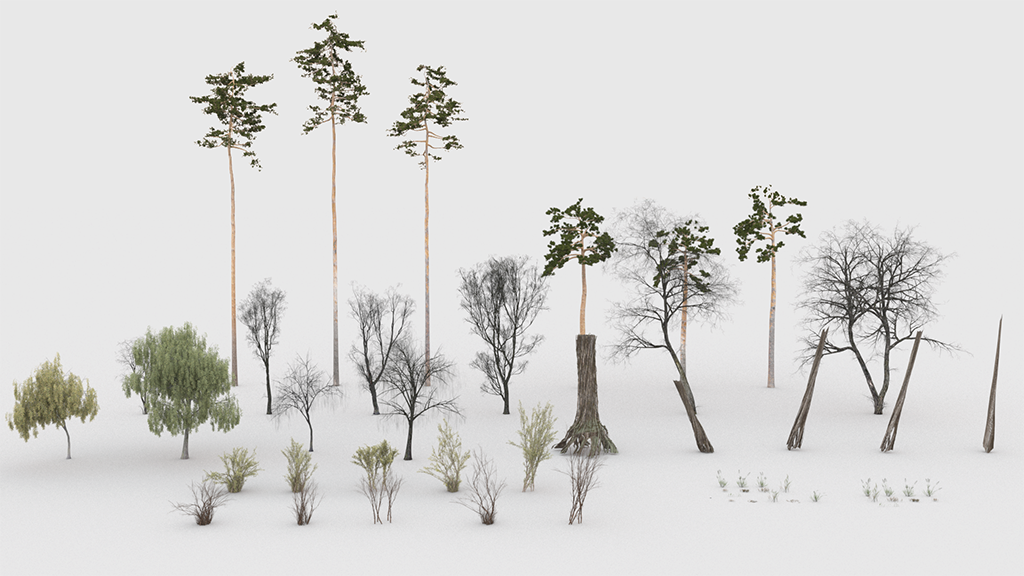
It's always essential to have the right assets. In the Mafia III setup we see an extensive selection of stones, pebbles, grasses, bushes, trees, and dead tree trunks culled from Blurs own libraries and several stock sources. A large variety and range of assets will allow you to more accurately reproduce the chaos found in nature and match your reference material and ecosystem, but even with fewer assets, Forest Pack can create naturalistic variety simply by randomising the rotation, scale and materials of objects.
Forest Lister
The easiest and quickest way to access Forest objects is to use Forest Lister. To open this click  from the Forest Pack toolbar. This tool allows you to see and manage all the Forest objects in the scene from a single panel. You can toggle the visibility of objects on or off using the lightbulb icon, change the viewport display mode using the dropdown menu and even jump instantly to individual rollouts by clicking on the statistic buttons. It's an invaluable time saver.
So let's start with the smallest items, the pebbles on the road. It is often useful to turn off all of the Forest objects except one in order to see more clearly the effects of your new settings. To do this click to grey out their lighbulb icons.
Getting started | Layer 1 - tiny pebbles
This object incorporates nearly all of the techniques Blur used for the entire setup, so we'll explore this one in detail and then skip a little on the other objects.
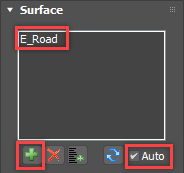
The first thing you need to do with scatter is to identify the areas. The stones should only be scattered on the road, which is as simple as selecting the loft object from the Surface rollout. The road is used instead of the central spline because the it is not perfectly flat and the stones must sit on top of the geometry correctly. Auto Update is also enabled so that the scatter refreshes instantly in the viewports if the road's path changes.
Using the default settings there's an even distribution of stones on the road, but what Blur wanted was to create more stones in the centre and at the edges where they would naturally accumulate. To do this Scale and Distance Falloff is enabled to control the density and scale of objects using a curve. These options are found in the Areas rollout, which you can also quickly access by clicking on the Areas button in Forest Lister.

The falloff feature is activated by checking the boxes next to Density and/or Scale. The area the falloff influences is determined by the Include and Exclude values. These values determine the distance from the perimeter of an area over which a graph function will be calculated. This is easier to illustrate if the graph is visible. To see and edit a falloff curve you click the Edit Curve button.
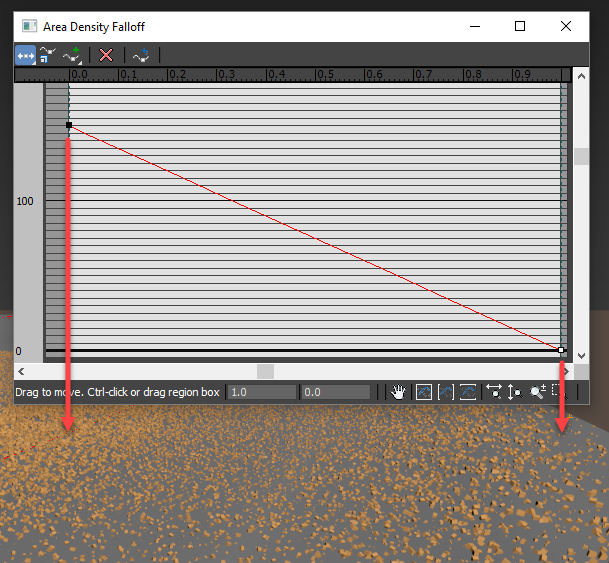
The graph's X Axis represent's the distance from the edge, determined by the include value. This road is about 7m wide so if the falloff needs to go from the middle of the road to the edge, a value of 3.5m (half the road's width) should be used.
The Y axis represents the density or scale. As you can see in the image above, the default graph linearly descends from left to right, so the density of scattered objects gradually decreases as it approaches the edge. If you edit the Include value you can adjust the range over which the falloff affect is calculated.
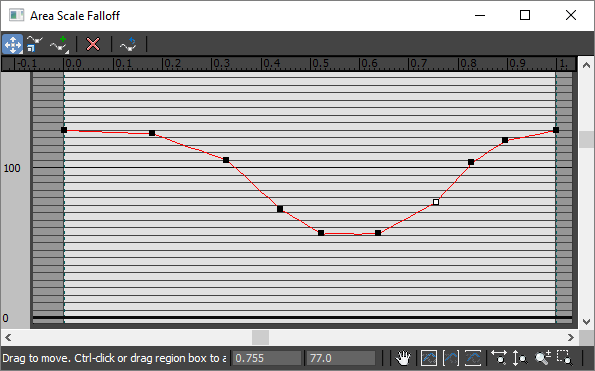
By changing this graph you can get some really interesting effects. For a road, the pebbles should be denser in the middle and at the edge where the cars don't normally disturb them. To do this you would edit the graph so the it is at 100% or more on the left and right, and dips down in the middle. The illustration below shows an appropriate curve for this effect. Notice that the graph is steeper at the middle of the road (left of the graph) than it is at the edges.
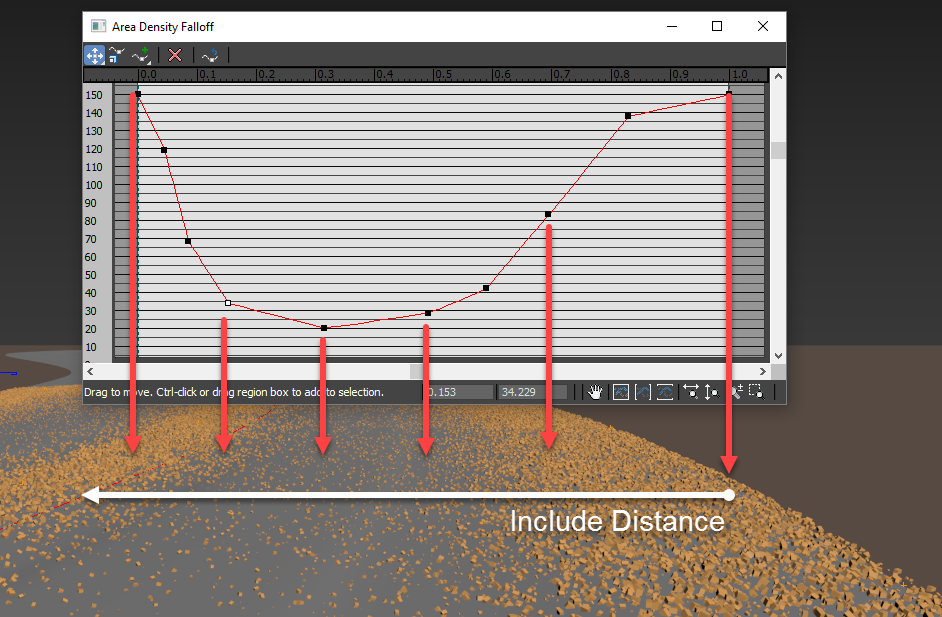
As well as using falloff graphs to adjust density, it's also going to look more believable if they are used to edit the scale as well. In that way those the few stones that survive a car's wheels are smaller than those thrown the sides. To do this, turn on the Scale feature and edit the graph so that it's similar to the density curve. Notice though that the scale graph at its highest point is at 125% and at its lowest point about 55%. You shouldn't reduce the scale down too low or the items would become invisible to the render, in which case you might as well use the density graph to remove them completely, which would be more efficient for rendering.
In the image below you can see how this scatter looks before and after applying the falloff graphs.
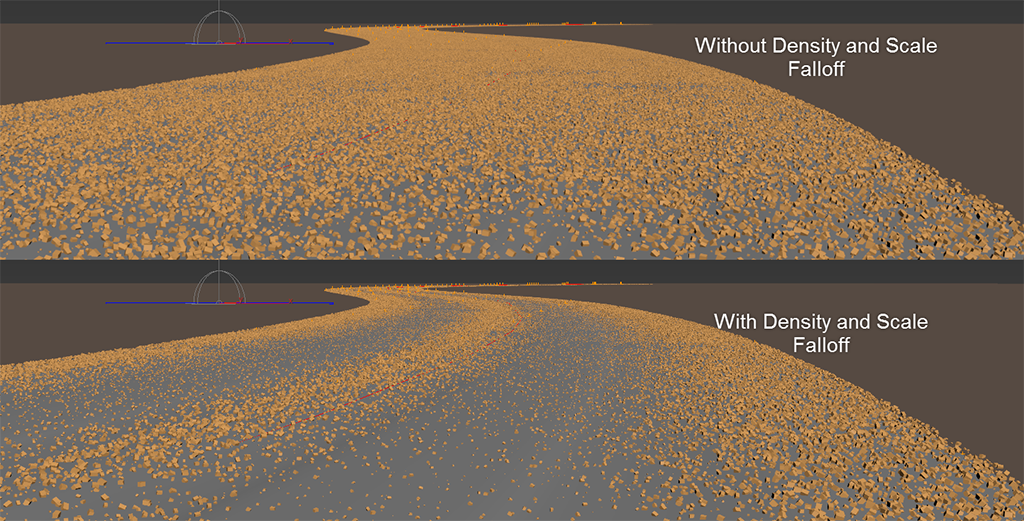
This is a much more convincing but it is a still too evenly distributed over the entire road. To break it up a bit there are two useful approaches: add disabled objects and change the distribution map.
Adding disabled objects allow you to randomly remove some of the stones. When this is coupled with Forest Pack's clusters feature, you can remove them in random patches, instead of just thinning out the entire distribution. Here's how this works. Firstly you need to go the Geometry rollout and add a new item. Immediately set this to Disabled and you'll see that some of the stones have disappeared.

It is possible to control the number of stones that are removed using the items' Probability values. The higher this number, the more likely that the item will be used. In Blur's setup and a value of about 25% is used, so a quarter of the existing stones are removed.
This thins out the density, but to get the correct look, it's necessary to remove stones in patches, not individually. To do this the Clusters feature is used, which is found in the Distribution rollout. This feature automatically groups together similar objects, as defined by their colour ID. To enable this setting just activate the radio button and then set the size of the clusters. Blur used a cluster size of 2.5m but you should feel free to experiment. It's important to note that this feature also respects the Probability values set in the Geometry rollout, so there will be fewer empty patches than stones.
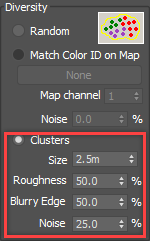
You can further control the appearance of clusters using Roughness and Blurry Edge. Roughness is used to add some irregularity to the shape of the clusters, and Blurry Edge allows adjacent clusters to bleed into one another. In Blur's setup a value of 50% works well to erode the edges and add some chaos to the shapes. Finally it is also possible to use Noise to reintroduce items from the other clusters. The image below shows how the scatter looks with the clusters enabled. You can clearly see the empty patches that have been added with this technique, breaking up the regular distribution.

To further break up the regularity of the scatter you can change the distribution map. In this sample file, Blur used Groups1 to create small clusters of stones instead of an even spread.
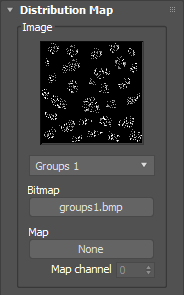
And finally, if you look closely there's a grid that's visible, even in the clusters. To break this up, introduce a random transform on the X and Y axis to each stone. This is achieved using Transform > Translation. A value of -100% to 100% works well, but larger values can be used if necessary.
And that's essentially it for the the first layer of stones. All the other Forest Pack objects in this scene use similar techniques, but with a few variations so that their distribution is sufficiently varied and chaotic that it looks natural and that the layers relate to one another convincingly.
Layer 2 - small asphalt pebbles
In Blur's scene a 2nd Forest Pack object adds asphalt pebbles, which are slightly larger. Actually all 3 of the stone objects share the same geometry and the size is increased by going to the Geometry rollout and changing the Global Scale. You can also change the randomised scaling if necessary to create a different effect for each layer. The tiny pebbles for example used a random scale between 25% and 150%, In this scatter the objects aren't scaled proportionately, it uses a random scale of 33% to 225% for the XY axis and 15% to 150% on the Z axis. Randomising these axes separately creates much larger stones in a wider range of sizes without them getting unnaturally tall. With these settings you end up with flatter, wider stones.
This layes is distributed slightly differently, opening the falloff maps reveals why. The curves have been adjusted so that the density is much higher around the centre and the edge of the road, and lower everywhere else, when compared to the tiny pebbles.
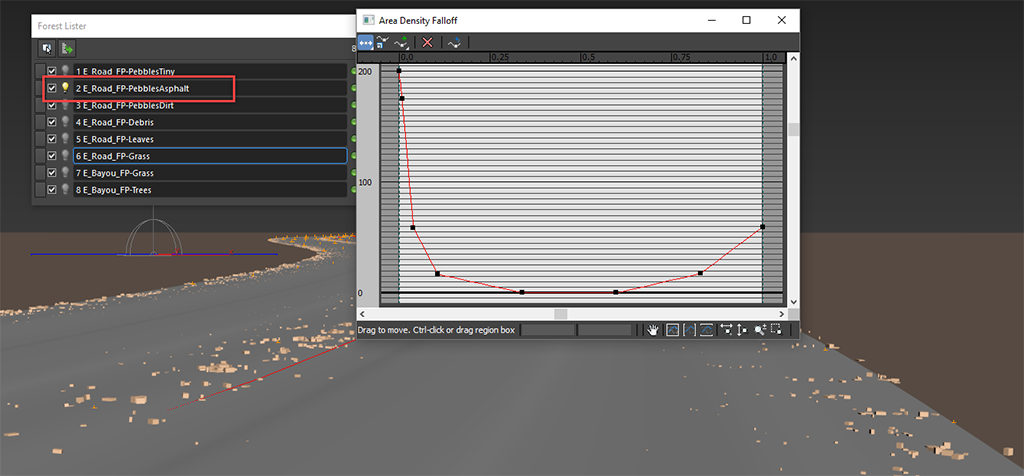
The quickest way to create additional layers is to simply duplicate the first Forest Pack object and then make a few changes. This saves you time because most of the work has already been done, these objects probably share the same scatter areas, include distance and more. You must be careful if you create layers by duplicating Forest Pack objects though, because you can end up with scattered items that occupy exactly the same place. This is most obvious if your Area, Distribution Map and Density settings remain identical. .
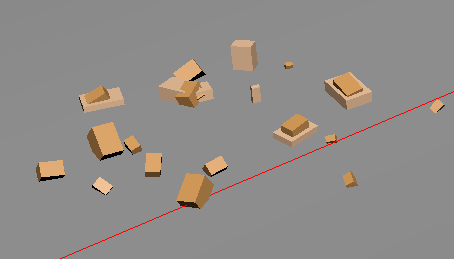
Two sets of stones with the same distribution setttings
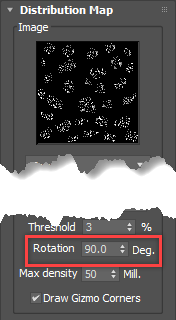
In Blur's setup, this is avoided by entering a new seed value for each layer in the the General Rollout. This will change all the randomised values and help avoid repetition. That helps, but because the distribution map is still the same, there's still a risk of items occupying exactly the same space (as shown above). To fix that, the Distribution settings can be edited and the easiest way is just to rotate the map, for example by 90 degrees. There's now far less chance of the layers clashing, instead you retain a shared aesthetic and gain an interesting visual interaction between the two layers.
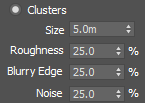
Finally, the cluster features can be modified slightly to create another level of random interaction between the layers. To create larger empty patches Blur increased the size of the Clusters to 5m , but trial and error will give you the results you need. For greater variety you can also change the shape for each layer, for example by reducing the roughness, blurry edge and noise settings all to 25%.
With both layers enabled we can start to see how the two layers of stones start to build up and complement one another.

Layer 3 - medium pebbles and dirt
The third layer adds medium sized pebbles to the road. Once again the larger size has been achieved not by scattering different objects, but by increasing the Global scale to 200%. Conversely, the randomised scale for the XY axis is reduced slightly from 33% to 100% and the XY axes and 15% to 100% for the Z axis . The overall effect is to create larger stones but with less range between smallest and biggest.
The stone are then distributed using a very similar falloff curve to the tiny pebbles, in fact if you examine the curves for layer 1 and the curves for this layer you'll see that they're nearly identical. Scale is very similar, and density is different only in that there are slightly fewer large stones in the worn part of the road, and a less gentle transition in the middle and at the sides.
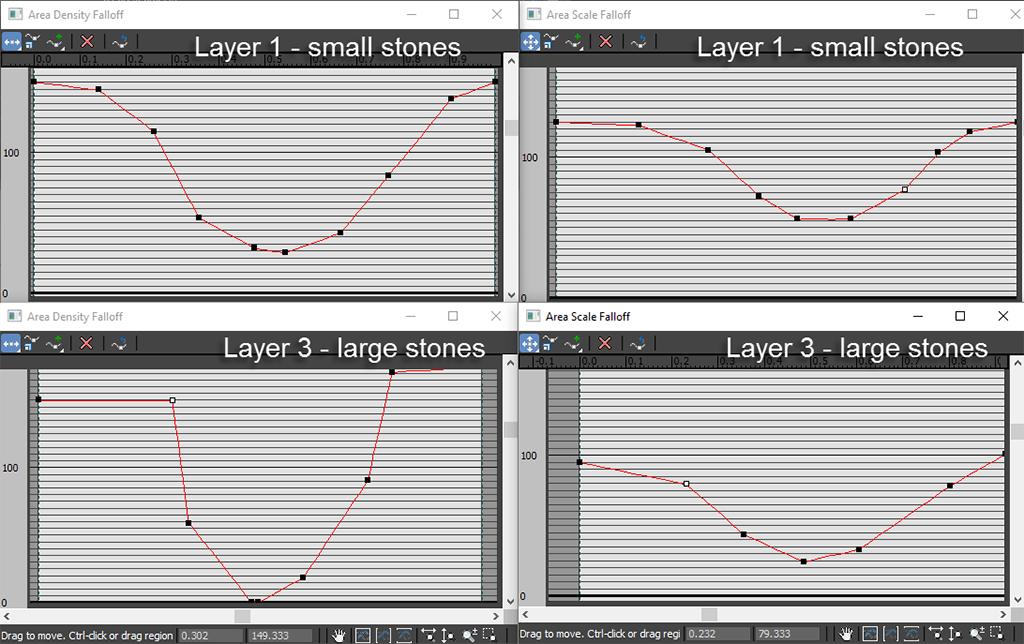
The distribution map settings are the same except that the rotation has been increased by another 90 degrees to 180 to avoid objects sharing the same locations. Cluster size in much lower at 0.5m on this layer, and this results in much smaller empty patches, so the stones are more evenly dispersed along the entire length of the road.
With these changes and all 3 layers turned on we can see the road is building up nicely.

Layer 4 - large Debris
Next up Blur added large debris to the road. This uses a different model with a global scale of 250%, the largest yet. Scale randomisation is set between 25% and 125% and this time proportions are maintained. This is a relatively large object so to make it any bigger than this might damage a car!
Because of their size, we want fewer of them - far fewer. In the Distribution rollout the map type is changed to Very Scattered and the density increased to 33m, this creates only a very occasional rock scattered along the road. Diversity clusters is not necessary for this scatter because it's already so sparse, but we still don't want these large rocks destroying tires, so the Density curve is drawn to remove them completely from the worn area. Where the curve touches the bottom of the graph, density is reduced to 0.
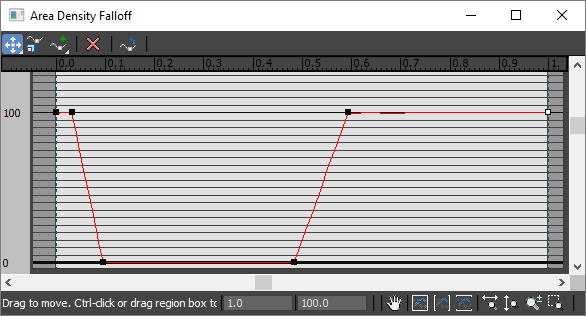
With this done very few debris models are added, just enough to add interest. You can see them in the screen shot below in red.

Layer 5 - leaves
This road is flanked by trees so we'd expect to see some leaves. Inspecting the items list, in addition to the leaf geometry you'd expect, we there's also a disabled item to create a more realistic and uneven distribution. To create more spaces than leaves, the leaf item's probability values are reduced to 25%. As we've already seen, these probabilities settings work in tandem with the Distribution Clusters feature, by turning this on and setting the size to 3.5m a nice randomness is achieved.
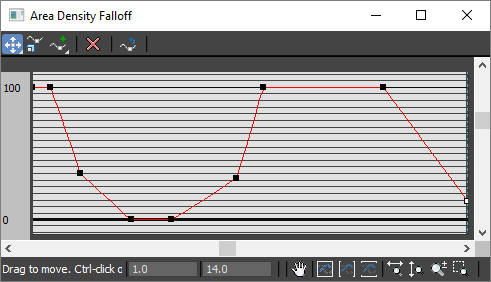
We also need far fewer leaves, this road is used relatively regularly so we only want a smattering, enough for a recent fall. The distribution settings should therefore reflect this and the distribution map used is Spread1 which is considerably more more sparse than the default map. Density is also increased to remove even more trees, Blur used 30m. By now you should be familiar with the density curve which is similar to the others we've already seen. Just like the layers described above, the leaves should be excluded from the areas of road most frequently used.
Layer 6 - Stray Grass
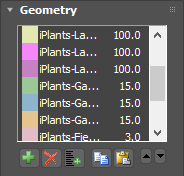
The road is surrounded by grass and weeds, but some will also grow in the natural mulch that collects at the edges. To simulate this a 6th layer adds grass only to the very edges of the road. This has the added benefit of hiding the transition between the road and the surrounding ground geometry, (which is also helped by a rather sophisticated material that adds the same ground texture to the sides of the road). Examing the Geometry list reveals that there are a number of different grass models used. The composition of the grass is once again controlled by adjusting the probability values of the items. By examining these we can see that the main ingredient is a typical lawngrass with the rest made of a mixture of small plants and weeds.
To ensure that the plants only grow on the very edge of the road, the density curve spikes only on the right hand side. The ramped increase allows the grass to gradually. but rapidly, reduce in number the further from the roads edge. A nearly identical graph is used for scale falloff so that the plants reduce in size as well as thinning out.
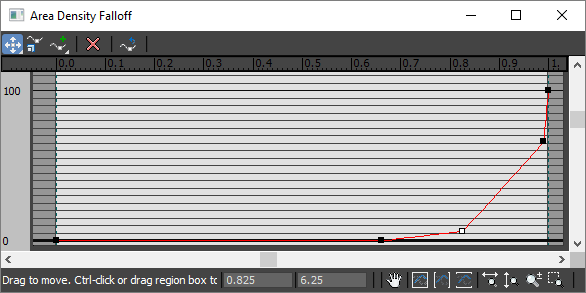
Distribution is pretty straightforward. A fairly sparse map with a 10m density setting. I can't emphasise enought that these values work for this project. You should adjust your density settings to get the effect you want. The beauty of Forest Pack's points-cloud mode is that it is quite easy to preview this in the viewports to help you towards the best settings.

Layer 7 - Environment Grass
The 6 layers added so far are applied directly to the road geometry. The remaining 2 layers are used to create the foliage on the surrounding landscape and should be scattered on the terrain geometry. To do this you go to the Surface rollout, click + then select the environment geometry. If your terrain also runs under your road, as it is in this case, you'll need to remove scattered items from this area. Thankfully the road is driven by a spline and we can reuse this to exclude the grass. To do this, in the Areas rollout the road spline is added to the Areas list. Open splines like this can be used with Forest Pack but because they have no lateral dimension, it has to be set manually in Forest Pack using the Thickness property. The road is about 7m wide, but it's good to have a bit of overlap so a value of 3m works well for this scene.
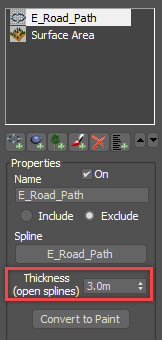
The density should also falloff slightly. This is a simple linear falloff so the curve can be left at its default setting and a small Exclude value added. This will help this grass to blend with the existing scatter at the edge of the road. Note that we used the Exclude value instead in Include because the spline clearing the grass from the road is removing scattered items. In some styles it is possible and desireable to use Include and Exclude falloff simultaneously.
The Distribution settings for the grass are pretty straghtforward. Once again the Spread1 Map is used with a 10m Density setting. The Clusters feature is also used, this time as it was originally intended, to group together plants of a the same type. This mimics the ways plants often disperse in nature with plants of a similar type growing close to one another. To make it easier to see the clustering effect you can go to the Display rollout and turn on Use Color ID. This tints the point cloud with the same colours set in the Geometry Items list and helps you to visualise the effects of clustering. Transform settings are turned on but left more or less their defaults.

Layer 8 - Trees
Finally, we get to the last Forest object which adds the trees to the sides of the road. If you needed to fill the entire terrain with trees, for example if your road was in a forest, then you could use the same techniques as we just explored for the grass. In this case though, the trees are only on the sides of the road extending into the swamp a short distance. To create this effect the landscape geometry is added to to the Surfaces rollout as before, but this time in the Area rollout the surface is turned Off. This means that the surface itself doesn't generate any scattered objects, but it is still used to calculate scattered items position on the Z axis when they're created using another overlapping areas. To define the actual area of the scatter, the road spline is used again, because it is being used to add trees the default Include setting is retained. The Thickness value determines how far either side of the road the trees should extend. A value of 25m, works well in this sample file.
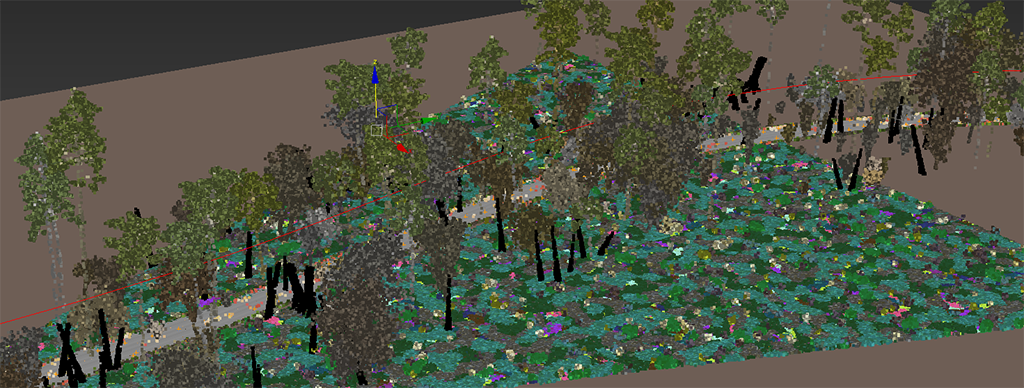
To exclude the trees from the road, you add the same spline again. This time change the mode to Exclude and increase the Thickness value until the trees are removed.
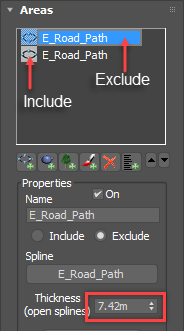
Otherwise the rest of the trees setup is straightforward. Transform randomisation is left at the defaults and no Clustering or Falloff features are used.
That completes the road setup. The image below whos how the 8 Forest Pack objects work together to create the complete system.

"An inherent part of blurs pipeline"
We can learn many valuable lessons from Blur that can be applied to many diverse projects. The ability to use Falloff curves, add complexity with layers, embrace the timesaving potential and flexibility of creating parametric rigs, and understand how small changes to probability, distribution settings and clusters yield big rewards are all useful skills.
Forest Pack is an inherent part of Blur's pipeline, and it used on a wide range of their projects. Some recent applications for Forest Pack have included 'scattering of vegetation (of course), building of architectural elements like floor and wall tiles and distant buildings, scattering of buttons, switches and dials from an aircraft’s control panel, debris floating on water and around planets and much much more.'
Forest Pack, isn't just for trees, it's an invaluable time saving tool.


Other examples of Blur's use of Forest Pack in production
If you're interested in learning more about how Blur created the Mafia III trailer including the exceptional character work, we recommend this in depth interview on FXGuide.

