Tutoriales
Aprende nuevas habilidades con nuestras lecciones breves
Productos destacados
Obtener Productos
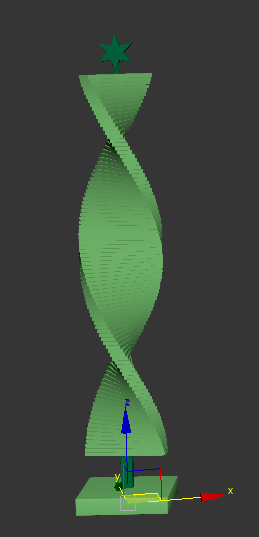
It has become something of tradition at iToo at this time of year to create a tutorial that uses RailClone to build a Christmas tree. As most people know, RailClone isn't a botanical modeller, so we have to use our imagination. Last year we created trees made of pipes that looked like they'd escaped from some sci-fi dystopia. This year we're keeping it classy with trees inspired by the minimalist designs of Johannes Molin.
There are no needles to drop on this tree, it's constructed from blocks stacked one atop the other. Each block can be incrementally scaled and rotated to create distinctive but recognisable shapes. The tree is fully parametric and editable from the modify panel with controls for height, block size at the top and bottom, pivot point, rotation angle, base size and more.
By completing this tutorial you will be able to:
- Create expressions using segment counters
- Create expressions using a segment's position in the array
- Use multiple generators
- Export parameters and attributes
- Create parameters that can be edited from the modifier rollout
- Use generator limits
Creating the star, trunk and base
The geometry required for this tree is very simple: A couple of boxes for the base and the branches, and a star for the top.
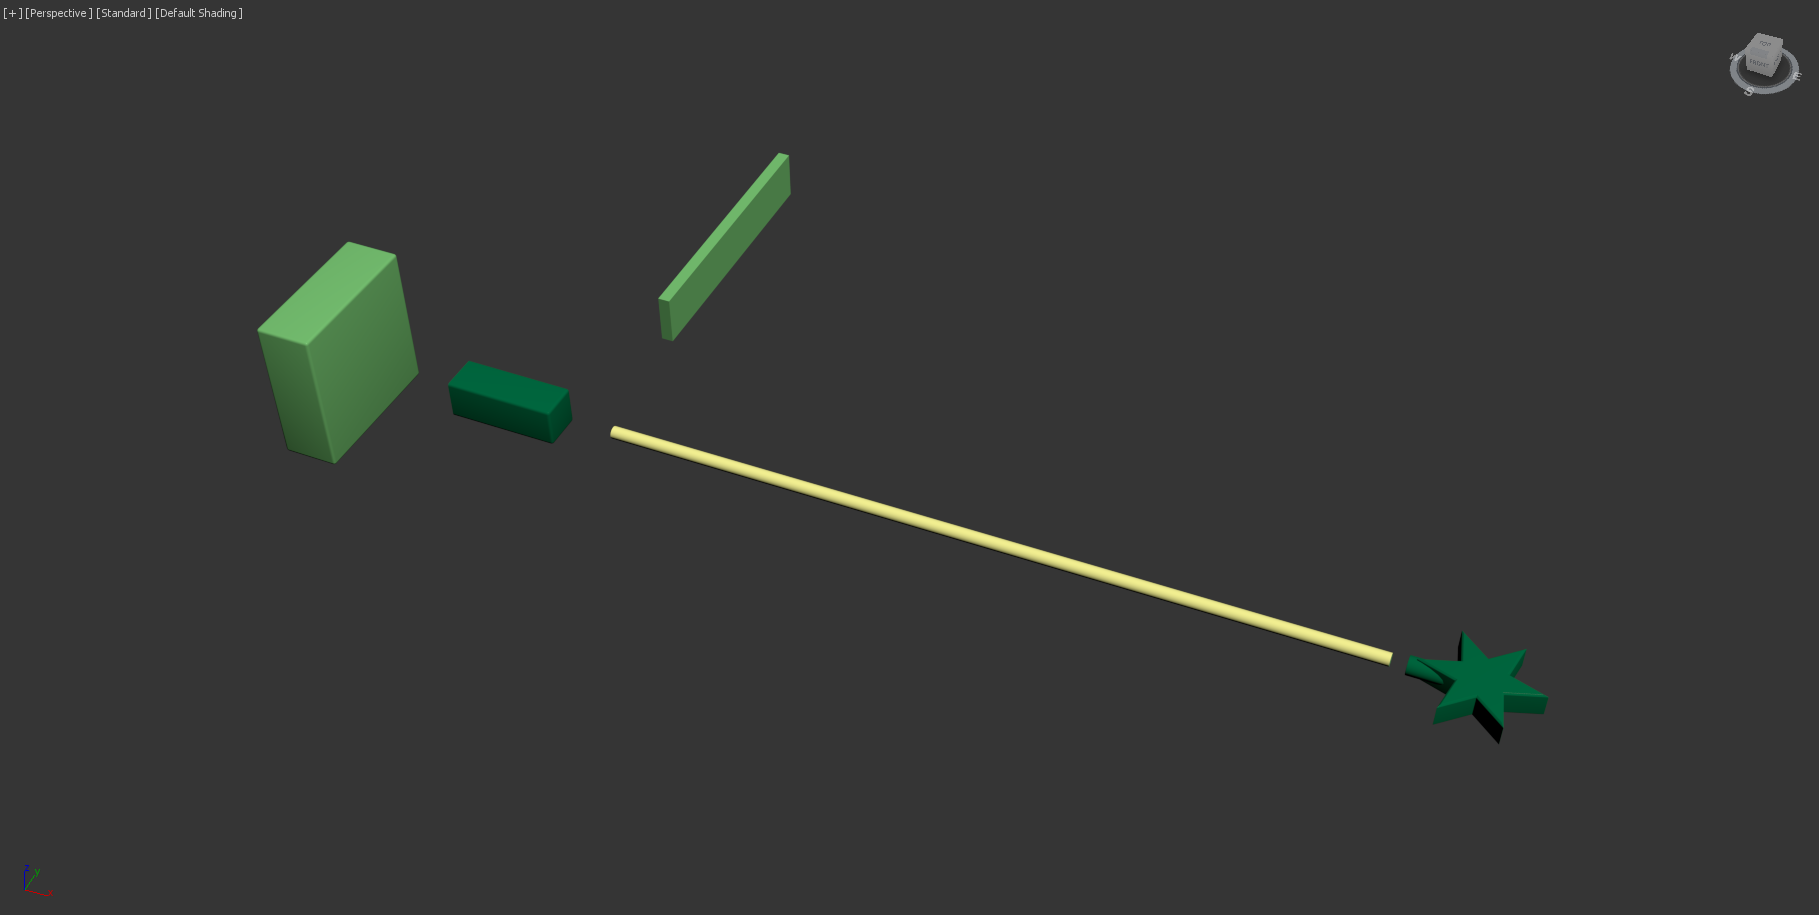
The style uses two generators, one for the base, trunk and star, and another for the branches. Start with the simpler of the two to create the core of the tree.
- Create a new RailClone object and open the Style Editor. Add an L1S array.
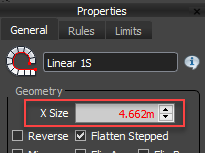
- Because the tree will always be straight, there's no need to use a spline to define a path for the array. Instead we'll use the Generator's X Size property
![RailClone Xmas Tree II-image2016-12-19 16:13:33.png]()
To make this value editable from the Modify panel, export the value by right-clicking on the generator and choosing Export Parameters > Geometry > X Size. - Create a new Numeric node and wire it to the newly exported X Size parameter. Rename the numeric node Tree Height so it's easy to identify. The size of this array can now be edited using this parameter. A value of 1.5m is a good starting point.
- Start at the bottom of the tree with the base and work up. Create a new Segment and set the Alignment>Z property to center, this will align the segment correctly so that it is centered to the trunk of the tree.
- From the Properties rollout, pick the object for the base from the scene.
- The base will also include a wooden block into which the metal pipe that forms the trunk is inserted. To add this, clone the existing segment and select the block geometry from the scene.
- To add both the base segment and this block to the Start input, use a Compose operator. Wire the Base segment to the first input and the Block to the second. Wire the Compose operator to the Generator's Start input.
- The array is being built horizontally but obviously the tree should grow vertically. No need to make things too complicated - just rotate the whole RailClone object by 90 degrees.
- Now we'll add the trunk, clone an existing segment node and use it to pick the trunk geometry from the scene. Wire this node to the Default input.
- Select the Generator and change Rules > Default > Default Mode to Scale. This mode stretches a single segment between the start and the end of the array.
- Clone a segment node again and use it to select the star geometry from the scene. Wire the segment node to the End input. You can now adjust the Tree Height parameter to see the size of the tree updating.
- To add a parameters to make the size of the base easy to adjust, select the base segment and export Fixed Scale X,Y, and Z. Create a new Numeric node, change the mode to Percent and wire this to the Y and Z inputs. .
- Create another Numeric node, set the mode to Percent, and wire it to the Z scale input. Make sure you rename both Numeric nodes so that their function is easy to identify. These parameters allow you to control the width and depth of the base geometry from the modify panel
- Do the same for the Star segment. Export the X,Y and Z Fixed Scale parameters and wire them all to a new Numeric operator. Change the mode to percentage and name the node Star Size so that it is easy to identify. The core of the tree is now complete and easy to adjust with an editable height, base size and star size.
Creating the "branches"
To add the branches use another L1S generator:
- Clone the existing generator and removing all the inputs. This saves time as many of the existing settings remain the same.
- Change the new generator's default mode to Adaptive. This will ensure the topmost branch is not sliced.
- Clone one of the Segment nodes and use it to pick the branch geometry from the scene. Wire this to the Default input.
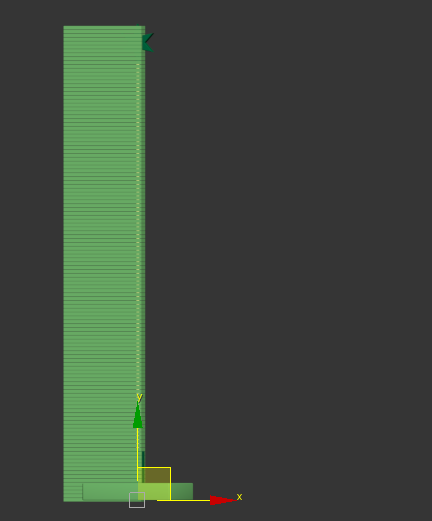
- The branches will appear, but they currently use the full height of the array, overlapping both the base and the star.
![RailClone Xmas Tree II-image2016-12-19 18:18:14.png]()
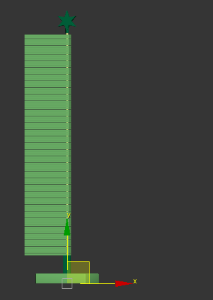
They should only fill in the area between the base and the star. To fix this use Generator > Limits, these allow you to shorten the length of the array using a set measurement from each end. The parameters are available in the Generator's Limits tab but to control the values parametrically both values will be exported by right-clicking the generator and selecting Limits > Padding Start and Padding End. - These values are driven by the X size of the base and the star. To expose these attributes, right click on the Compose operator and the star segment and select Export Attribute > Size > X.
- These attributes are now used to control the Generator limits. Wire the Compose operator's X Size attribute to the Generator's Padding Start input. Wire the Segment's X Size to the Padding End input. The branches will now start in the correct places, between the star and the base.
![RailClone Xmas Tree II-image2016-12-19 18:25:6.png]()
The branches are in the correct part of the tree, the next step is to add functionality to control their rotation and scale. This is really what this tutorial is all about - the festive theme is an excuse to sneak in a bit of training about expressions!
There are two ways in which parameters can be controlled incrementally. Firstly, using the segment count. This is the easiest because it returns a simple integer that can be used to multiply a value. Alternatively, the segment's position in the array can be used. This returns a scalar value between 0.0 at the start of the array, to 1.0 at the end. This too can be used as a multiplier to generate a value that gradually increases.
Either one of these two approaches is fine, but there are a couple of advantages and disadvantages. Using segment count is much easier, but the value on the final segment is going to be dependent on the total number of segments in the array, so it isn't particularly predictable. Using the segment position is harder to set up but produces predictable results with fixed values that can be set for the start and end of the array.
The next part of this tutorial will demonstrate how to use the segment count method to control rotation, and the segment position method to control scale.
Rotating the "branches"
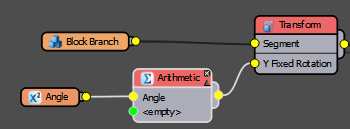
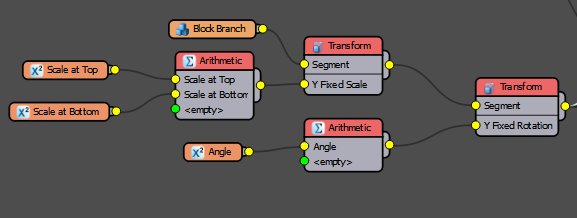
- Expressions can't be wired directly to a segment's properties, instead a Transform operator must be used. Wire a Transform operator between the existing branch segment and the Default input
- Right-click on the Transform operator and export Y Fixed Rotation.
- Create a new Numeric node and rename it Angle. This will be the rotation between each branch.
- Create a new Arithmetic node. Wire it to the Y Fixed Rotation input. Wire the Numeric node created in the previous step to the Arithmetic node's first input.
![RailClone Xmas Tree II-image2016-12-19 18:39:49.png]()
- It's time for some maths! Select the Arithmetic node and change the operation type to Expression. Open the expressions editor by clicking Edit Expression.
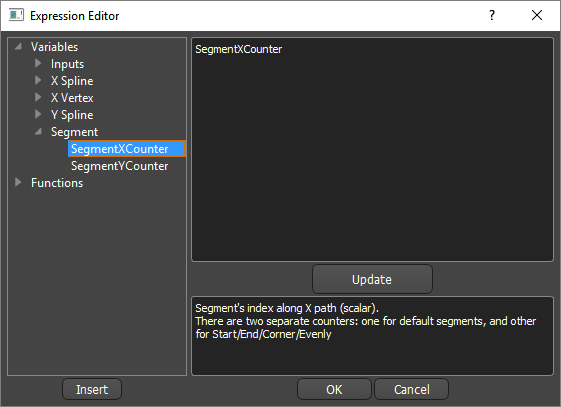
- On the left hand side there is a list of RailClone's built in variables. Below that are all the available functions. These can be typed manually, or by just double clicking on them to add them to the expression.
For example, to add a segment counter variable. go to the Variables List, open the Segment sub folder and double click on SegmentXCounter . Notice that help text displays in the lower text box to help you use the commands.
![RailClone Xmas Tree II-image2016-12-19 18:47:38.png]()
- The Segment count will be multiplied by the value contained in the angle numeric node already wired to the first input. To refer to nodes connected to inputs you use the variable Input#, where # is the number of the input. For example, to complete this expression you would use SegmentXCounter * Input1
- Now if the Angle value is increased the branches incrementally rotate.
![RailClone Xmas Tree II-image2016-12-19 18:51:47.png]()
Next add another expression so that the size of the branches decrease as they ascend the tree.
Scaling the "branches"
The second expression creates a a fixed scale for the start and end of the tree so that the sizes of the branches are the same whether the tree is 1m or 100m tall. To do this use the variable XSplinePosition.
XSplinePosition returns a value between 0.0 and 1.0 based on a segment's position along the array's path (though it works even if you're not using a spline). This can be used to multiply any value so that it gradually increases.
The full equation works by calculating out the difference between the start and the end scale value, multiplying this by XSplinePosition, and then adding this to the start value. Therefore if Input1 is the End value and Input2 is the Start value, the expression will look like this:
((Input1-Input2)*XSplinePosition)+Input2
To add this to the existing graph:
- Add another Transform operator, wired before the existing one. If the segments are scaled using the same transform operator that is performing a rotation, they will be scaled after the rotation operation causing unwanted results.
- Right-click on the new Transform operator and Export Y Fixed Scale.
- Wire a new Arithmetic node to the Y Fixed Scale input and change its operation to Expression.
- Create two new Numeric nodes. Call one Scale at Top and wire it to the Arithmetic node's first input. Call the other Scale at Bottom and wire it to the second input.
- Select the Arithmetic node, open the expressions editor, and enter:
((Input1-Input2)*XSplinePosition)+Input2 - Now if you adjust the two numeric nodes you can create branches that gradually decrease in size, but with fixed start and end points irrespective of the tree's height.
![RailClone Xmas Tree II-image2016-12-19 19:10:15.png]()
Choosing the pivot.
In the current version, each branch is centred on the trunk. what if an option is needed to rotate the branches from an end point instead? To do this a switch can be added that does two things: Changes the pivot that is used, and halves the scale value so that the tree retains the same proportions. First off, create the "switch"
- Selector operators are used to select from different inputs based on a numerical index. In the tree object the first index will be a segment with a centred pivot, and the second uses a pivot at the end of the branch. The pivot has already been placed correctly on the source geometry.
![RailClone Xmas Tree II-image2016-12-19 19:16:54.png]()
- Create a new Selector node and wire the final Transform operator in the chain to the first input. Wire the Selector operator to the Default input.
- Create a new Transform operator, change its Alignment Y and Z settings to Pivot. Wire this to the Selector operator's second input and connect the Transform operators together like this:
![RailClone Xmas Tree II-image2016-12-19 19:25:3.png]()
- Export the Selector operator's Index property and wire it to a new Numeric node. Set the type to Boolean and call it Centered?. Toggling this option will alternate between the branches centered on the trunk and aligned to the end. This works well, but when the branches are aligned to the end they are twice as large. To remedy this is is necessary to halve the scale value if the branches are aligned to the end.
- Create another Arithmetic operator and wire it just before the Transform operator that is controlling the scale. Wire the existing expression to this Transform operator's first input and wire the Centred Boolean to the 2nd input.
- Use the arithmetic operator to create a conditional expression by opening the expressions editor and entering:
if(Input2 = 0, Input1/2,Input1)
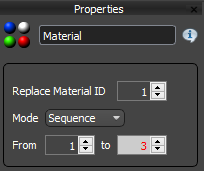
If statements works by testing to see if the first statement is true. If it is true the command returns the first value (Input1/2), and if it is false it will return the second (Input1). Now if you toggle the Centered parameter you will see that the overall profile of the tree is retained, but the pivot changes. - To finish up, add a final parameter to create sequences of materials. Wire a Material operator to the Default input, and wire the Selector node to the Material node's input.
- Change the material operator's Mode to Sequence and export the To property
- Wire a new Numeric node to the To property and rename it # of materials. This node will now create a looped sequence between material ID one and the value set in the numeric node.
![RailClone Xmas Tree II-image2016-12-19 19:49:0.png]()
The node tree below shows the complete Christmas tree style.
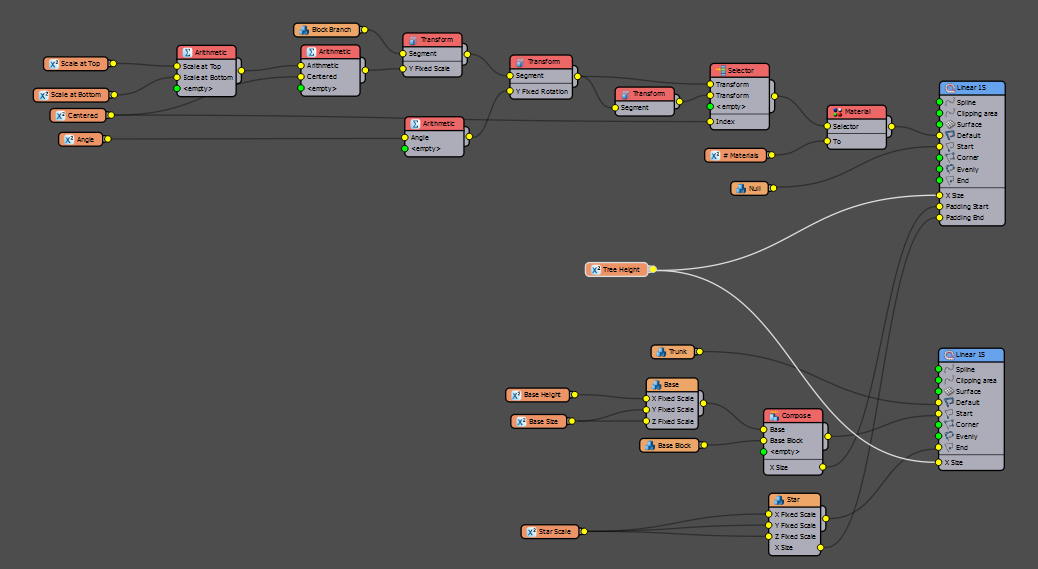
Conclusion
This style may not enjoy everyday use by many people, but the techniques demonstrated are extremely useful for learning how to use expressions to make incremental changes to parameters, as well as how to make objects easy to edit from the Modify panel. This is ideal for sharing RailClone styles with other users, or in studios where you may have a RailClone champion who produces styles for others to use. The tree is a great example of a style design for easy reuse; it has parameters to rotate branches, set a scale for the start and the end of the array, create sequences of material IDs, resize the base segments and the star, and of course change the overall height of the tree. It's surprising using these few settings just how many variations you can create.

This is our final tutorial for 2016, we hope you'll join us in the new year for lots more training and case studies but above all else we wish you a happy holiday!

